My 1985 4000 turbo quattro project
 09-17-2010, 03:17 PM
#1
AudiWorld Senior Member
Thread Starter
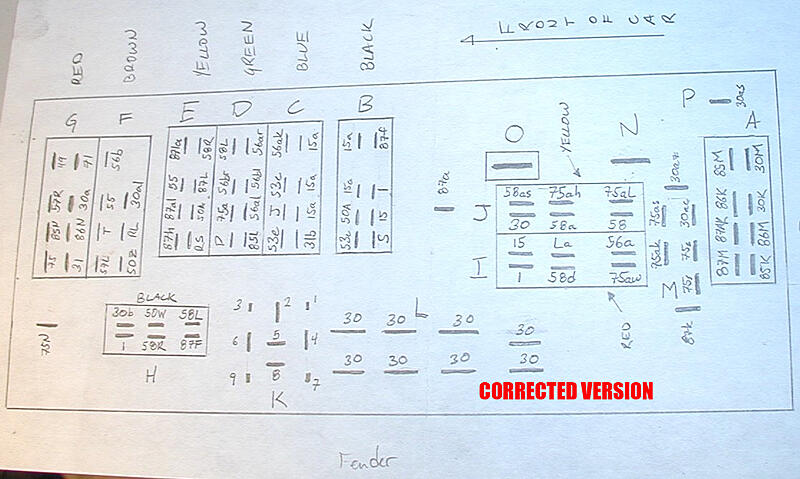
****READ THIS**** Unfortunately Imageshack totally screwed everybody by suddenly switching to a paid subscription and deleting all free-hosted photos, so I am aware of all the missing pictures from this thread. Some I don't have anymore, but some I do. If you need a specific one please message me. I did find probably the most important one, which is the corrected fusebox diagram, so here it is in case you didn't want to fry your ECU by using the original:
EDIT: If you want to skip ahead, fabrication and mechanical stuff continues for the first several pages. The wiring starts on page 5 and continues on page 7 after some chit-chat. Intake plumbing starts on page 8. The aim is to condense all the swap info into a single master thread at a later time, which I will link to here.
EDIT 2: If something isn't clear enough, then please ask for clarification. The only stupid question is the one the goes unasked. You can always PM me if you want also. Unlike an unfortunate many, I do not look down upon anyone wanting to learn!!! Nobody was born with knowledge.
EDIT 3: Here's the checklist for what you need to do a 10vt swap. Since my swap is basically complete, I think the list is pretty thorough, but if I've missed anything or if it's unclear, don't hesitate to ask. It's broken down by car and what you need versus what may be useful...
To save from the donor car:
�Engine (duh).
�All the intake piping you can get (or want). You can reuse most of it, though not necessarily in the stock way. The airboot-to-turbo pipe is steel so it's easy to weld on any ports you might need, such as for a bypass valve.
�Fuel distributor with all lines and injectors.
�Exhaust manifold and downpipe back at least until just after where the wastegate and exhaust join together. It may not fit the 4000's exhaust directly, but you'll want a good length of it to work with. It's possible to get the entire downpipe to fit, especially if you have the means to bend it a little.
�Red harness. This mostly runs between the ECU and the engine itself, but you'll need to pull the branch of it that runs over to the driver's side, including the plugs for the ISV controller (with the controller, looks like a giant relay), and the kostal connector. Don't cut anything when getting it out, other than the wiring on the other half of the kostal (you want both halves). It's better to pull the harness whole and cut if you need to after you have your wires traced later (though you shouldn't need to). You'll want about 6" of the other half of the kostal connector wiring (should be wrapped in yellow).
�Ignition coil.
�ECU.
�Fuel pump relay.
�If you can, pull the throttle cable. You might find it useful later, as the 4kq one is too short so you can put the two together.
�Oil cooler and shroud. This can come out with the engine and it's the easiest oil cooler to use, though the long lines take some specific positioning to get them routed correctly without kinking.
Optional from the donor:
�The power distribution block attached to the passenger side frame rail toward the front of the car. This is handy since you'll have to relocate the 4kq's battery to the trunk and this can mount on the firewall and provide a place to connect power to.
�Airboot if you plan to use the cut inner fender method, which is cheaper and leaves more space, though isn't as clean looking.
�After-run system (if you plan on using it). This includes a large blower attached to the driver's side motor mount, a pump attached to the coolant hoses, and a shroud with ducting that runs from the blower to the fuel injectors.
�If your junkyard is nice enough to give you an "all you can eat" pass to get everything you need for the base price of the engine, you might as well pull the intercooler, airbox, charcoal canister (behind the airbox in the fender, good for making a catch can out of), and anything else that looks useful.
To save from the 4000:
�Driver side engine mount (the aluminum one that's bolted to the engine, not the rubber one bolted to the frame).
�Oil pan, pickup tube, and baffle.
�Alternator and its brackets (the 5000/200 mounts on the opposite side but there's more room by the radiator).
�Coolant inlet (straight versus the angled MC one).
�Radiator and hoses.
Optional from the 4000:
�Valve cover, depending on which way you want to go with the throttle cable.
�Airbox, if you don't want to use a Ur-Q one.
�ECU harness, just because you'll most likely need a lot of wire and some connectors, and this will be an easy and "stock" way to get it. Still remove it from the car though.
�Intake manifold, if you want to run your intake pipes around the back instead of across the front. This also lets you keep the two-stage throttle valve if you want it, as well as negating the need to change the throttle cable.
�Battery tray. If you can remove this in one piece it fits perfectly in the trunk (weld or bolt it in) and is much cheaper than a battery box (free, come to think of it).
To source if you want a "clean stock" look (though it's not necessarily easier this way):
�Ur-Q "igloo" (the aluminum piece that serves as the air boot on those cars), as well as the top of the airbox, which will properly angle the air meter and fuel distributor, plus at least the short line for the fuel frequency valve.
�Ur-Q throttle cable (part # 857 721 555).
�Ur-Q downpipe, a direct-fit replacement.
Optional Ur-Q:
�Airbox. It's a nice aluminum piece that will resist heat really well from the turbo and exhaust, which are in very close proximity.
Also needed:
�Pre-bent tie rod for the passenger side or a good bending apparatus to tweak the 4kq one (DO NOT HEAT IT TO BEND IT).
Useful intake diameters for when you're shopping for an intercooler and pipes:
�5000/200 airboot outlet: 2.25"
�Ur-Q igloo outlet: 2.5"
�"Michelin Man" hose (from throttle body) outlet: 2.25"
�Turbo outlet (pressurized side): 2"
�Turbo inlet (intake side): 2.25"
Miscellaneous info:
�The intake air temperature sensor on later engines is mounted on the intercooler. Since you're probably not using the stock intercooler, you'll need an M6x1.00 tap to relocate the sensor. Make sure you put it on or after the "cool" side of the intercooler so that the temperature reading will be accurate for what's going into the engine. Good spots are on the endcap of your new intercooler or anywhere on the intake manifold where it will see incoming air. Early engines have the sensor mounted on the intake just after the throttle body (later intakes still have the flat spot for it), so disregard if you have this.
�You might find that you have the wrong pilot bearing, or in the case of an engine from an automatic car you'll need one period. The part number is 046105313D.
�When relocating the battery to the trunk, you will need a circuit breaker to protect the big, fat, juicy wire you'll be running under the carpet. Anything 200A+ will be sufficient. I have a 150A that trips once in awhile during long cranking, so that's probably right on the edge. Never had a problem with the 200. Nice to know they do work though.
VERY IMPORTANT: You need to put the circuit breaker as close to the battery on the TRUNK side of the cable as possible. Don't be tempted to mount it to the firewall and leave some 15 feet of direct-from-the-battery wire unprotected. You'd never be able to put that fire out.
-------------------------------------
I thought I've move this project here to liven things up a little. It'll be easier to update since it won't be buried constantly.
So I picked this car up cheap, intending to use it for parts, but it turned out to be a lot more solid than I thought so I decided to fix it up instead.

Fairly nice interior:

The hood is the only really funky part of the body, so I decided to turn it into a fake Sport Quattro hood.

I'll probably post more about that when I dig into it. I've finally finished the three grille panel for the front and I'm currently contemplating the louvers for the area above the turbo...
When I got the car it would start but ran really poorly. I couldn't press the gas at all or it would die. I think part of the problem was the cracked intake boot:

Fixing that got it running better, but it was still really rough. After some checking with a timing light, I found that one cylinder wasn't getting a spark, which happened to be the one with a wire that looks like this:

The green corroded part pretty much crumbled when I tried to clean it, so I fixed that and it ran perfectly.
But then my daily driver, an '84, needed the distributor, so that's when I decided to just do a turbo swap on it. That's where I am now, mostly waiting for a valve spring compressor and a torque wrench to come in the mail.
-Rog

EDIT: If you want to skip ahead, fabrication and mechanical stuff continues for the first several pages. The wiring starts on page 5 and continues on page 7 after some chit-chat. Intake plumbing starts on page 8. The aim is to condense all the swap info into a single master thread at a later time, which I will link to here.
EDIT 2: If something isn't clear enough, then please ask for clarification. The only stupid question is the one the goes unasked. You can always PM me if you want also. Unlike an unfortunate many, I do not look down upon anyone wanting to learn!!! Nobody was born with knowledge.
EDIT 3: Here's the checklist for what you need to do a 10vt swap. Since my swap is basically complete, I think the list is pretty thorough, but if I've missed anything or if it's unclear, don't hesitate to ask. It's broken down by car and what you need versus what may be useful...
To save from the donor car:
�Engine (duh).
�All the intake piping you can get (or want). You can reuse most of it, though not necessarily in the stock way. The airboot-to-turbo pipe is steel so it's easy to weld on any ports you might need, such as for a bypass valve.
�Fuel distributor with all lines and injectors.
�Exhaust manifold and downpipe back at least until just after where the wastegate and exhaust join together. It may not fit the 4000's exhaust directly, but you'll want a good length of it to work with. It's possible to get the entire downpipe to fit, especially if you have the means to bend it a little.
�Red harness. This mostly runs between the ECU and the engine itself, but you'll need to pull the branch of it that runs over to the driver's side, including the plugs for the ISV controller (with the controller, looks like a giant relay), and the kostal connector. Don't cut anything when getting it out, other than the wiring on the other half of the kostal (you want both halves). It's better to pull the harness whole and cut if you need to after you have your wires traced later (though you shouldn't need to). You'll want about 6" of the other half of the kostal connector wiring (should be wrapped in yellow).
�Ignition coil.
�ECU.
�Fuel pump relay.
�If you can, pull the throttle cable. You might find it useful later, as the 4kq one is too short so you can put the two together.
�Oil cooler and shroud. This can come out with the engine and it's the easiest oil cooler to use, though the long lines take some specific positioning to get them routed correctly without kinking.
Optional from the donor:
�The power distribution block attached to the passenger side frame rail toward the front of the car. This is handy since you'll have to relocate the 4kq's battery to the trunk and this can mount on the firewall and provide a place to connect power to.
�Airboot if you plan to use the cut inner fender method, which is cheaper and leaves more space, though isn't as clean looking.
�After-run system (if you plan on using it). This includes a large blower attached to the driver's side motor mount, a pump attached to the coolant hoses, and a shroud with ducting that runs from the blower to the fuel injectors.
�If your junkyard is nice enough to give you an "all you can eat" pass to get everything you need for the base price of the engine, you might as well pull the intercooler, airbox, charcoal canister (behind the airbox in the fender, good for making a catch can out of), and anything else that looks useful.
To save from the 4000:
�Driver side engine mount (the aluminum one that's bolted to the engine, not the rubber one bolted to the frame).
�Oil pan, pickup tube, and baffle.
�Alternator and its brackets (the 5000/200 mounts on the opposite side but there's more room by the radiator).
�Coolant inlet (straight versus the angled MC one).
�Radiator and hoses.
Optional from the 4000:
�Valve cover, depending on which way you want to go with the throttle cable.
�Airbox, if you don't want to use a Ur-Q one.
�ECU harness, just because you'll most likely need a lot of wire and some connectors, and this will be an easy and "stock" way to get it. Still remove it from the car though.
�Intake manifold, if you want to run your intake pipes around the back instead of across the front. This also lets you keep the two-stage throttle valve if you want it, as well as negating the need to change the throttle cable.
�Battery tray. If you can remove this in one piece it fits perfectly in the trunk (weld or bolt it in) and is much cheaper than a battery box (free, come to think of it).
To source if you want a "clean stock" look (though it's not necessarily easier this way):
�Ur-Q "igloo" (the aluminum piece that serves as the air boot on those cars), as well as the top of the airbox, which will properly angle the air meter and fuel distributor, plus at least the short line for the fuel frequency valve.
�Ur-Q throttle cable (part # 857 721 555).
�Ur-Q downpipe, a direct-fit replacement.
Optional Ur-Q:
�Airbox. It's a nice aluminum piece that will resist heat really well from the turbo and exhaust, which are in very close proximity.
Also needed:
�Pre-bent tie rod for the passenger side or a good bending apparatus to tweak the 4kq one (DO NOT HEAT IT TO BEND IT).
Useful intake diameters for when you're shopping for an intercooler and pipes:
�5000/200 airboot outlet: 2.25"
�Ur-Q igloo outlet: 2.5"
�"Michelin Man" hose (from throttle body) outlet: 2.25"
�Turbo outlet (pressurized side): 2"
�Turbo inlet (intake side): 2.25"
Miscellaneous info:
�The intake air temperature sensor on later engines is mounted on the intercooler. Since you're probably not using the stock intercooler, you'll need an M6x1.00 tap to relocate the sensor. Make sure you put it on or after the "cool" side of the intercooler so that the temperature reading will be accurate for what's going into the engine. Good spots are on the endcap of your new intercooler or anywhere on the intake manifold where it will see incoming air. Early engines have the sensor mounted on the intake just after the throttle body (later intakes still have the flat spot for it), so disregard if you have this.
�You might find that you have the wrong pilot bearing, or in the case of an engine from an automatic car you'll need one period. The part number is 046105313D.
�When relocating the battery to the trunk, you will need a circuit breaker to protect the big, fat, juicy wire you'll be running under the carpet. Anything 200A+ will be sufficient. I have a 150A that trips once in awhile during long cranking, so that's probably right on the edge. Never had a problem with the 200. Nice to know they do work though.
VERY IMPORTANT: You need to put the circuit breaker as close to the battery on the TRUNK side of the cable as possible. Don't be tempted to mount it to the firewall and leave some 15 feet of direct-from-the-battery wire unprotected. You'd never be able to put that fire out.
-------------------------------------
I thought I've move this project here to liven things up a little. It'll be easier to update since it won't be buried constantly.
So I picked this car up cheap, intending to use it for parts, but it turned out to be a lot more solid than I thought so I decided to fix it up instead.
Fairly nice interior:
The hood is the only really funky part of the body, so I decided to turn it into a fake Sport Quattro hood.
I'll probably post more about that when I dig into it. I've finally finished the three grille panel for the front and I'm currently contemplating the louvers for the area above the turbo...
When I got the car it would start but ran really poorly. I couldn't press the gas at all or it would die. I think part of the problem was the cracked intake boot:
Fixing that got it running better, but it was still really rough. After some checking with a timing light, I found that one cylinder wasn't getting a spark, which happened to be the one with a wire that looks like this:
The green corroded part pretty much crumbled when I tried to clean it, so I fixed that and it ran perfectly.
But then my daily driver, an '84, needed the distributor, so that's when I decided to just do a turbo swap on it. That's where I am now, mostly waiting for a valve spring compressor and a torque wrench to come in the mail.
-Rog
Last edited by Rogviler; 10-04-2016 at 11:06 AM.
 09-17-2010, 03:29 PM
#2
AudiWorld Senior Member
Thread Starter
Oh, I forgot to mention that I've also done all-red tail lights:

And installed the gauge faces that I was working on a few topics down:

This car is mostly about messing around and experimenting, since it was cheap and I don't really have an emotional attachment to it. Although I did have to drag it over three winding mountain passes to get it home...
Other plans include the one-piece front turn signal mod and quad-round headlights, similar to this, although I'll probably go without the crappy plastic headlight covers, which just never seem to look right:

Performance-wise, I picked up an Intended Acceleration ECU with a stiffer wastegate spring. I'm hoping for around 200hp. I'm doing new engine gaskets, ARP studs, all the usual stuff.
Nothing fancy, just a fun project that I can try a few ideas on, really.
-Rog
And installed the gauge faces that I was working on a few topics down:
This car is mostly about messing around and experimenting, since it was cheap and I don't really have an emotional attachment to it. Although I did have to drag it over three winding mountain passes to get it home...
Other plans include the one-piece front turn signal mod and quad-round headlights, similar to this, although I'll probably go without the crappy plastic headlight covers, which just never seem to look right:
Performance-wise, I picked up an Intended Acceleration ECU with a stiffer wastegate spring. I'm hoping for around 200hp. I'm doing new engine gaskets, ARP studs, all the usual stuff.
Nothing fancy, just a fun project that I can try a few ideas on, really.
-Rog
10-02-2010, 01:03 PM
#3
AudiWorld Senior Member
Thread Starter
I finally wrestled the old engine out of the 4000...

Unfortunately I'm a driveway mechanic at the moment, so I didn't have the option of removing the front sheet metal and backing the engine straight out, nor do I have a good way of dropping it out the bottom. So out the top it had to come.
Some tips if you have to do the same:
1. Remove the hood, obviously.
2. Remove as many of the easy pieces as you can, such as the intake manifold, radiator, airbox and fuel distributor, et cetera. Trust me, it's much easier to do it at the beginning so you can get to every bolt instead of trying to pry things around to do it when the engine is dangling half in the air and you realize you're hung up.
3. You have to remove the "snub mount", which is the bracket on the front of the engine that has a big rubber piece on it, along with the piece right behind the bumper that holds it down. This piece is to keep the engine from tipping backward when it's under load, so definitely put it back on when you're done.
4. It'll help a lot if you can do the core support mod, as if you were going to take it out the front, but you could possibly do it without any cutting at all. I ended up taking just a small section out of the top part.
5. The most important part is to figure out a good combination of taking off the downpipe, exhaust manifold, and/or the passenger side motor mount. It's kind of a puzzle box in there. Any one piece can be taken off without any of the others, but unfortunately they're all tangled up together. If you can get to one particular bolt on the bottom side of the downpipe-to-manifold flange then you'll have it made. That's a tough one though and I ended up rounding it off. What I eventually had to do is remove the passenger side motor mount completely and then I unbolted the exhaust manifold. Then it's not too bad to lift on out. Don't forget to remove the oil filter if you do it that way.
Getting the new engine in should be fun, but I'll figure that out when the time comes.
Also, if you have to do any valve work, I highly recommend getting this type of spring compressor:

That thing is slick. I found them on eBay for under $100, most other places are $200 or so. Always shop around!
-Rog
Unfortunately I'm a driveway mechanic at the moment, so I didn't have the option of removing the front sheet metal and backing the engine straight out, nor do I have a good way of dropping it out the bottom. So out the top it had to come.
Some tips if you have to do the same:
1. Remove the hood, obviously.
2. Remove as many of the easy pieces as you can, such as the intake manifold, radiator, airbox and fuel distributor, et cetera. Trust me, it's much easier to do it at the beginning so you can get to every bolt instead of trying to pry things around to do it when the engine is dangling half in the air and you realize you're hung up.
3. You have to remove the "snub mount", which is the bracket on the front of the engine that has a big rubber piece on it, along with the piece right behind the bumper that holds it down. This piece is to keep the engine from tipping backward when it's under load, so definitely put it back on when you're done.
4. It'll help a lot if you can do the core support mod, as if you were going to take it out the front, but you could possibly do it without any cutting at all. I ended up taking just a small section out of the top part.
5. The most important part is to figure out a good combination of taking off the downpipe, exhaust manifold, and/or the passenger side motor mount. It's kind of a puzzle box in there. Any one piece can be taken off without any of the others, but unfortunately they're all tangled up together. If you can get to one particular bolt on the bottom side of the downpipe-to-manifold flange then you'll have it made. That's a tough one though and I ended up rounding it off. What I eventually had to do is remove the passenger side motor mount completely and then I unbolted the exhaust manifold. Then it's not too bad to lift on out. Don't forget to remove the oil filter if you do it that way.
Getting the new engine in should be fun, but I'll figure that out when the time comes.
Also, if you have to do any valve work, I highly recommend getting this type of spring compressor:
That thing is slick. I found them on eBay for under $100, most other places are $200 or so. Always shop around!
-Rog
10-02-2010, 04:31 PM
#4
AudiWorld Senior Member
Thread Starter
I've also been working on getting these stupid wheel studs off that one of the previous owners installed:

I really hate whoever that person was right now. First of all, I thought that the car didn't come with a tool to remove the lug nuts so I've been trying all sorts of different things because they're sort of a security style, basically an oddly-shaped hex key.
But finally when I went to dig into the glove box to remove the old ECU and AC evaporator I found the tool in there. So that's the easy part. The next stupid thing is that the studs aren't metric, so they're slightly too big and are really tight. And someone stupid enough to do this obviously wouldn't put antiseize on the threads. So in the three I've managed to remove my allen key is already getting twisted... Plus the fact that I only have metric allen wrenches doesn't help. The threads in the hub are a little messed up because of the incorrect studs, but so far it seems to be salvageable. (EDIT: They weren't, and I ended up replacing all the hubs.)
I guess I'm not surprised, I mean the car came with one of those silly Walmart universal shift ***** that never stay on, so of course a junky set of wheel studs and lugs would find their way on there. Also observe that they are conical seat lugs, not the proper ball seat ones. Just stupid.
Oh, and of course I should've done at least the front wheels before I took the engine out, as putting the car in gear is useless now and having someone step on the brakes without any power assist doesn't quite hold it well enough.
But if this is the worst thing from here on out I'll be happy.
Probably not though.
-Rog
Last edited by Rogviler; 08-04-2012 at 06:23 PM.
10-05-2010, 07:30 PM
#5
AudiWorld Senior Member
Thread Starter
I'm going to write a concise "shopping list" of what to make sure you snag when you pull the donor engine if you happen to do the same swap from a junkyard pull like I'm doing. I wish I'd had one, since I pretty much had free rein to pull whatever I needed for free after the cost of the engine and neglected to get the ignition coil and fuel pump relay (which aren't mentioned in the most popular swap guide so I assumed you used the stock 4kq stuff), so now I have to get those separately.
I'm also going to write down some clear instructions regarding the wiring, since all of the information is scattered around and some of it's pretty messy. And depending on when your harness was made, some of the wiring info is completely wrong. If you're like me you want exact diagrams and clear descriptions, not "if I remember right" and "I think this wire is for..."
I'm currently working on the wiring part, trying to get some clarification from the community and tracing wires out with the ole multimeter and a wiring diagram.
So if you're interested in those bits of info, be sure you follow this thread. I really want to cater to people who are nervous about this type of swap or don't have a degree in electrical engineering or auto mechanics like everyone else who does it seems to. I know from experience that it's no fun to feel lost.
Please don't be afraid to ask questions! Especially basic ones, because that's where something like this always starts. If I don't know the answer then we'll learn together.
-Rog
Last edited by Rogviler; 10-05-2010 at 07:43 PM.
10-08-2010, 04:08 PM
#6
AudiWorld Senior Member
Thread Starter
A little update on the fake Sport Quattro hood...
I finally got the front "three grilles" panel figured out, so I started tacking it to the hood today.

A gold star to whoever can name what the grille cutouts came from...
For some reason the picture made it look like the angle of that piece is really perpendicular, but it's actually less than 45 degrees, more or less what the real thing is. I realize that the three grilles are positioned a little differently, aren't quite as tall, a different shape, et cetera, but so far I've spent $40 on this project, which will give much of the functionality and the looks, versus $3000 for a nice replica that would fit a 4000, so do the math if you want. I'll wait.
Also, the grille piece isn't going to be as tall as it looks. The center part of the hood is cut along the sides and front, and is more or less a flap at the moment, which I propped up to do the welding. It'll get trimmed and sit a lot farther down. It's just easier to trim excess than try to scab on a piece when I come up short.
I hope this was the hardest part, but I'm pretty well dreading the louvers over the turbo. I suspect those are going to be a lot of fun. I'm considering not doing them or maybe doing something different, but since the car is going to have a turbocharger, I might as well for functionality. I know those need all the cooling they can get.
Overall, I accept that it's a custom piece and won't look exactly the same. Call it what Audi would've done if they'd offered a cheaper option for a 4000 turbo (if they made one) or call it me not having the kind of job that affords me thousands of dollars in disposable income. Either way I think it's turning out even better than I hoped.
-Rog
I finally got the front "three grilles" panel figured out, so I started tacking it to the hood today.
A gold star to whoever can name what the grille cutouts came from...
For some reason the picture made it look like the angle of that piece is really perpendicular, but it's actually less than 45 degrees, more or less what the real thing is. I realize that the three grilles are positioned a little differently, aren't quite as tall, a different shape, et cetera, but so far I've spent $40 on this project, which will give much of the functionality and the looks, versus $3000 for a nice replica that would fit a 4000, so do the math if you want. I'll wait.
Also, the grille piece isn't going to be as tall as it looks. The center part of the hood is cut along the sides and front, and is more or less a flap at the moment, which I propped up to do the welding. It'll get trimmed and sit a lot farther down. It's just easier to trim excess than try to scab on a piece when I come up short.
I hope this was the hardest part, but I'm pretty well dreading the louvers over the turbo. I suspect those are going to be a lot of fun. I'm considering not doing them or maybe doing something different, but since the car is going to have a turbocharger, I might as well for functionality. I know those need all the cooling they can get.
Overall, I accept that it's a custom piece and won't look exactly the same. Call it what Audi would've done if they'd offered a cheaper option for a 4000 turbo (if they made one) or call it me not having the kind of job that affords me thousands of dollars in disposable income. Either way I think it's turning out even better than I hoped.
-Rog
Last edited by Rogviler; 10-08-2010 at 09:32 PM.
10-09-2010, 04:46 PM
#7
AudiWorld Senior Member
Thread Starter
Got the center part of the hood tacked to the grille panel. It was kind of a compromise between having it look proportional to the original and having the same rise as the original, just because the grille openings are about 3/4" shorter. I decided to go with the same rise, which means there's more distance between the top of the grilles and the top of the hood, but I wanted the extra space for airflow.
Pics:

Showing the angle:

I think it's coming along well. I still need to fill in the sides, but at least it's solid again.
-Rog
Pics:
Showing the angle:
I think it's coming along well. I still need to fill in the sides, but at least it's solid again.
-Rog
Trending Topics
10-09-2010, 10:59 PM
#8
AudiWorld Senior Member
Thread Starter
Some of my visual notes for the SQ hood for anyone interested...
I believe this is the original:

Note how far back the three grilles are, and that there is a little detail piece on each side that creates a sort of scoop look. I might do this if I can come up with a good way to do it. Probably two little triangles cut from some square stock would do it...
This is a less accurate copy:

Note that the grilles are set back the same amount, but there isn't any of the detail bits, it's just smooth.
Finally, an even less accurate copy:

I actually like this one the best. Note how the grilles are right at the edge of the hood. I was going to do this, but realized that there was a bunch of reinforcement in the way underneath, so I had to set it back a ways. I still had to trim off some of the extra metal, but with all the extra reinforcement I added I wouldn't be surprised if it's actually stronger than it was.
Anyway, the fact that there is so much variation out there makes me a little more comfortable with making my own. Haters gonna hate of course, but I'm having fun doing it and that's all that matters to me.
-Rog
I believe this is the original:
Note how far back the three grilles are, and that there is a little detail piece on each side that creates a sort of scoop look. I might do this if I can come up with a good way to do it. Probably two little triangles cut from some square stock would do it...
This is a less accurate copy:
Note that the grilles are set back the same amount, but there isn't any of the detail bits, it's just smooth.
Finally, an even less accurate copy:
I actually like this one the best. Note how the grilles are right at the edge of the hood. I was going to do this, but realized that there was a bunch of reinforcement in the way underneath, so I had to set it back a ways. I still had to trim off some of the extra metal, but with all the extra reinforcement I added I wouldn't be surprised if it's actually stronger than it was.
Anyway, the fact that there is so much variation out there makes me a little more comfortable with making my own. Haters gonna hate of course, but I'm having fun doing it and that's all that matters to me.
-Rog
10-14-2010, 10:03 AM
#9
AudiWorld Newcomer

Join Date: Jun 2009
Posts: 8
Likes: 0
Received 0 Likes
on
0 Posts
Awesome build thread. I'm keeping an eye out for updates, as I have an 87 CGT sitting in my garage I bought with the best intentions, but haven't gotten a chance to work on yet, and I like that you're pretty thorough with your posts.
Also, good to see more 4k enthusia in CO! Are you in Denver?
Keep it up man!
Also, good to see more 4k enthusia in CO! Are you in Denver?
Keep it up man!
10-14-2010, 10:55 AM
#10
AudiWorld Senior Member
Thread Starter
Thanks! If even one person gains something from my experience it's worth it...
I'm actually near Grand Junction. Wesside, yo! I don't think I've ever met another Audi enthusiast around here, except for one guy who stopped me in the mall parking lot to chat about my car and how, among other things, I should put a W8 in it. ")
Might as well do an update... I found some steel tubing from a broken floor fan that's the right radius to cut in half to fill in the sloped sides where I cut the center of the hood (the flap). I thought about trying to roll the existing bevels up more to meet the flappy part, but I know my limitations and I don't want it to look like crap if I can help it.
So I welded the tubing halves on, which worked great, but they were short so now I have about a foot left where there's just a little sliver of space to fill in. That's where I've stopped because it's been frustrating to try to weld a little strip in there without the hood flap moving around and warping. I'm still mulling a good way to do this.
In the meantime, I've discovered some stuff called Plasti Dip that I'm playing around with. It's basically a rubbery plastic spray-on coating that normally you coat tool handles with. It seems a lot of people use it on their bumpers and even wheels and interior bits. The nice part about it is that if it ever gets damaged or you don't want it anymore you can just peel it right off. So I'm hoping this will be a good way to take care of some of the aging trim and plastic on this car while staying within a reasonable budget. If I'm ambitious I might paint the whole car with it.
Anyway, you can get it in black at most hardware stores like Home Depot. I'm trying to find some of the red to see if it's close to the Tornado Red on my '84...
-Rog
I'm actually near Grand Junction. Wesside, yo!
I don't think I've ever met another Audi enthusiast around here, except for one guy who stopped me in the mall parking lot to chat about my car and how, among other things, I should put a W8 in it. Might as well do an update... I found some steel tubing from a broken floor fan that's the right radius to cut in half to fill in the sloped sides where I cut the center of the hood (the flap). I thought about trying to roll the existing bevels up more to meet the flappy part, but I know my limitations and I don't want it to look like crap if I can help it.
So I welded the tubing halves on, which worked great, but they were short so now I have about a foot left where there's just a little sliver of space to fill in. That's where I've stopped because it's been frustrating to try to weld a little strip in there without the hood flap moving around and warping. I'm still mulling a good way to do this.
In the meantime, I've discovered some stuff called Plasti Dip that I'm playing around with. It's basically a rubbery plastic spray-on coating that normally you coat tool handles with. It seems a lot of people use it on their bumpers and even wheels and interior bits. The nice part about it is that if it ever gets damaged or you don't want it anymore you can just peel it right off. So I'm hoping this will be a good way to take care of some of the aging trim and plastic on this car while staying within a reasonable budget. If I'm ambitious I might paint the whole car with it.
Anyway, you can get it in black at most hardware stores like Home Depot. I'm trying to find some of the red to see if it's close to the Tornado Red on my '84...
-Rog
Last edited by Rogviler; 10-14-2010 at 10:58 AM.