Rear Arnott Gen1 Bag Replacement Guide
 02-01-2010, 04:01 AM
#1
Audiworld Junior Member
Thread Starter

Join Date: May 2005
Posts: 24
Likes: 0
Received 0 Likes
on
0 Posts
I'm definately not a pro mechanic, but this was my experience of doing the Rear Arnott Bag Swap. The arnott instructions were good, but didn't mention anything about having to twist the new bag onto the damper (something that I found hard) Please feel free to make any changes or correct things i've missed!
1. Loosen wheel nuts
2. Place car into jacking mode, by pressing both up and down buttons on the dash until both leds are lit.
3. Find the jacking point and jack up car and remove wheel
4. Undo the blue air line to the shock and let the air out.
5. Remove the top two nuts holding in the top of the shock

6. Remove the bottom nut / bolt on the shock ( I had to remove a rubber wishbone protector first - all the bolts holding it on snapped which was nice)
7. Push down on the top of the shock to get it to compress so that it's out of the recess: - I had a lot of problems compressing the shock enough to do this. So i removed the bolt that connected the bottom wishbone to the hub to give me another inch to play with.
8. Once the top of the shock is almost out, I then pushed up from the bottom of the shock to remove it from the lower wishbone. This then allowed me to pull the shock out. (i'm sure there must be an easier way, but I found it tough)
9. Now I made myself a nice cup of tea, and then ventured back out to the garage. I had to extend the new shock - I did this by using two pairs of pliers on the bottom plastic to get a good purchase. Don't entend it fully as it's a bitch to get it to fold back in on itself.
10. Remove the black airline connecting the damper to the bag.
11. remove the topcap
12. Use a impact driver or electic drill to wind the top nut off without the damper shaft rotating too.
13. Hold the shock and firmly twist 45o then you should feel it loosen and you can seperate the damper from the bag.

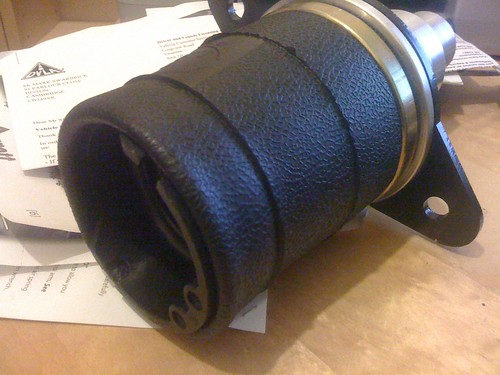
(old and new for comparison)

14. Place the new bumpstop over the damper and lube / fit the new o-ring - clean the damper too.
15. Place the damper inside the new shock and tighten the top nut
16. You need to make sure the bottom of the back is locked into place with the damper. I found this tricky. In the end I used an adjustable oil filter wrench to grip the plastic of the airbag and twist / lock it onto the damper. Make sure it's perfectly lined up with the air holes in the right place otherwise the bag will be twisted when you try and remount it back into the car.
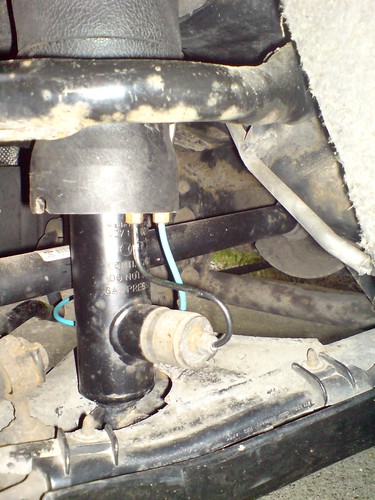
17. Replace the new top cap and reattach the black air hose
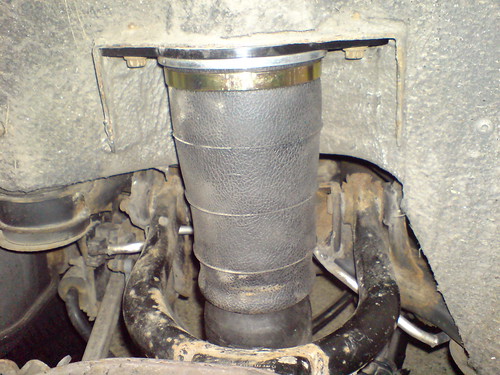
18. Clean the area in the car where the shock mount goes and slide the new shock into place. I did it bottom end in first and it went in quite easily.
19. Reattach the blue air hose
20. Reattach all nuts/bolts and torque to required settings.
21. Refit wheel and wishbone protector
22. Lower jack, turn on ignition and turn off jacking mode.
23. Look nervously as airbag inflates then do a little happy dance that you didn't f*ck it up ;-)
1. Loosen wheel nuts
2. Place car into jacking mode, by pressing both up and down buttons on the dash until both leds are lit.
3. Find the jacking point and jack up car and remove wheel
4. Undo the blue air line to the shock and let the air out.
5. Remove the top two nuts holding in the top of the shock
6. Remove the bottom nut / bolt on the shock ( I had to remove a rubber wishbone protector first - all the bolts holding it on snapped which was nice)
7. Push down on the top of the shock to get it to compress so that it's out of the recess: - I had a lot of problems compressing the shock enough to do this. So i removed the bolt that connected the bottom wishbone to the hub to give me another inch to play with.
8. Once the top of the shock is almost out, I then pushed up from the bottom of the shock to remove it from the lower wishbone. This then allowed me to pull the shock out. (i'm sure there must be an easier way, but I found it tough)
9. Now I made myself a nice cup of tea, and then ventured back out to the garage. I had to extend the new shock - I did this by using two pairs of pliers on the bottom plastic to get a good purchase. Don't entend it fully as it's a bitch to get it to fold back in on itself.
10. Remove the black airline connecting the damper to the bag.
11. remove the topcap
12. Use a impact driver or electic drill to wind the top nut off without the damper shaft rotating too.
13. Hold the shock and firmly twist 45o then you should feel it loosen and you can seperate the damper from the bag.
(old and new for comparison)
14. Place the new bumpstop over the damper and lube / fit the new o-ring - clean the damper too.
15. Place the damper inside the new shock and tighten the top nut
16. You need to make sure the bottom of the back is locked into place with the damper. I found this tricky. In the end I used an adjustable oil filter wrench to grip the plastic of the airbag and twist / lock it onto the damper. Make sure it's perfectly lined up with the air holes in the right place otherwise the bag will be twisted when you try and remount it back into the car.
17. Replace the new top cap and reattach the black air hose
18. Clean the area in the car where the shock mount goes and slide the new shock into place. I did it bottom end in first and it went in quite easily.
19. Reattach the blue air hose
20. Reattach all nuts/bolts and torque to required settings.
21. Refit wheel and wishbone protector
22. Lower jack, turn on ignition and turn off jacking mode.
23. Look nervously as airbag inflates then do a little happy dance that you didn't f*ck it up ;-)


 02-04-2010, 07:12 AM
#4
AudiWorld Super User

Join Date: Apr 2001
Posts: 6,750
Likes: 0
Received 0 Likes
on
0 Posts
I did one of these on my AR about 4 or 5 months ago, it was so ridiculously simple I didn't bother making a tech article about it, although I thought it would be handy for some people, if you've done a rear you can tackle a front no problem, and if you've done the front, you have more than enough experience to tackle a rear. Of course, the front is really simple too, but I struggled at first until I found out you should disconnect the control arms and this makes it 90% easier, and that little crush nut holding the arm up sucks, I just poke and bend at it with a screwdriver until it falls off and then I leave it on the ground. Or sometimes pick it up and throw it in the toolbox or hang it on a piece of rope for a nice necklace to give to my gf.
02-04-2010, 07:19 AM
#5
AudiWorld Super User
Join Date: Apr 2001
Posts: 6,750
Likes: 0
Received 0 Likes
on
0 Posts
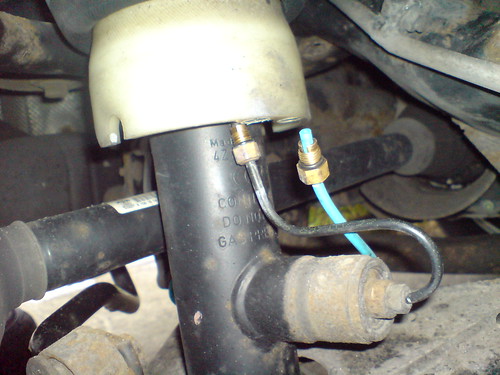
For one, my level sensor had FALLEN off and the scissors were just laying on the suspension when I got there. I'd make a note to check these first. Also, if you are having trouble getting the new spring back in, the bottom does go in first like you said, but I found that even after compressing it, it would not fit, so while pushing and compressing (wearing a pair of gloves too to not lose any fingers) I put a foot on the wide part of the rear rotor and added weight to the wishbone, this pushed it all down far enough that then I could easily slide the new airbag into place on the top section.
Here's a pic of what you should make sure it looks like, if the scissors part below where you can't see in this pic is not like shown, you might have to reattach this to this, I found i had to squeeze mine on with big adjustable pliers from the rear/under the car.
Here's a pic of what you should make sure it looks like, if the scissors part below where you can't see in this pic is not like shown, you might have to reattach this to this, I found i had to squeeze mine on with big adjustable pliers from the rear/under the car.

Trending Topics

Thread
Thread Starter
Forum
Replies
Last Post
Tstealth32
A8 / S8 (D3 Platform) Discussion
13
08-30-2018 04:05 PM
OceanA4.5
A4 (B7 Platform) Discussion
1
02-06-2006 12:42 PM