rear caliper rebuild guide
 11-28-2009, 12:49 PM
#1
Audiworld Junior Member
Thread Starter

I had been looking at sorting my rear brakes out for some time.
The hand brake was very temperamental, choosing to stick on when ever it felt like with no reason.
First I looked at up rating the rear calipers to a more modern design from a newer car as the newer models have a better handbrake mechanism in the rear calipers that isn�t prone to failure like the older models.
This option was soon ruled out as I have S6 running gear with S6 brakes all round and the rear brakes set up on the S6 C4 chassis is bigger than any of the newer set ups about.
So my only other 2 choices was buying refurnished / new calipers or repair them my self.
I chose to repair them my self and then if they really where no good then I would buy some replacements.
Below is how I rebuilt my C4 S6 rear calipers but I am sure it would be the same for most of the Audi range.
Please note this is based on my own experience and I tell this as only a guide and not matter of fact to be followed to the letter.
Firstly I removed the calipers from the car and cleaned them up for disassembly.

On removal and closer inspection of the caliper I could see the problem of all my handbrake woes. The seal that sits in the housing to prevent ingress of dirt and water in to the caliper down the handbrake mechanism shaft was very badly perished.

To solve this I had purchased the complete rebuild seal kit 204310 from www.biggred.co.uk

This contains every seal you will need for 2 rear callipers and even the boots for the carrier sliders.
Below are the parts for 1 caliper and carrier.

Firstly I mounted the caliper in the vice to make it easier to work on.

I then removed the external hand brake return spring and the spring anchor bolt.

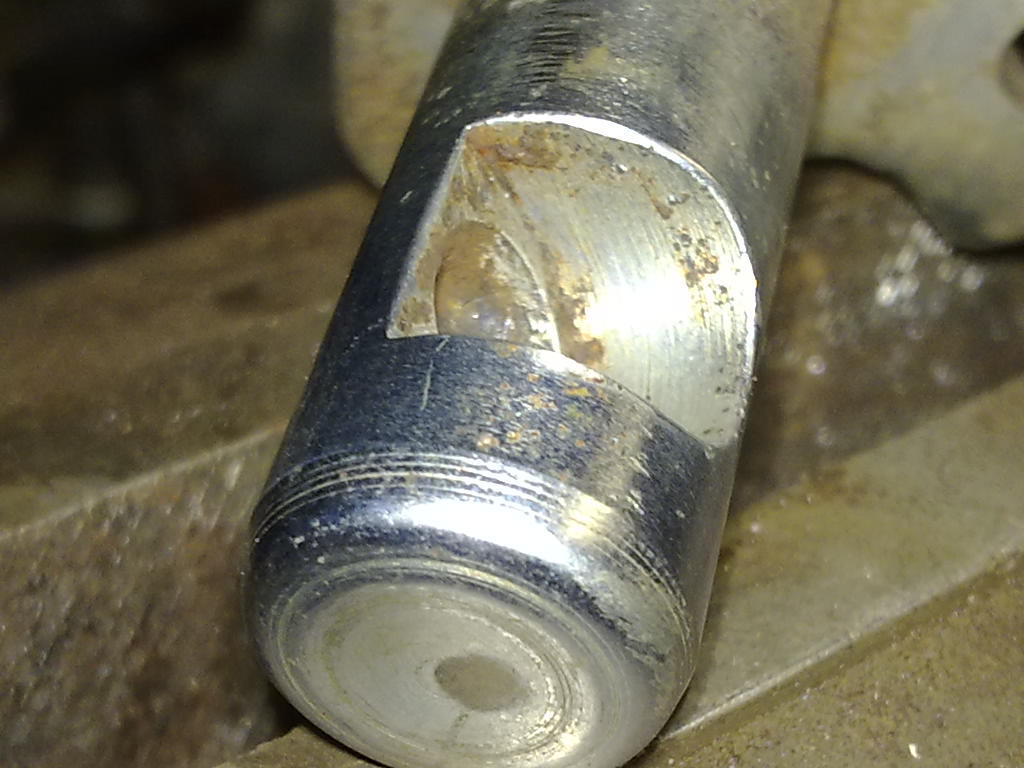
I then wound the caliper piston anti clockwise out of the housing.

When removing the piston from the caliper be careful of any fluid that is still in the caliper. This might splash in your eyes from the dust seal when the piston is removed as show below.

So with the piston and its dust seal removed from the housing we can see the hand brake mechanism inside. I left the piston seal in the housing to protect the seal groove whist removing the hand brake mechanism.
As you can see below there is a circlip holding every thing in place.
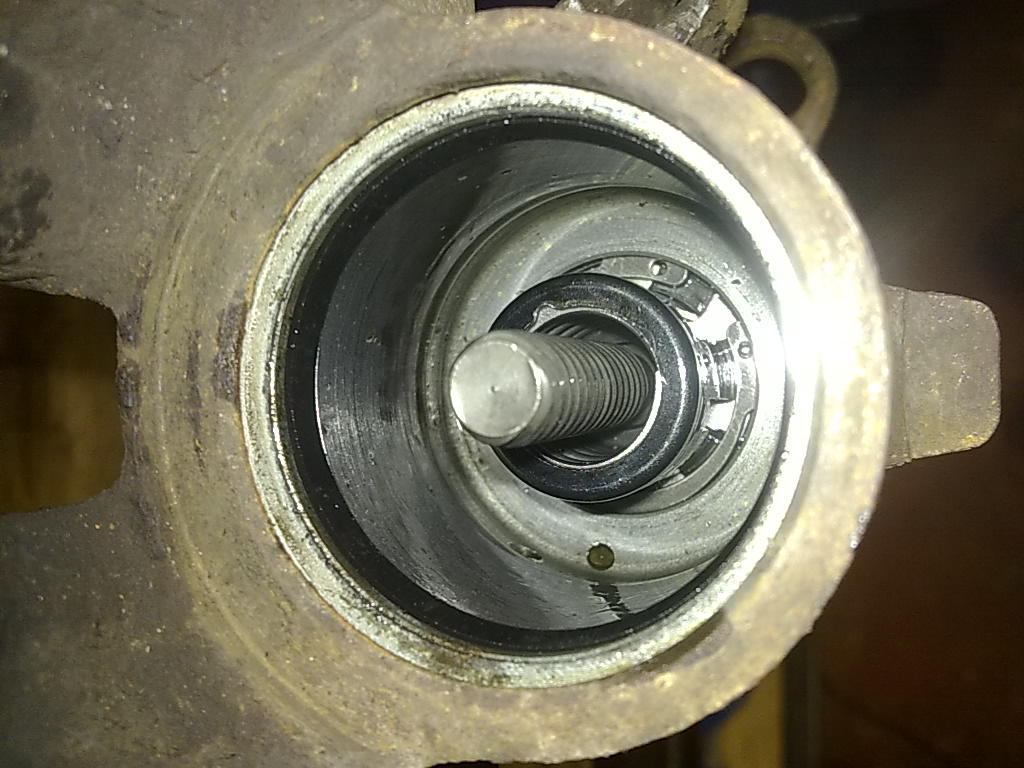
I positioned the caliper in the vice to remove the circlip and hand brake mechanism.
The circlip retains the spring for the hand brake mechanism and as such these parts are under load from the spring.

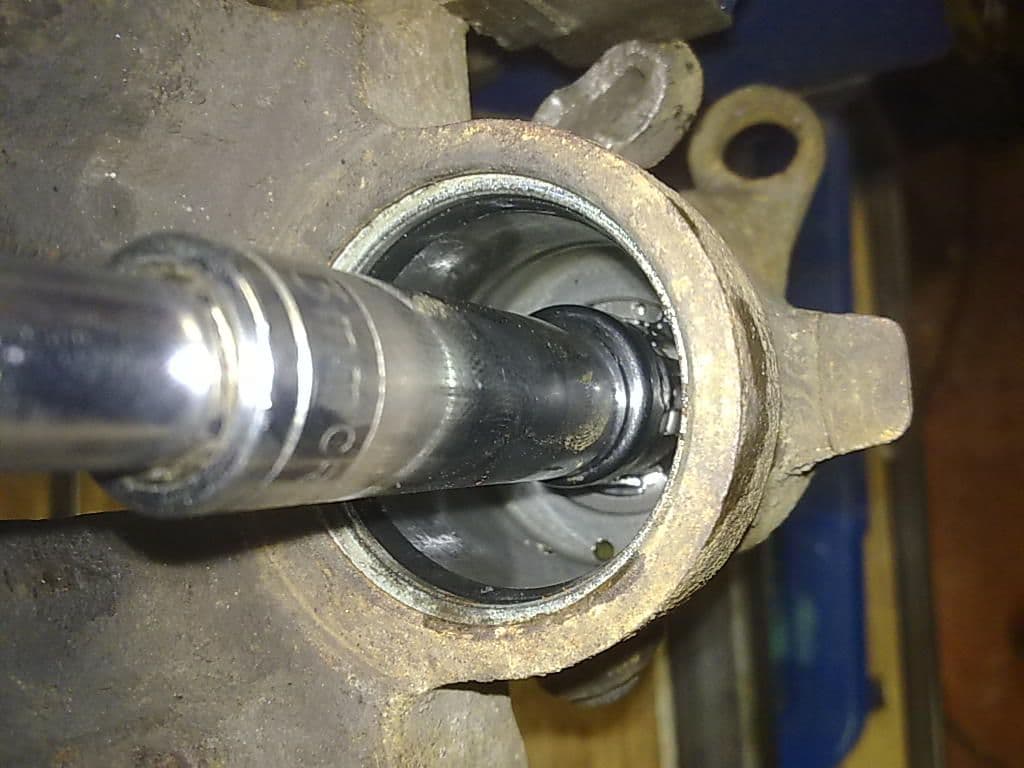
To remove the circlip I first needed to remove the spring load on the circlip by using a set of gear pullers and an appropriate deep socket as shown below.

This set up let me compress the spring and remove the load on the circlip to make removing the circlip much easier. If you don�t do this every thing in side the caliper will fly out when you remove the circlip and you can loose these parts in a game of �garage hide and seek� when inevitably the part you are looking for wins and you have to get a new part. I knew from a friend who had done this that if you do loose the metric circlip for some reason a 1� 1/8 circlip will be a suitable substitute if you grind the circlips location tangs down a little.
Here is a close up of the spring being compressed for circlip removal. You will need long straight nose circlip pliers for this.
Once the circlip is removed you can remove the gear puller set up and remove the spring, spring shroud and circlip.
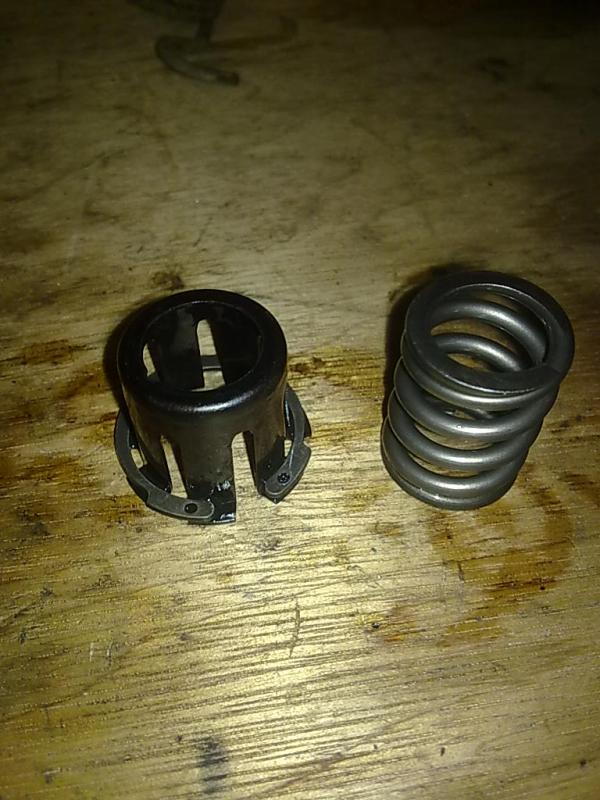
Below the spring is a washer (see below). Remove this.

Once the spring washer is removed you will see the hand brake mechanism location plate. Note the dimples and the rectangle hole location and orientation to the housing before you remove this part.

Once the hand brake mechanism location plate is removed you can the remove the hand brake mechanism rod. This is done by giving it a good wiggle and a pull. This is held in by a small O�ring so it might help to give it a squirt of WD40 down the side of the rod to help lube the O�ring.

Once hand brake mechanism rod is removed you can see the start of the problem you are to uncover. The end of the rod is coved in a build up of dirt and old grease. This needs cleaning off and the O�ring replacing.

In the caliper there will be a small pin in the hole that the rod came from. This is the pin that the hand brake cam moves to move the rod. This needs removing and cleaning of all dirt.

Next remove the hand brake mechanism cam arm from the housing.
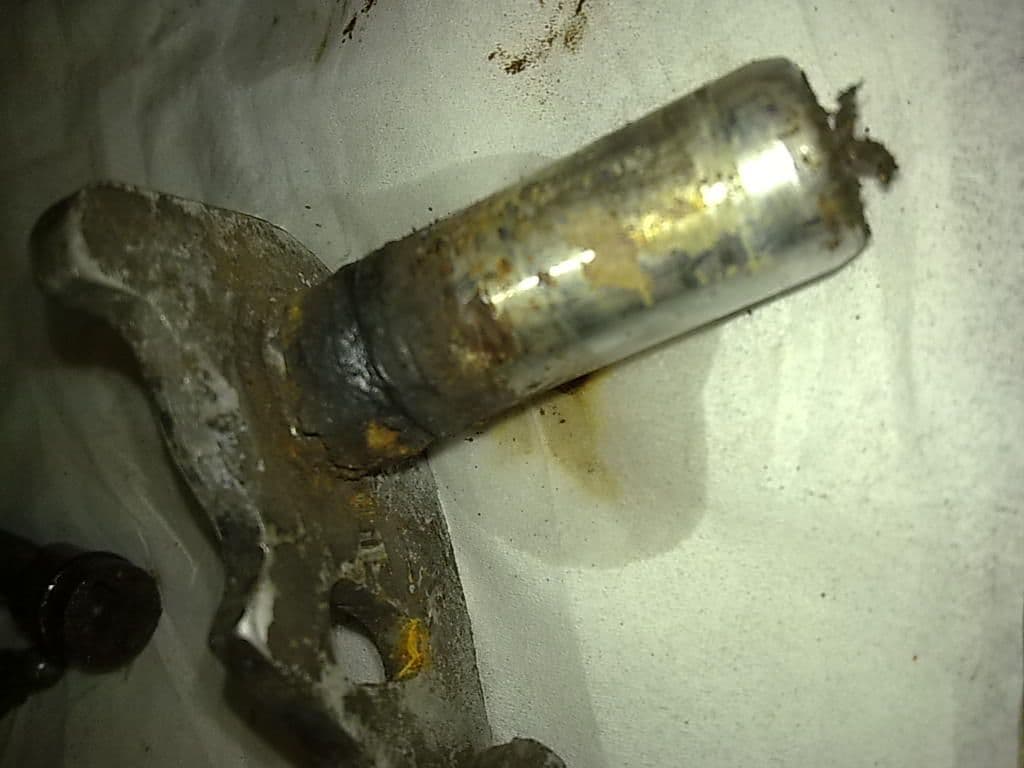
The pictures below show you the extent of the problem. The hand brake mechanism cam arm seal has perished and dirt and water has made its way in to the housing and damaged all of the moving components and the lubrication for these components.


When removed the hand brake cam lever is heavily corroded and contaminated with dirt.
This all needs to be cleaned off thoroughly.

There might also be a small burr caused by the cam mechanism pin. This needs to be removed to prevent catching the new seal and to create a freer moving mechanism.
When the housing is cleaned (see picture below) you should inspect the bore where the hand brake cam sits for any burs and scoring and remove these.

Unfortunately my camera gave up at this point so I don�t have any photos of reassembly but in the spirit of all good vehicle maintenance books �re fitment is the reverse of removal� remembering to change all seals in the caliper.
Make sure you grease the internal workings of the handbrake mechanism with good quality high temp grease.
Make sure you assemble all seals with grease on the faces that see movement as a dry seal will have a much shorter life.
When reassembling the piston you need to put the dust seal on the piston but not in the groove on the piston. You then need to fit the dust seal in to the housing before fitting the piston as you will not be able to do it any other way. The piston will need pushing and winding in to the housing. A brake caliper rewind tool is a real helper on this.
Once re assembled the hand brake mechanism should be nice and free moving. With the external spring returning the mechanism with no problems.
I have been using my new home refurbished rear callipers for about 2 weeks now in some very wet and cold weather and they have not stuck once and the handbrake is fully functioning with no sticking and there is now feeling back in the hand brake lever so its not just a case of pulling it until the car stops.
All in all I am very happy with the rebuild.
This has been my first �how to� and it was quite fun, I might even do another one�..maybe
If anybody has any tips or tricks they would like to share on this subject then please do.
The hand brake was very temperamental, choosing to stick on when ever it felt like with no reason.
First I looked at up rating the rear calipers to a more modern design from a newer car as the newer models have a better handbrake mechanism in the rear calipers that isn�t prone to failure like the older models.
This option was soon ruled out as I have S6 running gear with S6 brakes all round and the rear brakes set up on the S6 C4 chassis is bigger than any of the newer set ups about.
So my only other 2 choices was buying refurnished / new calipers or repair them my self.
I chose to repair them my self and then if they really where no good then I would buy some replacements.
Below is how I rebuilt my C4 S6 rear calipers but I am sure it would be the same for most of the Audi range.
Please note this is based on my own experience and I tell this as only a guide and not matter of fact to be followed to the letter.
Firstly I removed the calipers from the car and cleaned them up for disassembly.
On removal and closer inspection of the caliper I could see the problem of all my handbrake woes. The seal that sits in the housing to prevent ingress of dirt and water in to the caliper down the handbrake mechanism shaft was very badly perished.
To solve this I had purchased the complete rebuild seal kit 204310 from www.biggred.co.uk
This contains every seal you will need for 2 rear callipers and even the boots for the carrier sliders.
Below are the parts for 1 caliper and carrier.
Firstly I mounted the caliper in the vice to make it easier to work on.
I then removed the external hand brake return spring and the spring anchor bolt.
I then wound the caliper piston anti clockwise out of the housing.
When removing the piston from the caliper be careful of any fluid that is still in the caliper. This might splash in your eyes from the dust seal when the piston is removed as show below.
So with the piston and its dust seal removed from the housing we can see the hand brake mechanism inside. I left the piston seal in the housing to protect the seal groove whist removing the hand brake mechanism.
As you can see below there is a circlip holding every thing in place.
I positioned the caliper in the vice to remove the circlip and hand brake mechanism.
The circlip retains the spring for the hand brake mechanism and as such these parts are under load from the spring.
To remove the circlip I first needed to remove the spring load on the circlip by using a set of gear pullers and an appropriate deep socket as shown below.
This set up let me compress the spring and remove the load on the circlip to make removing the circlip much easier. If you don�t do this every thing in side the caliper will fly out when you remove the circlip and you can loose these parts in a game of �garage hide and seek� when inevitably the part you are looking for wins and you have to get a new part. I knew from a friend who had done this that if you do loose the metric circlip for some reason a 1� 1/8 circlip will be a suitable substitute if you grind the circlips location tangs down a little.
Here is a close up of the spring being compressed for circlip removal. You will need long straight nose circlip pliers for this.
Once the circlip is removed you can remove the gear puller set up and remove the spring, spring shroud and circlip.
Below the spring is a washer (see below). Remove this.
Once the spring washer is removed you will see the hand brake mechanism location plate. Note the dimples and the rectangle hole location and orientation to the housing before you remove this part.
Once the hand brake mechanism location plate is removed you can the remove the hand brake mechanism rod. This is done by giving it a good wiggle and a pull. This is held in by a small O�ring so it might help to give it a squirt of WD40 down the side of the rod to help lube the O�ring.
Once hand brake mechanism rod is removed you can see the start of the problem you are to uncover. The end of the rod is coved in a build up of dirt and old grease. This needs cleaning off and the O�ring replacing.
In the caliper there will be a small pin in the hole that the rod came from. This is the pin that the hand brake cam moves to move the rod. This needs removing and cleaning of all dirt.
Next remove the hand brake mechanism cam arm from the housing.
The pictures below show you the extent of the problem. The hand brake mechanism cam arm seal has perished and dirt and water has made its way in to the housing and damaged all of the moving components and the lubrication for these components.
When removed the hand brake cam lever is heavily corroded and contaminated with dirt.
This all needs to be cleaned off thoroughly.
There might also be a small burr caused by the cam mechanism pin. This needs to be removed to prevent catching the new seal and to create a freer moving mechanism.
When the housing is cleaned (see picture below) you should inspect the bore where the hand brake cam sits for any burs and scoring and remove these.
Unfortunately my camera gave up at this point so I don�t have any photos of reassembly but in the spirit of all good vehicle maintenance books �re fitment is the reverse of removal� remembering to change all seals in the caliper.
Make sure you grease the internal workings of the handbrake mechanism with good quality high temp grease.
Make sure you assemble all seals with grease on the faces that see movement as a dry seal will have a much shorter life.
When reassembling the piston you need to put the dust seal on the piston but not in the groove on the piston. You then need to fit the dust seal in to the housing before fitting the piston as you will not be able to do it any other way. The piston will need pushing and winding in to the housing. A brake caliper rewind tool is a real helper on this.
Once re assembled the hand brake mechanism should be nice and free moving. With the external spring returning the mechanism with no problems.
I have been using my new home refurbished rear callipers for about 2 weeks now in some very wet and cold weather and they have not stuck once and the handbrake is fully functioning with no sticking and there is now feeling back in the hand brake lever so its not just a case of pulling it until the car stops.
All in all I am very happy with the rebuild.
This has been my first �how to� and it was quite fun, I might even do another one�..maybe
If anybody has any tips or tricks they would like to share on this subject then please do.
 11-29-2009, 01:35 PM
#2
AudiWorld Member

Join Date: Nov 2006
Posts: 386
Likes: 0
Received 0 Likes
on
0 Posts
Thank you for the write up, on the money for sure. Being the cheap guy that I am and not wanting to shy away from a challenge I did the same thing for my 96, that was over three years ago and still functions perfectly. I was able to pick up a seal at a local jobber which was a little smaller than original (not quite as tall). They cost me $3.00 each however the cost of the calipers have gone down quite a bit and I'd certainly weigh that against the fuss of repair. I was thinking of doing a write up and was too far into it when it crossed my mind, so I'm really glad you did it. For sure this is not for the faint of heart, make sure you've got the gear if you tackle this. Kudos to you P.D.Q.
12-01-2009, 11:23 AM
#3
AudiWorld Super User


Join Date: Mar 2003
Posts: 6,001
Likes: 0
Received 0 Likes
on
0 Posts
Nice write up. Is that oddball p-brake mechanism unique to the C4 S-car series? I dont recall seeing it on my regular C4. Admit i didnt yet rebuild the (rear) calipers. Fronts i did. Fairly simple.
G
G
01-25-2010, 05:15 AM
#5
AudiWorld Super User
Really an excellent writeup! I will check the handbrake seal on my rear A6 caliper that I'm currently down for replacing the dust boot that tore...don't ask!
Two suggestions:
1. A drill press can be used to unload the spring the remove the handbrake mechanism from the caliper. That little spring looks pretty strong. Gear puller setup looks cool!
2. Per Audi, the piston seal is supposed to be soaked in brake fluid or a special lubricant for 30 minutes that comes with the OEM seal kit. That being said, I've used brake fluid. Works fine. The seal lives in brake fluid!!
My audi technician friend says the dust boot has to be put on with the piston out; my plan was to simply replace the dust boot but now that I see the handbrake mechanism seal can fail I'll have to look at it more closely!
11-26-2011, 12:33 AM
#6
AudiWorld Junior Member

Join Date: Aug 2005
Posts: 5
Likes: 0
Received 0 Likes
on
0 Posts
you're the man. I just did this job and used your guide as a reference. I will be posting some pictures of my alternate "tools" and approaches, it was difficult to get it done without the right tools but I made it work. I'll post pictures and explanations soon. Right now I am enjoying a few celebratory Rolling Rocks  Thanks again to the OP for a layout of what the setup inside is like!
Thanks again to the OP for a layout of what the setup inside is like!
04-23-2012, 08:56 AM
#7
AudiWorld Super User
anyone have any idea where to get a rebuild kit for the rear caliper that is in North America ? usually the rebuilt kits just come with a seal and dust boot.. you need all the stuff tho
Trending Topics
10-03-2013, 08:37 PM
#8
AudiWorld Junior Member

Join Date: Feb 2010
Posts: 25
Likes: 0
Received 0 Likes
on
0 Posts
Hi, sorry to bump this old thread but I've ran into an issue with the disassembly step of rebuilding a pair of B5 S4 calipers.
To start with, I want to say that your technique for loading the spring (with a puller) to remove the snap ring is excellent!
I bought an internal snap ring tool that worked fantastic for getting at that snap ring:
It worked on the first attempt without any difficulty
The problem I'm having, is that after removing the snap ring the spring cage and spring don't seem to want to come out. I didn't have time yet to look closely into it, but even yanking on the cage with pliers didn't seem to make it budge. Also the e-brake mechanism works fine.
Do you or anyone else have any suggestions on this?
Thanks for your writeup and time
 07-02-2014, 01:18 AM
#10
AudiWorld Newcomer

Join Date: Apr 2012
Posts: 1
Likes: 0
Received 0 Likes
on
0 Posts
"Once hand brake mechanism rod is removed you can see the start of the problem you are to uncover. The end of the rod is coved in a build up of dirt and old grease. This needs cleaning off and the O�ring replacing."
Hello. What exactly is the O-ring size? Included in Frenkit 238010 are two sizes
- 33101 10x2, 5 mm
- 33102 10x2 mm
Included seins D4083 is only 10x2 mm. As I read on the internet it is better to wear an the 10x2, 5 because the thinner may leak brake fluid. But this pear is hard to push.
Audi 100 C4 1991 FWD 2.8
Apologizes for language