Finally got around to trimming out my tow hitch surround
 11-19-2013, 08:36 PM
#1
AudiWorld Expert

Thread Starter

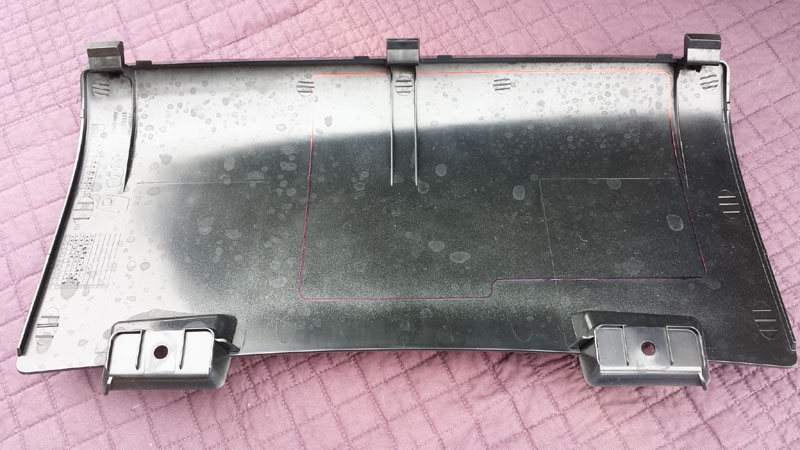
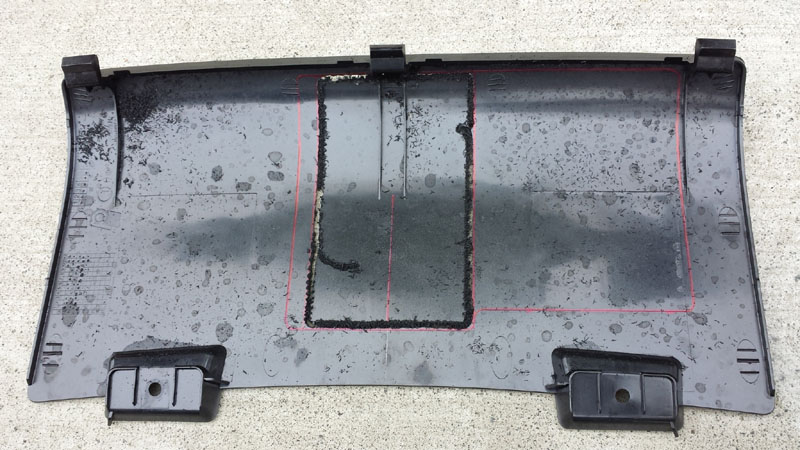
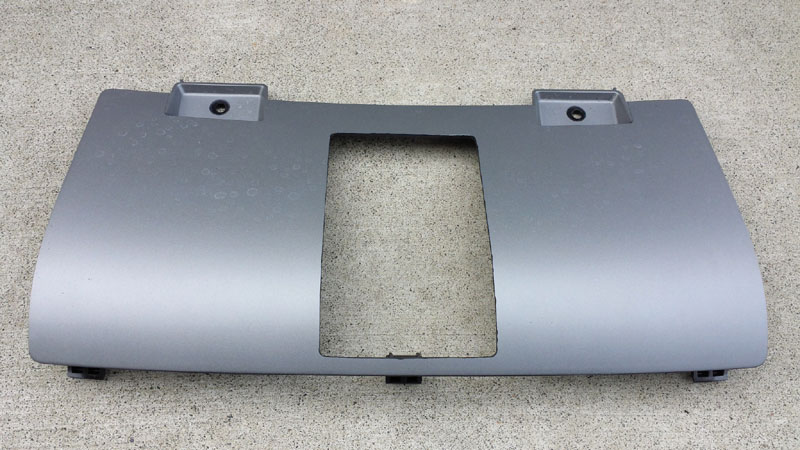
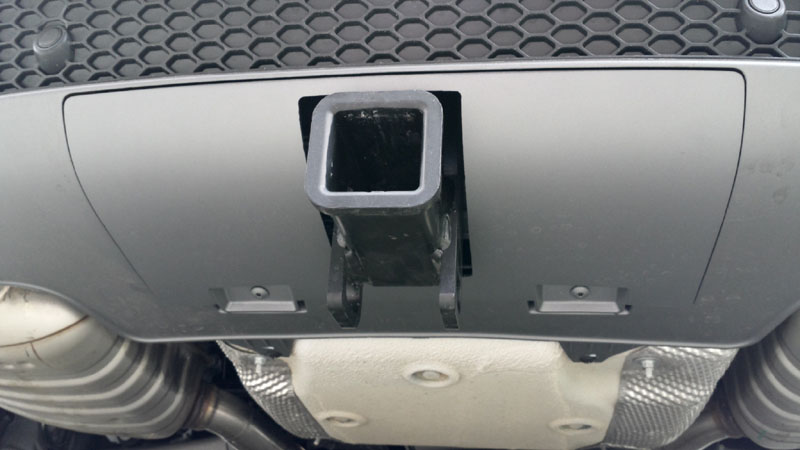
Traced out the raised lip that can be cut out to allow hitch and electrical connector to be accessible with panel in place. I just did this as a reference as this would be a "worst case" cutout for me. I wanted to keep the cutout much smaller than this: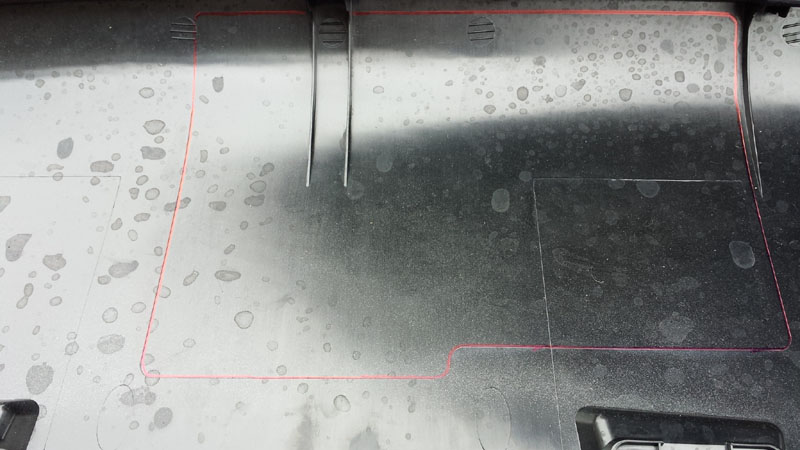
Another angle:
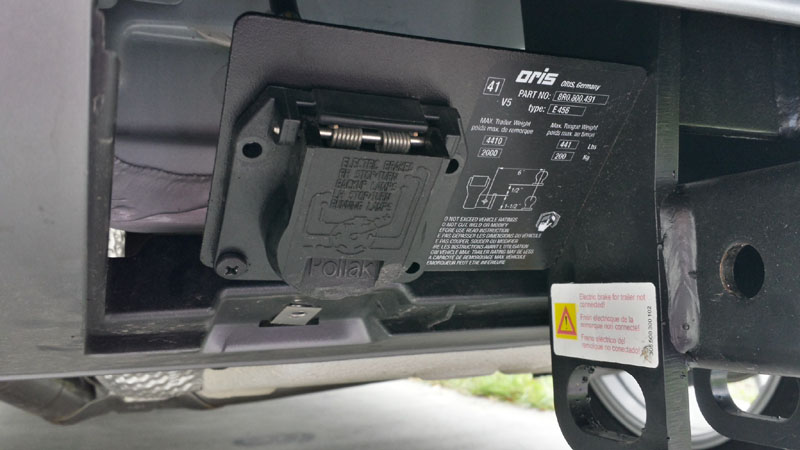
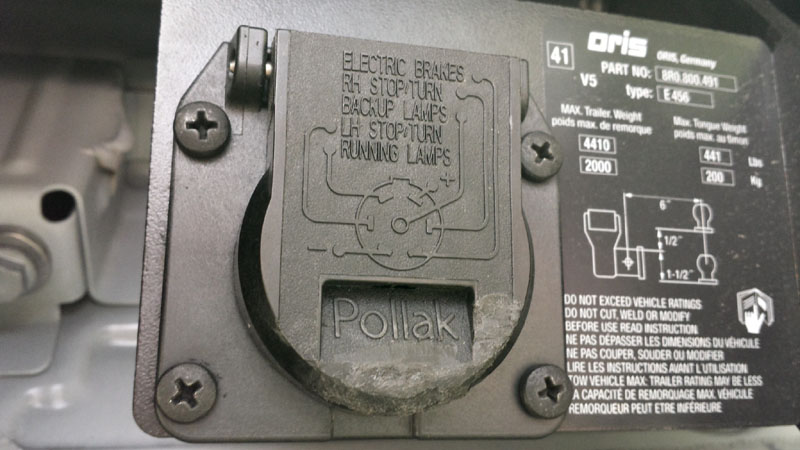
For the elec connector, I had considered just cutting a single hole for the finger tab that extends too low. I decided first to remove the elec connector entirely to get the fit around the hitch complete first. As you can see here, the metal mounting plate is actually out of the way of the panel, so optionally I could just ziptie the elec connector out of the way and not need to cut a hole for it:
Another angle:
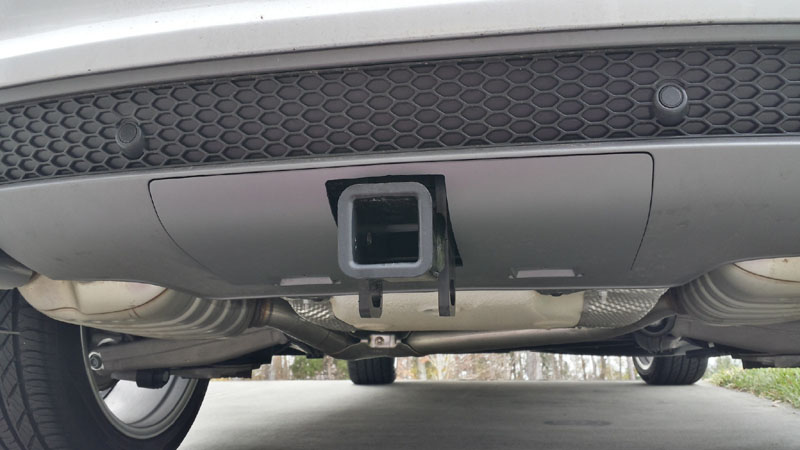
After measuring the hitch about 3.5" wide, I decided to cut 4" wide section. As you can see, this is still about 1/2" narrower than the "suggested" cutout on one side. I used a rotary tool and slowly cut it out, keeping a little distance from my lines so I could do the final filing to get to the desired size:
Ta-da!
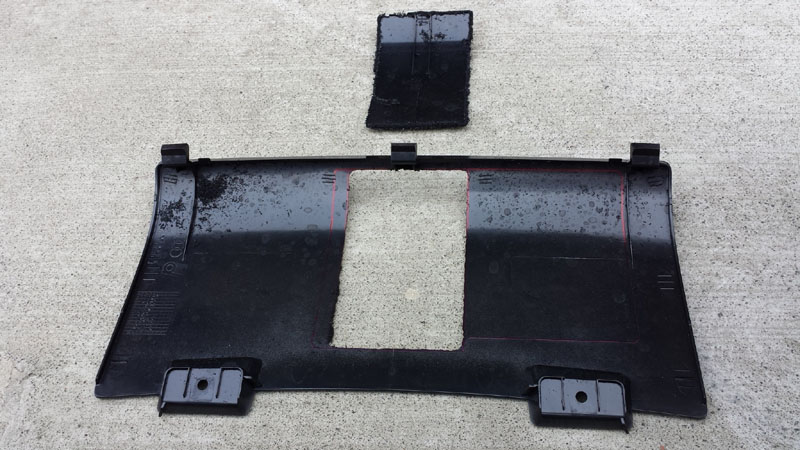
Not too bad, obviously still rough:
Test fit went well:
Filed the sides and corners (round file):
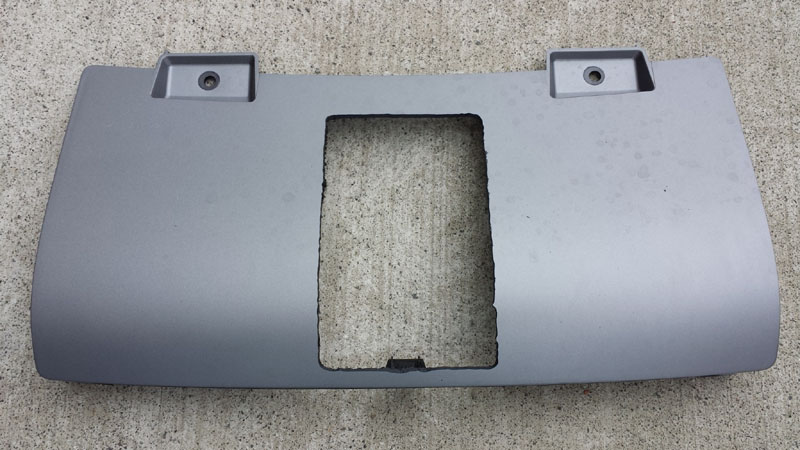
After reviewing the size of the elec connector and holding the panel in place checking clearances, I decided to trim off the finger-pull on the elec connector spring-lid. That was the only thing in the way, so with that removed, the panel will fit without a cutout. I can still grip the elec cover on the sides and open it. Since I rarely ever tow, I decided I'd prefer to have the cover more completely intact than ease of access to elec connector. I'll just remove the 2 screws to remove the panel when I need elec connection access:
Finger tab cut off:
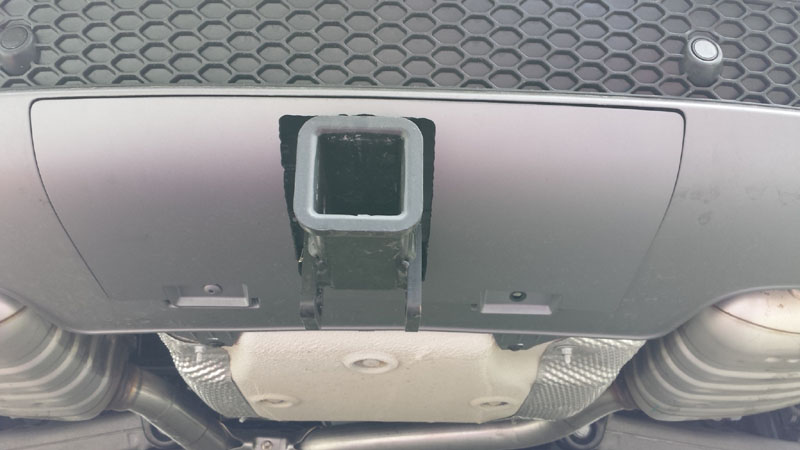
Panel in place:
Panel in place:

Panel in place:
Panel in place:
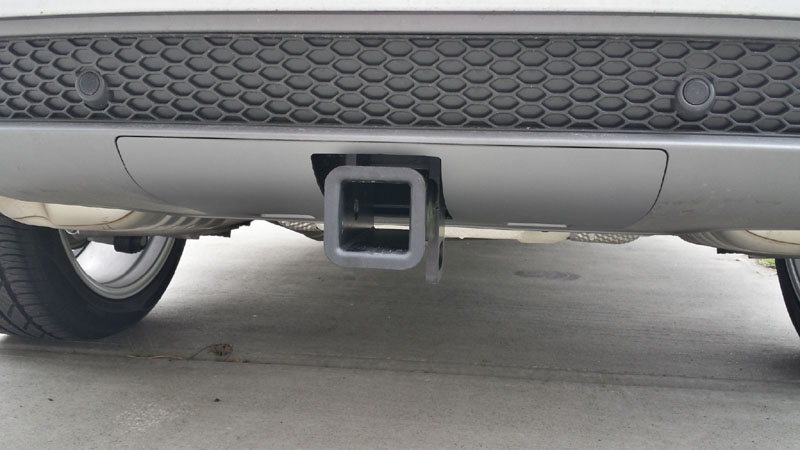
Just needs a clean/classy hitch cap and I'll be all set. Maybe a solid color (White/Gray/Black) or carbon fiber look, or Audi rings, or similar.
Another angle:
For the elec connector, I had considered just cutting a single hole for the finger tab that extends too low. I decided first to remove the elec connector entirely to get the fit around the hitch complete first. As you can see here, the metal mounting plate is actually out of the way of the panel, so optionally I could just ziptie the elec connector out of the way and not need to cut a hole for it:
Another angle:
After measuring the hitch about 3.5" wide, I decided to cut 4" wide section. As you can see, this is still about 1/2" narrower than the "suggested" cutout on one side. I used a rotary tool and slowly cut it out, keeping a little distance from my lines so I could do the final filing to get to the desired size:
Ta-da!
Not too bad, obviously still rough:
Test fit went well:
Filed the sides and corners (round file):
After reviewing the size of the elec connector and holding the panel in place checking clearances, I decided to trim off the finger-pull on the elec connector spring-lid. That was the only thing in the way, so with that removed, the panel will fit without a cutout. I can still grip the elec cover on the sides and open it. Since I rarely ever tow, I decided I'd prefer to have the cover more completely intact than ease of access to elec connector. I'll just remove the 2 screws to remove the panel when I need elec connection access:
Finger tab cut off:
Panel in place:
Panel in place:
Panel in place:
Panel in place:
Just needs a clean/classy hitch cap and I'll be all set. Maybe a solid color (White/Gray/Black) or carbon fiber look, or Audi rings, or similar.
 11-19-2013, 09:44 PM
#2
AudiWorld Super User

wow, we think alike Mark!
I did the same exact thing with my SQ panel, that is, cutting off the finger pull tab on the spring-loaded connector lid so I could do the same small panel cut as yours. It was very important for me to do this especially since my panel has a continuation of 2 of the 4 "diffuser fins" molded onto the panel that I wanted to preserve. Will try to take some pics to post this weekend. And while I'm at it, I'll get some shots of the winter shoes (the peelers you sold me) as well, which I've finally mounted on the car
I did the same exact thing with my SQ panel, that is, cutting off the finger pull tab on the spring-loaded connector lid so I could do the same small panel cut as yours. It was very important for me to do this especially since my panel has a continuation of 2 of the 4 "diffuser fins" molded onto the panel that I wanted to preserve. Will try to take some pics to post this weekend. And while I'm at it, I'll get some shots of the winter shoes (the peelers you sold me) as well, which I've finally mounted on the car
11-20-2013, 06:31 AM
#3
AudiWorld Expert
Thread Starter
wow, we think alike Mark!
I did the same exact thing with my SQ panel, that is, cutting off the finger pull tab on the spring-loaded connector lid so I could do the same small panel cut as yours. It was very important for me to do this especially since my panel has a continuation of 2 of the 4 "diffuser fins" molded onto the panel that I wanted to preserve. Will try to take some pics to post this weekend. And while I'm at it, I'll get some shots of the winter shoes (the peelers you sold me) as well, which I've finally mounted on the car
I did the same exact thing with my SQ panel, that is, cutting off the finger pull tab on the spring-loaded connector lid so I could do the same small panel cut as yours. It was very important for me to do this especially since my panel has a continuation of 2 of the 4 "diffuser fins" molded onto the panel that I wanted to preserve. Will try to take some pics to post this weekend. And while I'm at it, I'll get some shots of the winter shoes (the peelers you sold me) as well, which I've finally mounted on the car
11-26-2013, 11:38 AM
#4
AudiWorld Expert
Thread Starter
wow, we think alike Mark!
I did the same exact thing with my SQ panel, that is, cutting off the finger pull tab on the spring-loaded connector lid so I could do the same small panel cut as yours. It was very important for me to do this especially since my panel has a continuation of 2 of the 4 "diffuser fins" molded onto the panel that I wanted to preserve. Will try to take some pics to post this weekend. And while I'm at it, I'll get some shots of the winter shoes (the peelers you sold me) as well, which I've finally mounted on the car
I did the same exact thing with my SQ panel, that is, cutting off the finger pull tab on the spring-loaded connector lid so I could do the same small panel cut as yours. It was very important for me to do this especially since my panel has a continuation of 2 of the 4 "diffuser fins" molded onto the panel that I wanted to preserve. Will try to take some pics to post this weekend. And while I'm at it, I'll get some shots of the winter shoes (the peelers you sold me) as well, which I've finally mounted on the car
 11-26-2013, 12:00 PM
#5
AudiWorld Super User
No, didn't post it yet, my bad... became occupied with other things (the RS7 arrived on Friday and I took delivery on Saturday) so I forgot all about the other Audi and did a photo shoot of the new one instead
pics here if interested...
https://www.audiworld.com/forums/sho...1&postcount=58
Had a bit of light snow too so the SQ5 is all dirty... will clean her up and take some nice photos soon.
pics here if interested...
https://www.audiworld.com/forums/sho...1&postcount=58
Had a bit of light snow too so the SQ5 is all dirty... will clean her up and take some nice photos soon.
11-26-2013, 12:50 PM
#6
AudiWorld Expert
Thread Starter
No, didn't post it yet, my bad... became occupied with other things (the RS7 arrived on Friday and I took delivery on Saturday) so I forgot all about the other Audi and did a photo shoot of the new one instead
pics here if interested...
https://www.audiworld.com/forums/sho...1&postcount=58
Had a bit of light snow too so the SQ5 is all dirty... will clean her up and take some nice photos soon.
pics here if interested...
https://www.audiworld.com/forums/sho...1&postcount=58
Had a bit of light snow too so the SQ5 is all dirty... will clean her up and take some nice photos soon.
Needs a flat bottom steering wheel to top it off. Everything else looks spot on!
And of course a chip, assuming it's similar to S8
12-08-2013, 03:44 PM
#7
AudiWorld Super User
Ok, finally took pics of the cut-out I did and also the peelers I'll be running for the winter (which I'll post on another thread).
I turned down my dealer's offer to do it because I thought I could do a closer and cleaner job, especially since I did not want to include an opening for the electrical connector in the cut. Luckily, I was right and did not screw it up
Started out with the rough cut using a dremel with a plastic cutting wheel, speed on low, and took my time so as not to melt the plastic. Cut the straight lines first and left the corners intact so the piece being cut out stays in place. Once all the lines were cut, I taped over them so that the piece won't move when I use a big round burr to cut out the corners. Finally, I brought it to work with me and used dental finishing burrs at the office (normally used for dentures and various dental appliance acrylics) to clean it all up. Very pleased with the result and the vertical cuts certainly cannot get any closer to the tow hitch.
<a href="http://www.flickr.com/photos/9771718@N06/11280156326/"><img src="http://farm4.staticflickr.com/3670/11280156326_e7479feb08_b.jpg" alt="IMG_1204"></a>
The SQ5's panel has 2 of the 4 "diffuser fins" which is why is was important for me to make a cut that did not include the connector opening. In order to do this, I did the same modification as Mark P to the lid of the 7-pin connector: removed the tab with a dremel so that it would not interfere with the panel's seating. Took all of 30 seconds to hack it off.
<a href="http://www.flickr.com/photos/9771718@N06/11280211374/"><img src="http://farm3.staticflickr.com/2876/11280211374_f34e9da2ae_b.jpg" alt="DSC00027"></a>
<a href="http://www.flickr.com/photos/9771718@N06/11280265463/"><img src="http://farm6.staticflickr.com/5498/11280265463_862ed6d76d_b.jpg" alt="DSC00028"></a>
All done!
<a href="http://www.flickr.com/photos/9771718@N06/11280140045/"><img src="http://farm8.staticflickr.com/7452/11280140045_566d1cd229_b.jpg" alt="DSC00033"></a>
<a href="http://www.flickr.com/photos/9771718@N06/11280269823/"><img src="http://farm6.staticflickr.com/5510/11280269823_dffc0423ae_b.jpg" alt="DSC00034"></a>
<a href="http://www.flickr.com/photos/9771718@N06/11280271483/"><img src="http://farm4.staticflickr.com/3726/11280271483_355bb4176d_b.jpg" alt="DSC00036"></a>
Put a little hitch cap as a finishing touch. For those interested, it's a Curt rubber hitch cover with leash from Amazon for $8.
<a href="http://www.flickr.com/photos/9771718@N06/11280144945/"><img src="http://farm3.staticflickr.com/2820/11280144945_19719406f2_b.jpg" alt="DSC00051"></a>
Trending Topics
12-09-2013, 04:51 PM
#9
AudiWorld Junior Member

Mark & Larry, terrific work! Question: How was the scribe line inside of the panel made? Rather, both jobs illustrate pre-determined measurements and deliberate lines. Seek advice on how I could replicate the preliminary work of marking the scribe line as you both appear to have done. Thank-you.
12-09-2013, 05:04 PM
#10
AudiWorld Expert
Thread Starter
Mark & Larry, terrific work! Question: How was the scribe line inside of the panel made? Rather, both jobs illustrate pre-determined measurements and deliberate lines. Seek advice on how I could replicate the preliminary work of marking the scribe line as you both appear to have done. Thank-you.
Here's what it looks like naturally (ignoring the cutout, this is Larry's):

Here's what it looks like after I ran a sharpie marker along the small ridge. This cutout would fit the hitch and the electrical connection. I drew this as I knew it would be the largest I'd need to cut, and thus all of my cuts should be contained within here:
From there, I carefully inserted the panel as much as possible and determined where the centerline of the hitch was located. You can see the in the middle of my cutout. From there, I measured the width of the hitch, added a little extra buffer, and then drew new lines parallel to my centerline. I tried to cutout just shy of this line so I could file the remainder smooth (but not file too much):