How do you remove the front driver quarter panel?
 08-09-2013, 06:54 PM
#1
AudiWorld Junior Member
Thread Starter

So I got some small scratches on the front of my quarter panel. I took it in to get a quote on a repaint and they quoted me $600. I figured this might be a good opportunity to learn how to paint. I mean what's the worst that could happen? If i mess it up, then I let the pros do it.
So I sanded everything, primered it, painted and clear costed it. It was okay had a little orange peel in the clear coat. So I'm going to try again.
Now I'm thinking about taking off the quarter panel so I can bring it inside in a controlled environment and hopefully get a better result.
I can't find any instructions on how to remove the quarter panel. I've searched the forums and come up with nothing. Anyone have a 'How to' so the shop manual instructions?
 08-12-2013, 04:14 AM
#2

how bad were the scratches? if they were just white scratches it usually would be buffed right out. But if the scratches that you can feel with your finger nail. Then you will need some touch up paint etc.
08-12-2013, 06:54 AM
#3

Unless you also want a lesson in a bunch of other autobody skills, you may be better leaving the panel on the car.
There will likely be a bunch of other things that need to be removed in order to get the panel off. You might end up opening a can of worms. Then you will have to worry about scratching the "perfect" panel trying to get it back on straight and even.
Pro shops will paint the panel on the car for precisely this reason.
08-12-2013, 03:02 PM
#4

I've taken the panel off, trust me when I say it not a very easy task (I bought the car as a write-off and the fender was damaged so it needed to be repaired). You're better off doing it on the car or taking it to a body shop. The bumper needs to come off, wheel liner, ect...not easy.
08-19-2013, 06:39 AM
#5
AudiWorld Junior Member
Thread Starter
Thanks all for your responses.
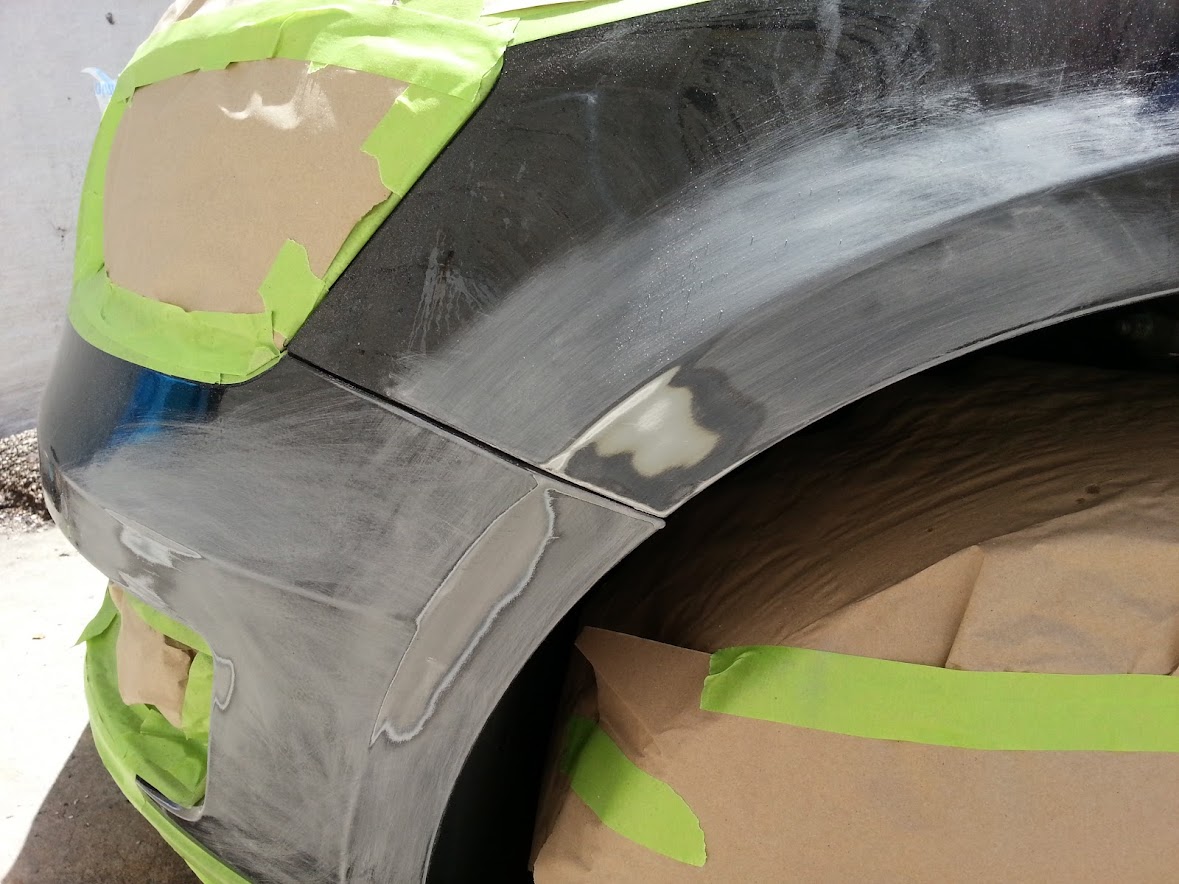
Here are some pics of the before and after (1st attempt). You can see that the scratches span both the 1/4 panel and the bumper. The 1/4 panel scratch went down to metal.
Overall, it was an ok repair and the bumper came out better than the 1/4 panel. However I wasn't satisfied with the final result on the 1/4 panel because there was a little 'orange peel' effect in the clear coat. Probably due to my lack of experience in painting, so I was either too far away or over sprayed.
So I gave it another shot and while spraying the clear coat the nozzle spewed drops instead of spray... so that try was no good.
3rd time, almost got everything right but over sprayed by the A pillar, so needs to be redone.
All in all, I'm only in it for ~$150 and learning a lot as I go. I might give it one more go before taking it in to be done.
09-07-2013, 01:56 PM
#7
AudiWorld Member

Join Date: Feb 2013
Location: Between Vancouver and Vancouver
Posts: 169
Likes: 0
Received 1 Like
on
1 Post
Hi audibk,
My car has a damage similar to yours.

I have messed up on the less extensive fixes, which are documented in this thread: Not 2000 miles, scratched! -- Seattle Eastside body shop?
Now I am thinking of doing it your way. Do you mind sharing what steps you took? In particular, I am interested to know:
1. Did you use a primer?
2. How many layers for each coat?
3. Were there sanding or compounding between layers?
4. And most importantly, since (I think) you did not spray the entire bumper, how did you manage to blend in the new paint?
Any help would be appreciated! TIA.
My car has a damage similar to yours.
I have messed up on the less extensive fixes, which are documented in this thread: Not 2000 miles, scratched! -- Seattle Eastside body shop?
Now I am thinking of doing it your way. Do you mind sharing what steps you took? In particular, I am interested to know:
1. Did you use a primer?
2. How many layers for each coat?
3. Were there sanding or compounding between layers?
4. And most importantly, since (I think) you did not spray the entire bumper, how did you manage to blend in the new paint?
Any help would be appreciated! TIA.
Trending Topics
09-09-2013, 01:50 PM
#8
AudiWorld Junior Member
Thread Starter
Hi audibk,
My car has a damage similar to yours.
I have messed up on the less extensive fixes, which are documented in this thread: Not 2000 miles, scratched! -- Seattle Eastside body shop?
Now I am thinking of doing it your way. Do you mind sharing what steps you took? In particular, I am interested to know:
1. Did you use a primer?
2. How many layers for each coat?
3. Were there sanding or compounding between layers?
4. And most importantly, since (I think) you did not spray the entire bumper, how did you manage to blend in the new paint?
Any help would be appreciated! TIA.
Hi 81Coupe,
To answer your questions:
1) Yes I used Primer.
2) Primer = 2-3 coats, base color = ~5 coats, Clear coat = ~4 coats.
3) Yes I did sand between some layers, didn't use compound. You vary the grit between layers, getting finer as you go up. The base color will cover up the sanding marks from the primer and the Clear from the base color.
4) My first go around I didn't spray the entire bumper or 1/4 panel. You need to 'blend' it which there is a technique for. My 2nd and 3rd go, I just did the 1/4 panel and basically did the whole thing. But that was just to fix the Clear not the base color, so it was a light sanding with 800-1500 grit and then clear coat.
I purchased the paint supplies and followed the instructions/techniques from this site: http://www.automotivetouchup.com/directions.htm
I found that they have pretty helpful and detailed videos.
1 thing I will mention that I discovered after the fact. There is a difference in Clear coat that you can buy, it's either a 1 part or 2 part product. The 2 part had to be mixed and activated but supposed to be harder and give a better result. This is what I'll be trying next:
All in all, for me it was a learning experience and worth the try, rather then just taking it in and having someone else do it.
Hope you get good results and are happy with it. If you have any more questions, let me know.
09-09-2013, 03:23 PM
#9
AudiWorld Member
THis is kind of a moot point...but my wife swiped a park car to avoid an effing cat. Anyway, we had 3M film on it and all the rubber that was transferred to our car and the palpable scratches were only into the film. Peeled it all off and done.
BTW nice job on the paint, isn't black the hardest to apply well?
BTW nice job on the paint, isn't black the hardest to apply well?
09-10-2013, 08:43 AM
#10
AudiWorld Member
Join Date: Feb 2013
Location: Between Vancouver and Vancouver
Posts: 169
Likes: 0
Received 1 Like
on
1 Post
Hi 81Coupe,
To answer your questions:
1) Yes I used Primer.
2) Primer = 2-3 coats, base color = ~5 coats, Clear coat = ~4 coats.
3) Yes I did sand between some layers, didn't use compound. You vary the grit between layers, getting finer as you go up. The base color will cover up the sanding marks from the primer and the Clear from the base color.
4) My first go around I didn't spray the entire bumper or 1/4 panel. You need to 'blend' it which there is a technique for. My 2nd and 3rd go, I just did the 1/4 panel and basically did the whole thing. But that was just to fix the Clear not the base color, so it was a light sanding with 800-1500 grit and then clear coat.
I purchased the paint supplies and followed the instructions/techniques from this site: http://www.automotivetouchup.com/directions.htm
I found that they have pretty helpful and detailed videos.
1 thing I will mention that I discovered after the fact. There is a difference in Clear coat that you can buy, it's either a 1 part or 2 part product. The 2 part had to be mixed and activated but supposed to be harder and give a better result. This is what I'll be trying next: Amazon.com: Eastwood 2K Aero-Spray Aerosol High Gloss Clear Paint: Automotive
All in all, for me it was a learning experience and worth the try, rather then just taking it in and having someone else do it.
Hope you get good results and are happy with it. If you have any more questions, let me know.
Thank you for taking time to give me such detailed explanation. It answers all the questions I have (for now), yet it also looks very daunting! As my scratches are not as deep as yours, I am still experimenting with different ways to repair the color coat without resorting to spraying. But since my previous ham-handed approach has already worn through the clear coat in some places (see the other thread), I think spraying a clear coat will be unavoidable.
Intriguing information about the two part clear coat. I didn't know there is such a difference. It seems the way to go, but I wonder whether it is more difficult to apply. However on the other hand, I am also playing with the idea of covering the bumper with clearbra. In that case, a one part product will probably be enough (?)
Appreciate your help!