Simplified C4 UrS Lower Control Arm Replacement DIY (what did I miss)?
 02-07-2013, 02:51 PM
#1
AudiWorld Super User

Thread Starter
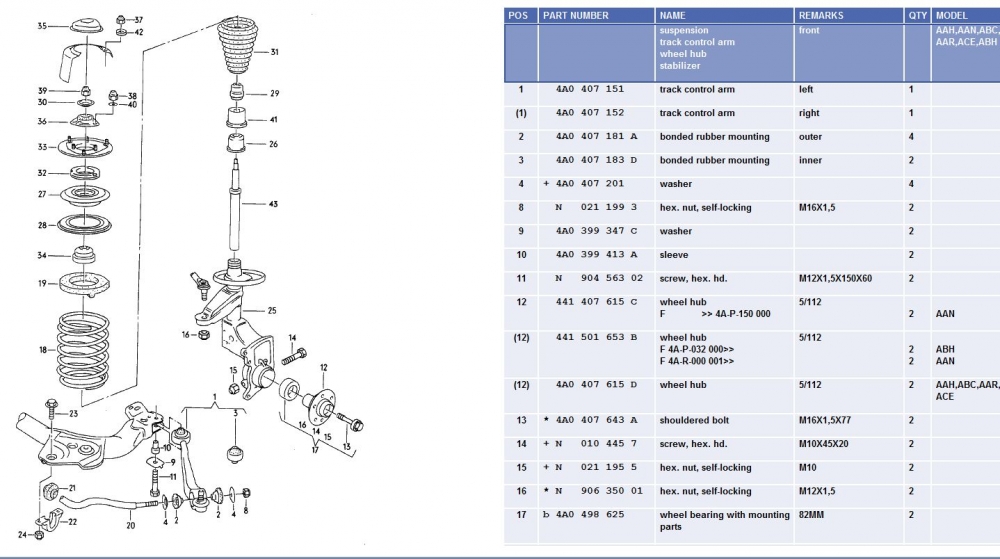
Parts needed (reference diagram below)
Item 1 obviously. Go for OE/dealer parts if possible, otherwise TRW or Febi/Bilstein. We are not liking anything made in China (e.g. Meyle of recent years) - they don't last. Should come with Items 2, 3 and 8 but, if not, you need at least Items 3 and 8.
Items 14 and 15 - both sides, hold the tie-rod end into the strut. Best to go new.
Items 10 and 11. 10 is a sleeve that goes in the end of the lower control arm and often they are rusted. Remove by threading in a wheel bolt (really) and pulling out. Item 11 is a stretch bolt and typically should not be reused.
When I did my front lower control arms, I took the whole strut out so I had to remove Item 13 that holds the CV joint into the hub. However, I think it is possible to re and re the lower control arm by:
1. Loosening the wheel bolts (5 per side)
2. Jacking the car up and getting it on jack stands on the designated jacking points
3. Removing both wheels
4. Working one side at a time, loosen items 8 and 11.
5. Removing Items 15 and 14. (Note orientation beforehand)
6. Prying the ball joint at the end of the control arm out of Item 25 (use a large pry bar (like 6 ft) on top of the lower control arm and under the subframe, push down, hard.
7. When the ball joint comes out, move the end of Item 25 forward a bit. (Note: If this doesn't work, you might have to loose items 37 to create some slack. If that is not enough, then you might have to also compress the spring with a set of Macpherson strut spring compressors). Your objective is to get better access to Item 8.
8. Remove Item 8, further loosen Item 11.
9. With Item 8 off, use a rubber mallet to "persuade" the ball joint end of the lower control arm to rotate towards the back of the car.
10. Once you have the lower control arm free of Item 20 (the sway bar), remove Item 11 at the subframe end of the lower control arm.
11. Try to pull the lower control arm out of the subframe. It is seems stuck, it is Item 10 ("Sleeve")that is hanging things up. Insert a wheel bolt into the exposed end of Item 10 and use a 17 mm socket and rachet to rotate the wheel bolt into 10 a few threads. Then wiggle and pull on the wheel bolt to remove the sleeve. Once the sleeve is out, pull the old lower control arm out. Note the orientation, you need to get the new left lower control arm on the left side and the right on the right. They are similar but different. Half way there. Now you can do the other side.
12. Once both control arms are out, then you can start re-installing the new control arms. Start with inserting the lower control arm into the subframe mount (in the correct orientation for that side)
13. Insert a new Item 10 through the subframe and into the end of the lower control arm. Insert the round end of Item 10 first, gently tapping it in at the oval end.
14. Insert a new Item 11 through the subframe, through the end of the lower control arm and sleeve and into the subframe mount. Start the threads by hand and then put a few turns on with a socket and rachet.
15. With at least the innermost items 4 and 2 on the Item 20 sway bar, rotate the lower control arm onto the end of item 20. Put the outer items 2 and 4 onto the sway bar and if you have any threads exposed, start item 8. If you have no threads exposed, remove items 8, 4, and 2, and then put just 4 and 8 on and turn 8 enough to move the lower control arm further onto Item 20 sway bar. Then remove Item 8 and Item 4, install Item 2, 4 and 8 and go again, but not necessary as far as possible.
16. Now comes the tricky part, getting the new ball joint on the end of the new lower control arm into the Item 25 wheel bearing housing (strut). This is where loosening items 37 might give you enough flexibility to move the strut around a bit. I sat on a 6 ft pry bar (pipe) (on top of the lower control arm and under the subframe), behind the wheel bearing housing, and used my weight to move the lower control arm down while using my two arms to manipulate the strut over the end of the ball joint. When things look lined up, lighten up on the sway bar prying and let the ball joint go into the strut. Persuade with light taps with a rubber mallet, as needed. Be gentle.
17. Insert new item 14 and add new item 15 nut and tighten.
18. Go to the other side and repeat.
19. When both sides are in, tighten, torque and stretch the new bolts and nuts, eg. Items 11, 14 and 15, 8 and items 37 on the top (if you loosened them). Check your work.
20. Re-install the wheels and lower the car. Torque the wheel bolts to 82 lb-ft.
NOTE: IF the above didn't work for you, the problem probably would have occurred at Step 7. The solution would be to put the wheels back on, lower the car and remove Item 13 that holds the CV joint into the hub. Once the ball joint was out of the strut, removing Item 13 would provide some further flexibility to move the strut away from the lower control arm. I avoided this suggestion at the beginning because Item 13 is a single use bolt and you will need new ones (2) to complete the job. I replaced Items 32 and 36 so I removed the entire strut when I did my lower control arms.
http://12v.org/urs/FrontSuspensionTorqueValues.PDF
Last edited by UrS4boy; 02-07-2013 at 03:06 PM.


Thread
Thread Starter
Forum
Replies
Last Post
UrS4boy
Audi Original "S" Cars
0
03-13-2013 11:15 PM
topthis$A4$
A4 (B5 Platform) Discussion
10
01-09-2007 08:58 PM
CaseyH
A8 / S8 (D2 Platform) Discussion
10
01-25-2005 12:24 PM