
 08-15-2016, 12:52 PM
Last edit by: IB Advertising
See related guides and technical advice from our community experts:
- Audi A6 C5 How to Replace Oxygen Sensors<br>Step by step instructions for do-it-yourself repairs.

DIY/HOW-TO: C5 A6/B5 S4 2.7T OXYGEN (O2) SENSOR REPLACEMENT W/ PICS- MUCH REQUESTED!!
02-03-2010, 04:57 PM
#1
D.I.Y/How-To: Oxygen (O2) Sensor Replacement on Audi (C5) A6 2.7T / (B5) S4 2.7T
It is finally here! After hours of searching the forums myself for a good tutorial on how to change the Pre/Post cat O2 Sensors on a 2.7T - I was never able to come across anything but hundreds of people pleading for one - with descriptions, pictures, details, etc. Well folks, HERE YOU GO! I must say, I am happy to be the one to provide you with this information, however and like always, this must be said:
DISCLAIMER:
I, Ben C. (aka 01A6Turbo), hold no responsibility, should you (the reader of this tutorial) choose to attempt this repair work amongst yourself, without seeking the help of a professional. I hold no legal liability/responsibility should something within the event of you following my instructions cause damage or injury to yourself, your vehicle, or any other matter. I am posting this how-to tutorial as a follow guide due to a lack of available information/photographs/et. all for the Oxygen (O2) Sensor Replacement repair on the Audi (C5) A6 2.7T and Audi (B5) S4 2.7T engine models.
THE HOW-TO:
Okay, so your fuel economy has sort have been down in the dumps lately; possibly your reaching that "100k" mark Bosch claims their sensors last up to and it's time to check them; or maybe your car isn't idling/running as smooth as she was the day you purchased her; perhaps your CEL (Check Engine Light) has illuminated and you ran to your local auto store and the guy behind the counter told you one or more of your Oxygen Sensors were throwing codes and needed replaced. Well, that's why we're here! So let us start with the #1 most important thing of the day�.
Audi-Coffee.jpg?t=1265248855
MmmMmmmMmmm Have to love that Jo'!
OVERALL DIFFICULTY:
===================
On a scale 1 - 10 (10 being Audi Certification Required), I give this job a true 6 or 7.
ESTIMATED TIME OF JOB:
=====================
Approximately 3-6 hours depending on mechanical skill level, age of old sensors, ability to move about like a gymnast It personally took me 4-4.5 hours and this was my first time doing O2 Sensors.
VEHICLE PERFORMED ON IN TUTORIAL:
================================
2001 (Build Date 05/00) (C5) Audi A6 2.7L Twin-Turbo V6 30v
TOOLS NEEDED: (More or less depending on your mechanical skill level - these are the tools I personally used)
==============
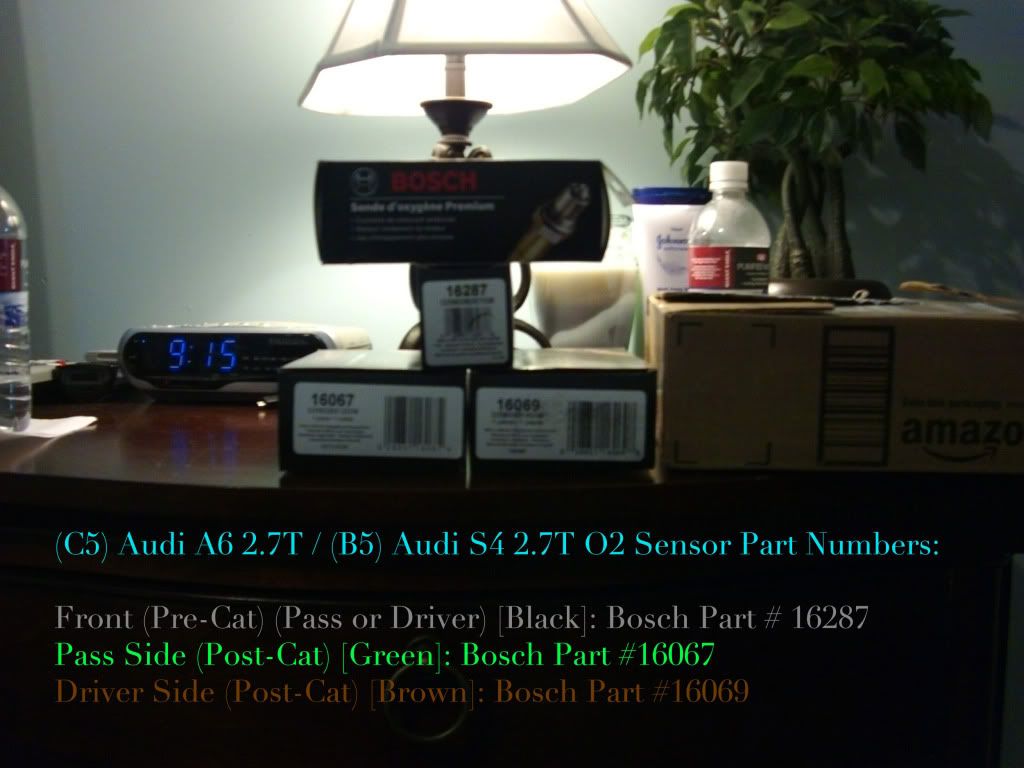
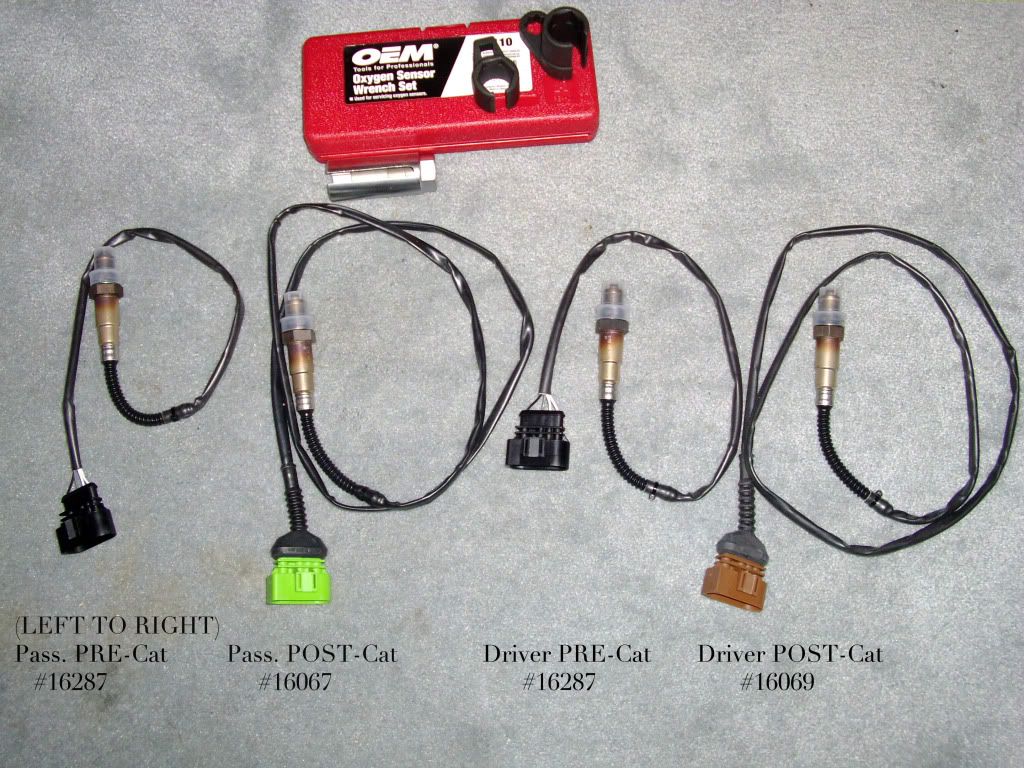
Replacement Oxygen Sensors (See photo below for part #s)
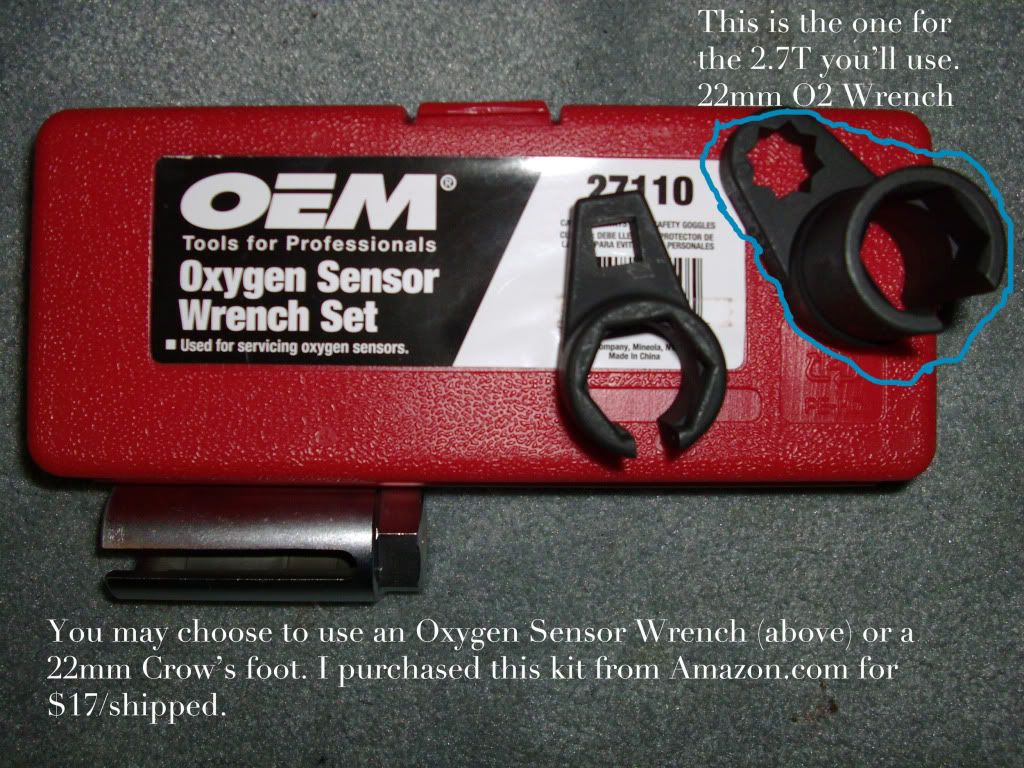
1 22mm O2 Sensor Wrench AND/OR 1 22mm Crow's Foot (solely based on preference/availability of the tool)
1 Phillips
1 Flat head screw driver
1 Can PB Blaster (or similar)
1 1/2" Ratchett
2 1/2" one (1) foot extensions (total of 2 feet)
1 Universal Socket
1 10mm Socket
1 pair of large needle nose pliers or similar (to remove MAF to Y-Pipe Accordian hose clamp)
Anti-seize
4-6 Zip Ties
Flashlight
1 Roll of very strong tape (I used USPS Shipping Tape)
1 VAG-Com AND/OR OBD II Scan Tool (if reason for this repair is CEL/Codes)
1 Pair Snips/Scissors
*** BE SURE TO DO THIS WITH A COMPLETELY COLD ENGINE ***
Tools-Needed.jpg?t=1265248914
Here are some, not ALL of the tools I used. I had to add tools as I went further into the job not really knowing exactly what I'd need. However these are the essentials to start out with!
1-O2-Sensors-Part-Numbers.jpg?t=1265248953
2-O2-Sensor-Wrench-Set.jpg?t=1265248989
3-O2-Sensors-Wrench-Set.jpg?t=1265249019
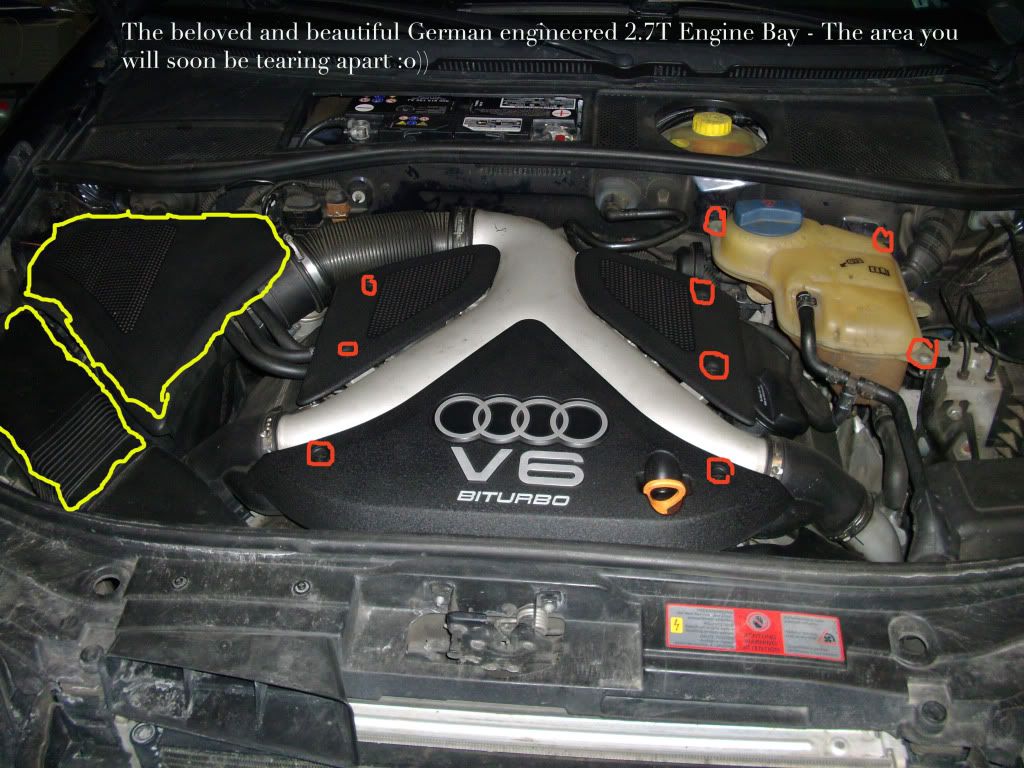
4-Engine-Bay.jpg?t=1265249047
Step 1: Remove the engine cover pieces outlined in YELLOW by hand. They simply lift up and off.
Step 2: With a Phillips screwdriver - Unscrew the pop-up plastic screws and remove the engine covers.
Step 3: Remove 3 metal screws on the coolant reservoir tank with a Phillips.
*** Step 2 & 3 Outlined in RED ***
Step 4: Once coolant reservoir is unscrewed, carefully lift tank off of metal holding plate and located the sensor wire connected to the bottom. With a flathead screwdriver, being careful not to break the clip, disconnect this sensor and move the coolant reservoir out of the way. (Side note: At this time, I also removed the black engine cover on the side of the valve cover/side of manifold. Be sure to remove the oil cap before lifting up on this cover (after unscrewing 2 pop-up plastic screws just as in Step 2 above. Replace the oil cap once cover is removed.)
*** OFF TO THE PASSENGER SIDE NOW ***
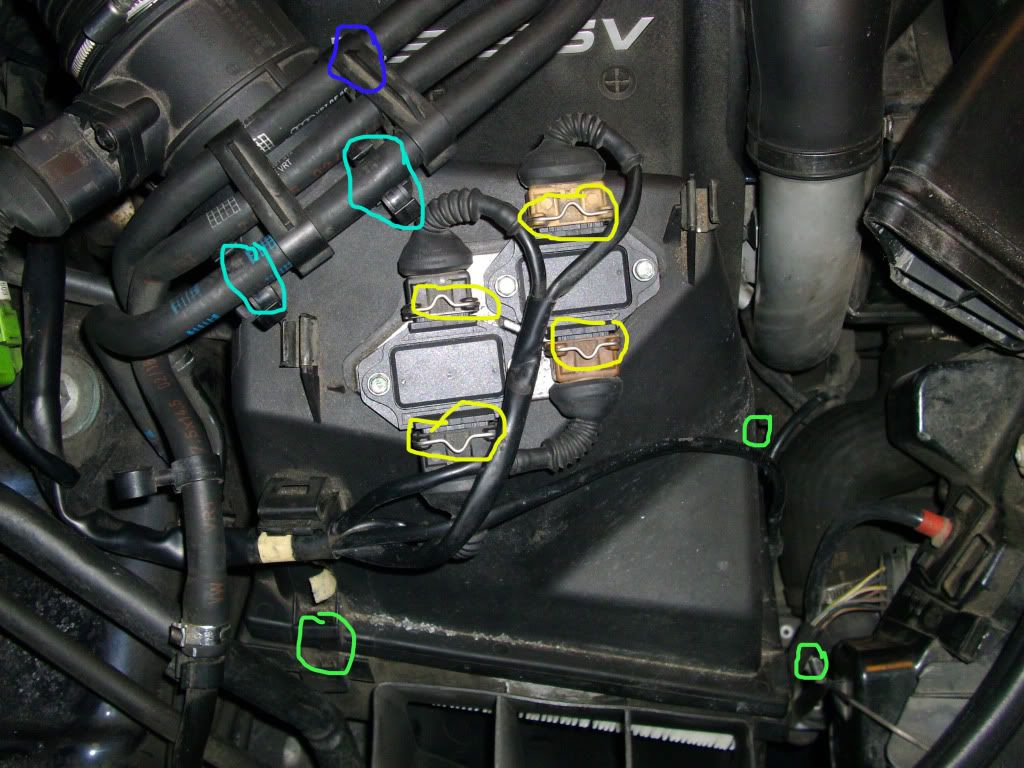
5-Airbox.jpg?t=1265249081
Step 1: Remove/unclip the four (4) connectors to your two (2) ICMs (Ignition Control Modules). (Circled in Yellow) Simply push down on metal clip and slide off connector.
Step 2: Unclip two (2) clamps connected onto your fuel lines (Circled in Cyan/Baby Blue)
Step 3: Remove MAF housing from Airbox (Circled in Dark Blue) - there are two of these clips directly Left & Right from each other. Don't lose the O-Ring inside!
Step 4: Unclamp the Airbox's clamps (4) that connect the Top & Bottom of the Airbox together (Circled in Lime Green). The 4th is on the MAF housing corning, down below. Hard to reach.
Step 5: Now with your large pliers (or similar tool), remove the accordion hose from the silver Y-pipe. Squeeze the clamp together and it will open up, allowing you to slide off the hose.
Next to the accordion hose, this is where you will now see three (3) of your four (4) connector harnesses with connectors for the Oxygen Sensors.
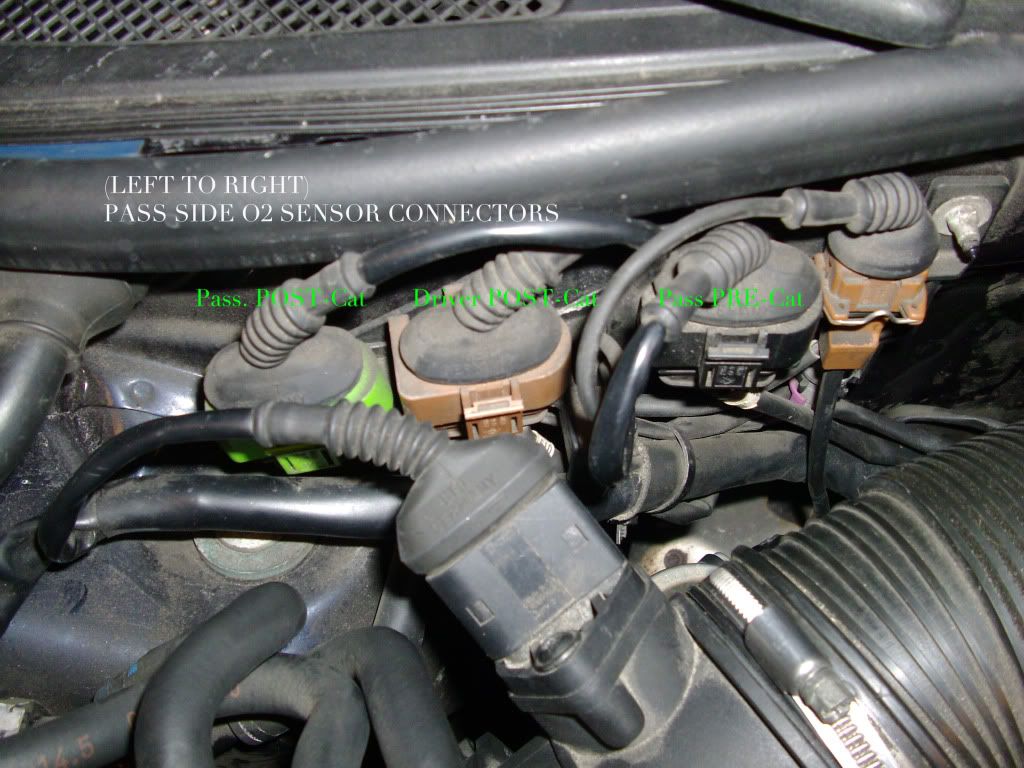
6-O2-Connectors-Pass-Side.jpg?t=1265249181
*** REMOVING Y-PIPE ***
If you are like me and do not have any spare 1-time clamps lying around, I came up with another method to remove the Y-Pipe and never have to worry about tampering with those clamps.
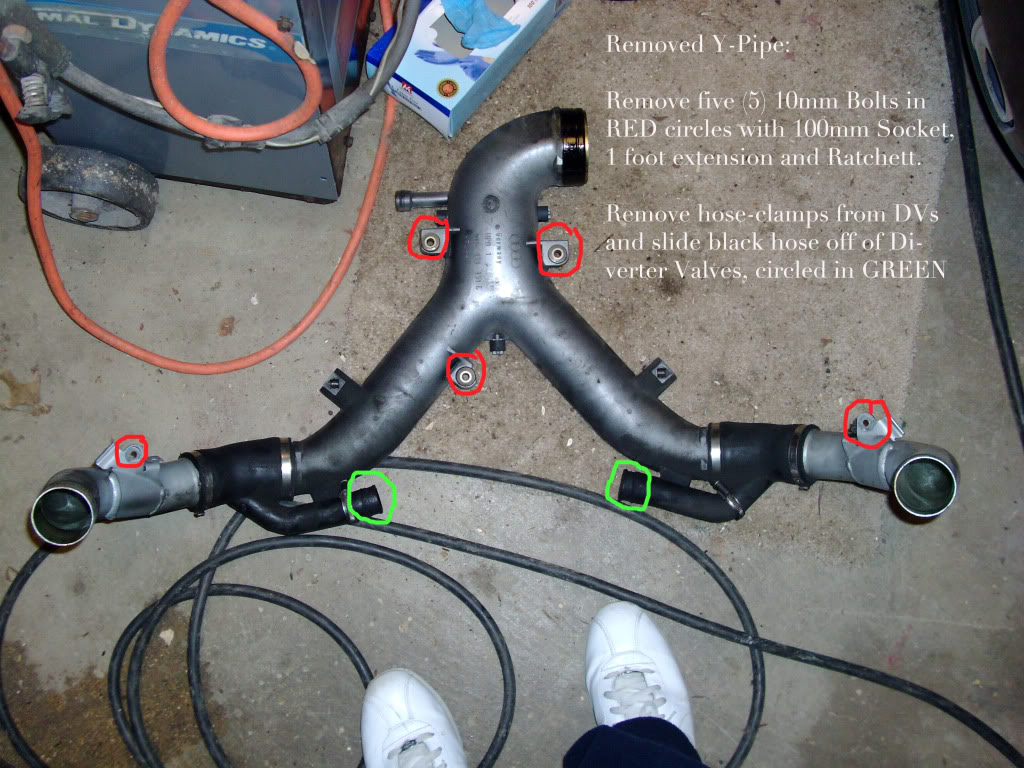
Step 1: Remove three (3) 10mm bolts located near the rear of the Y-Pipe, near where you just removed the accordion hose. Next, follow the Y-Pipe down to where it splits and heads down the side of the manifold. Next to your Coil packs 1 & 4 (near the front of the engine) you will see two more 10mm bolts. Remove these. All necessary bolts to be removed are circled in RED in the above photo.
Step 2: Head back to the rear of the Y-Pipe and you will see part of the Spyder hose assembly connected to a little off branch next to the curve in the pipe. It is black and plastic. Squeeze down on the top and bottom of this and pull it off.
Step 3: If you have already replaced your DVs (Diverter Valves), you probably already have reusable hose-clamps installed. Using a flat head screw driver, loosen these hose-clamps and remove the black tubing from the Y-Pipe, from the DV. (Circled in GREEN in the above photo).
Your Y-Pipe should now be free to be removed. Your engine should now look like my photo below.
IMPORTANT: TO ENSURE NO DIRT/DEBRI/ETC GETS INTO ANY UNWANTED PLACES, USE CLEAN SHOP RAGS AND COVER OF HOLES OF THE PIPING YOU JUST EXPOSED FROM REMOVING THE Y-PIPE!!
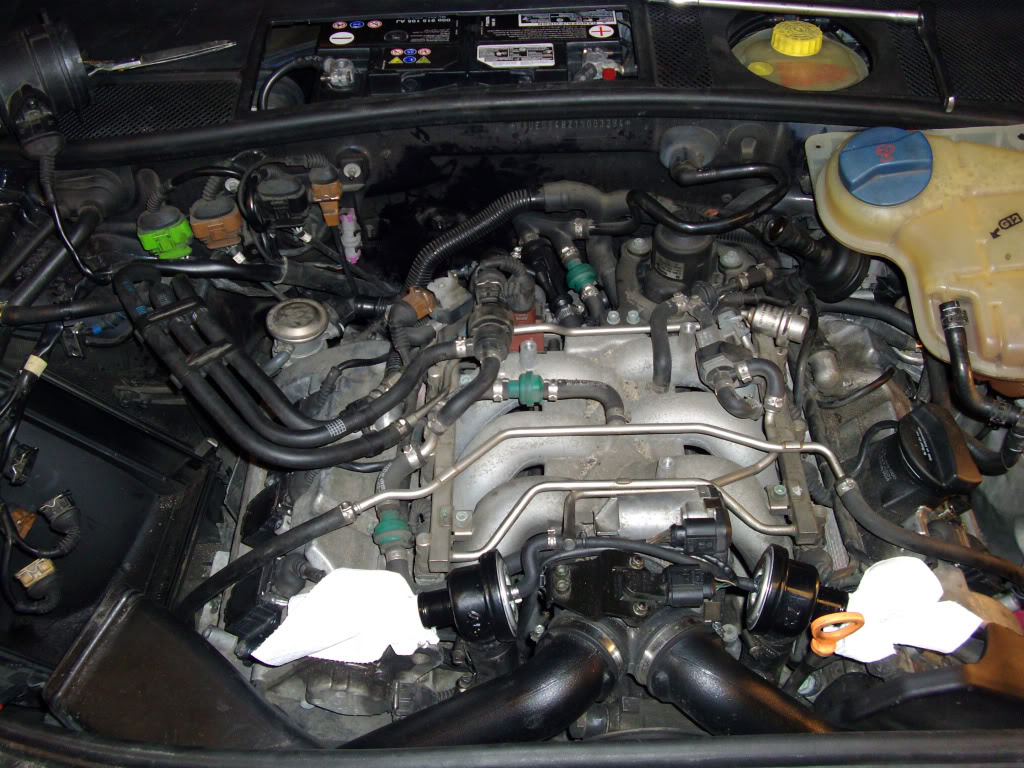
Now that you have everything needed to be removed out of the way (Coolant reservoir, Air box, MAF housing, Accordion hose, Y-Pipe), using your flashlight you should be able to see the passenger and driver side O2 sensors. First we will go over the passenger side as it is easier to remove then the driver side.


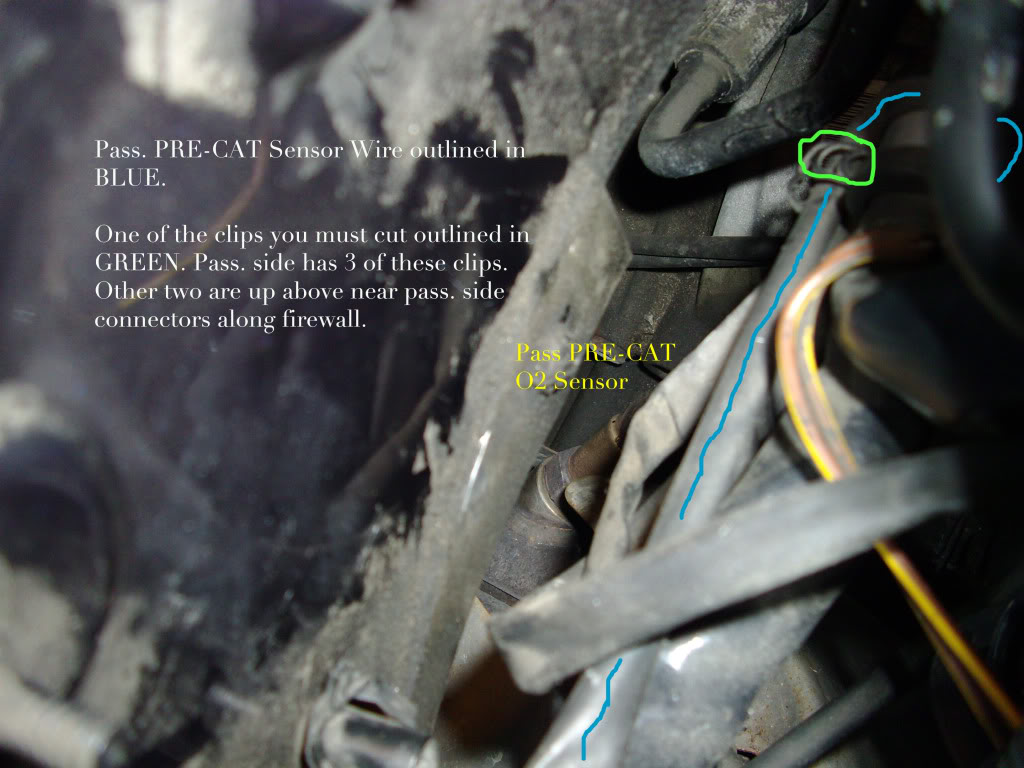
Remove the Passenger Side Pre-Cat Connector from its retaining harness by sliding it forward and out. Once removed from the harness, depress the two clips and slide the two connectors apart shown below:
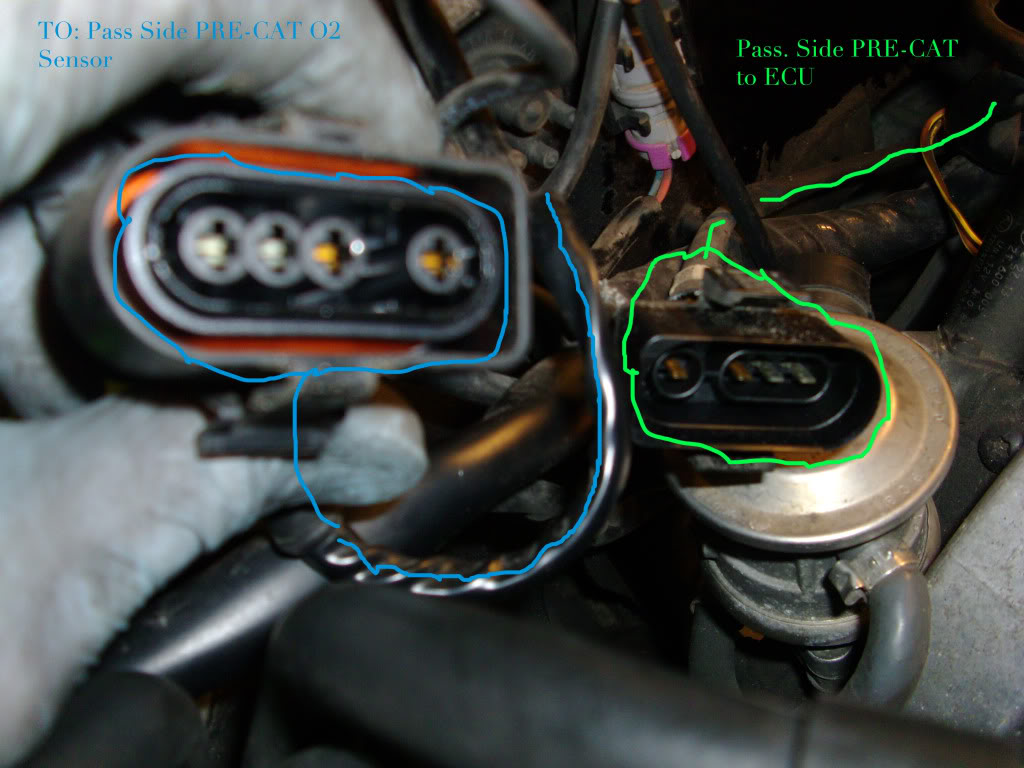
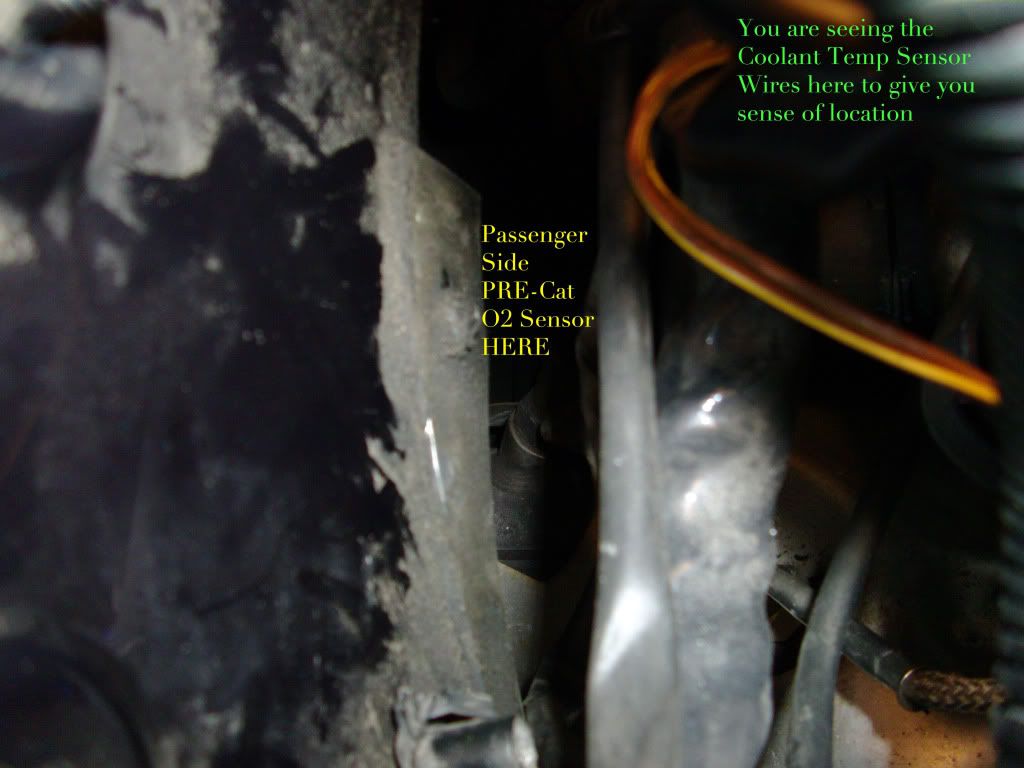
Spray and SOAK that baby with PB blaster. The angle is a little hard, but after a few short, gentle sprays, you'll be able to determine exactly how to spray it where the sensor meets the bung of the CAT. Allow it to soak for 10-15 minutes if your sensors are older (mine had 115k miles on them. They weren't going anywhere!) You may want to repeat this step a few times depending on age.
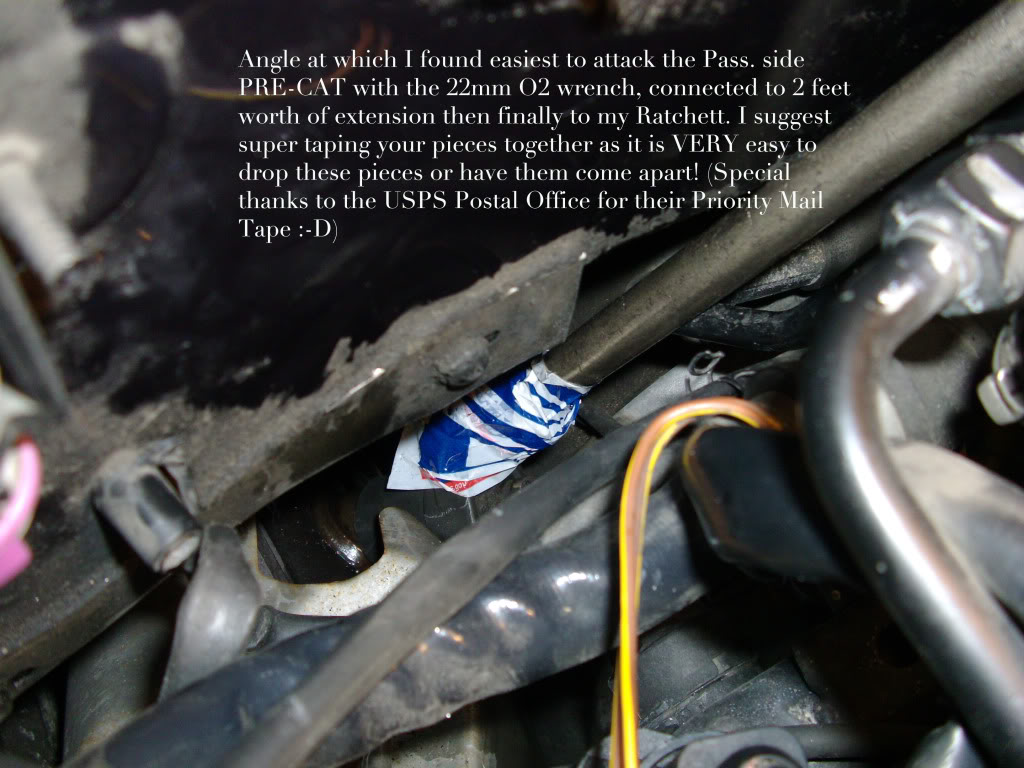
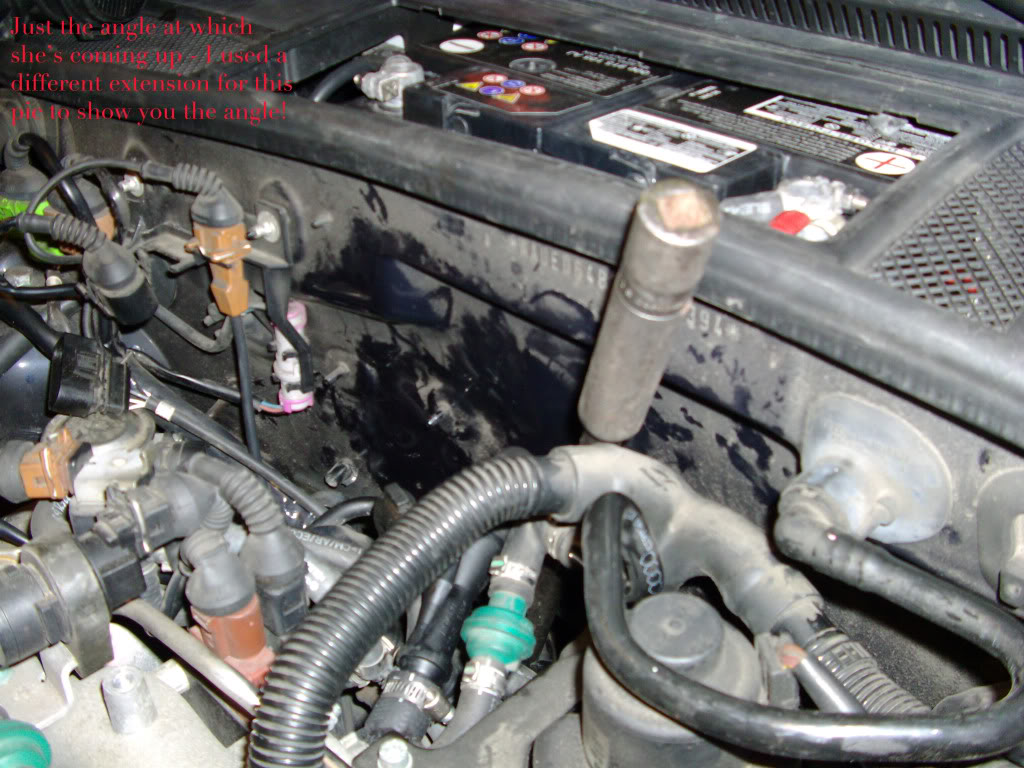
Now with your rig'd tool (O2 wrench, Universal, 2 foot extension, ratchet) that is securely taped/tied together (you do NOT want to drop anything down below and at this angle, it is very easy to lose your O2 wrench/crow's foot! Better to be safe than sorry!)) slide it over the O2 sensor wire and down onto the sensor. If you aren't able to loosen the sensor with some elbow grease/muscle, try the old mechanic's method of tightening first, then loosening. Or you may try what I did and get a rubber hammer and pound away at the ratchet knocking her loose. It is easier said than done, be warned! To get off my passenger pre-cat, I probably fought with it for a good hour or so!! Once she comes loose, reach down and hand loosen her off. Your retaining clips should already be cut - just pull the sensor up and out.
Apply anti-seize to the threads of the new sensor, reach down and hand tighten her. Be careful not to twist the wires of the new sensor while doing so! I used my left hand to turn the wires as I tightened the sensor with my right hand. Get your rig tool again and give her a good nice tighten - doesn't have to be extremely tight, you don't want to fight her as much next time as you did this time if she needs to be replaced again! Re-thread the wire the way you feel is best, applying zip ties along the way. Try to stick to the OEM setup for best results. Attach the new connector-sensor end with the connector-ECU end, reinsert both connectors into their appropriate harness and congratulations, you are now done with the passenger side!
Now onto the PITA driver side. We do not lie about this�this sensor, due to it's angle and limited availability on the 2.7L engine puts the ITCH in BITCH. ROTFL.
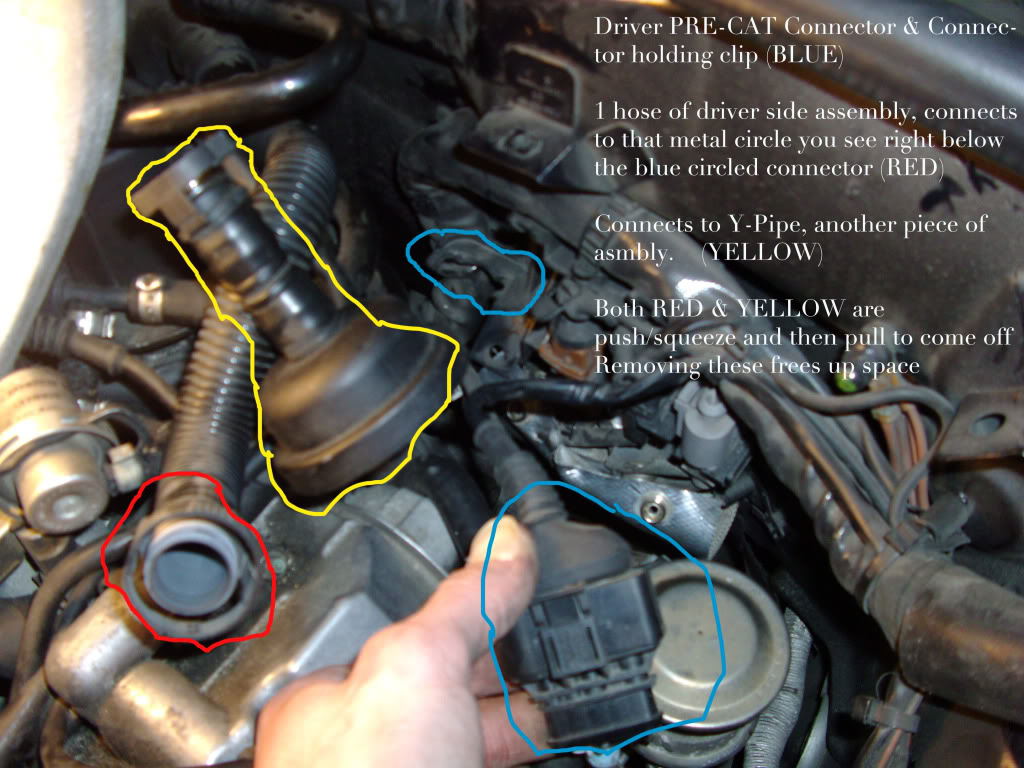
Sorry the picture is out of place but this (circled in YELLOW and RED) are the pieces of the Spyder assembly I was referring to above that were disconnected.

The hardest part of removing the driver side O2 Sensor is it's angle. If it wasn't for that, it wouldn't be so bad. However, I, as well as many others, agree it is best to approach it from the passenger side of the engine bay, using your 2 foot extension, universal socket and O2 wrench/crow's foot. This sensor honestly took me a good 2-2.5 hours to get off! It got drenched in PB blaster for 20 minutes at a time, for about 5 times! I honestly kicked, cussed, cursed and threw a tantrum trying to get that sucker out. Do some breathing exercises to calm yourself before attempting this one! loll
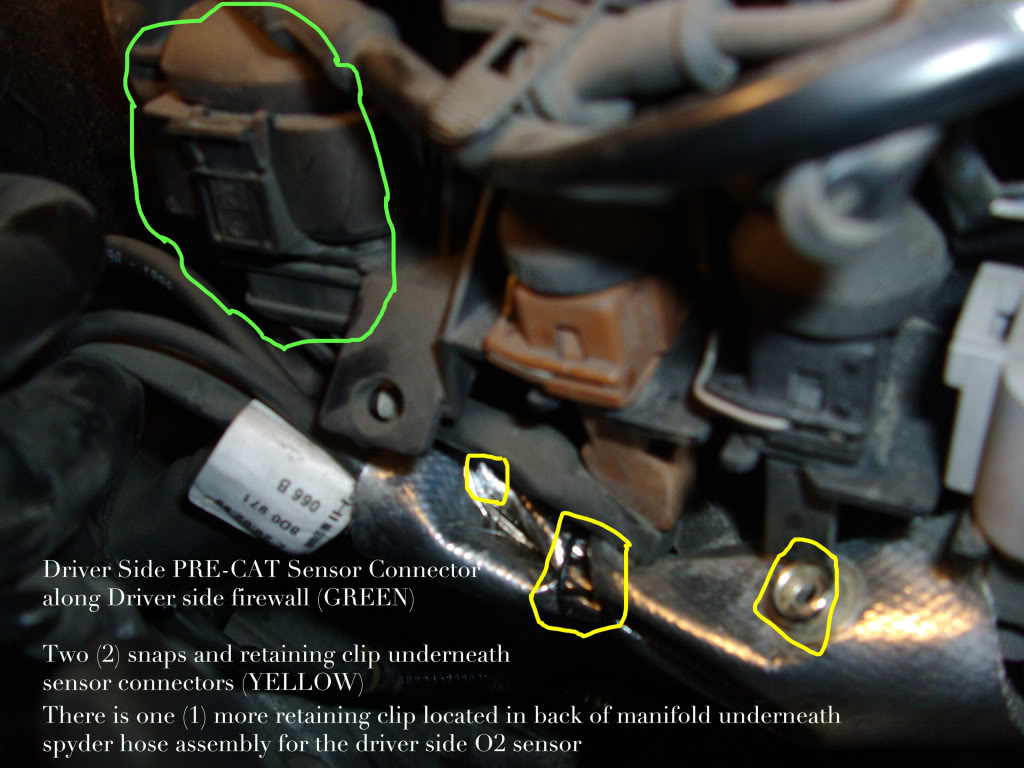
This side is done the same as the passenger although below the connector you have a heat shield with two buttons that needs released, and 2 retaining clips that need cut. Once loosened with the wrench/crow's, again, hand loosen the rest, and carefully pull the old sensor out. Anti-seize the threads on the new sensor, hand tighten her down, then grab your wrench/crow's, like the passenger, tighten her down, rethread your wires, applying zip ties in factory location or some where close to, connect the sensor connector with the ECU connector, reinsert into the harness housing and give yourself a great big pat on the back! The two hardest sensors are complete.
As most here say - reinstall everything in the reverse order. Again, congratulations on a job well done!!!
Last thing's, last. If your old O2's were throwing a code, hook up your VAG-Com/OBD II Scan Tool, erase the code(s) and remember to take her on a drive cycle so the ECU can relearn all of it's 9 categories with the new sensors! Even if you weren't throwing codes, this is still a good step to complete.
Now, even though I have not done my post-cat's (I ordered them at the same time to have them as back-up, plus got a wonderful deal on them from amazon.com - but I will worry about doing these when the weather is a bit more kind.) the process is the exact same - only EASIER!! I bet that put a smile on your face. The only difference being these are located after the cat-converter and must be attained from underneath the vehicle. If you are doing these at the same time as your PRE's, just add a jack lift and two jack stands to your list of tools needed. PLEASE if you are unfamiliar with the proper way of lifting a car, refer to your OEM Manual AND/OR the Bentley Publisher's manual. Always secure ANY vehicle with the parking brake applied, blocks in front of/behind of the rear tires and ensure that the vehicle is safe and sturdy before EVER climbing underneath one.
I truly and honestly hope this HOW-TO Tutorial has and will help many of you in the future. I have just spent the last 2.5 hours preparing the pictures, and writing this tutorial - I thank all of you that has ever helped me in the past and am always happy to provide back to our little community of Audi Worlders
Good Luck & God Bless!
- Ben - (01A6Turbo)
It is finally here! After hours of searching the forums myself for a good tutorial on how to change the Pre/Post cat O2 Sensors on a 2.7T - I was never able to come across anything but hundreds of people pleading for one - with descriptions, pictures, details, etc. Well folks, HERE YOU GO! I must say, I am happy to be the one to provide you with this information, however and like always, this must be said:
DISCLAIMER:
I, Ben C. (aka 01A6Turbo), hold no responsibility, should you (the reader of this tutorial) choose to attempt this repair work amongst yourself, without seeking the help of a professional. I hold no legal liability/responsibility should something within the event of you following my instructions cause damage or injury to yourself, your vehicle, or any other matter. I am posting this how-to tutorial as a follow guide due to a lack of available information/photographs/et. all for the Oxygen (O2) Sensor Replacement repair on the Audi (C5) A6 2.7T and Audi (B5) S4 2.7T engine models.
THE HOW-TO:
Okay, so your fuel economy has sort have been down in the dumps lately; possibly your reaching that "100k" mark Bosch claims their sensors last up to and it's time to check them; or maybe your car isn't idling/running as smooth as she was the day you purchased her; perhaps your CEL (Check Engine Light) has illuminated and you ran to your local auto store and the guy behind the counter told you one or more of your Oxygen Sensors were throwing codes and needed replaced. Well, that's why we're here! So let us start with the #1 most important thing of the day�.
Audi-Coffee.jpg?t=1265248855
MmmMmmmMmmm Have to love that Jo'!
OVERALL DIFFICULTY:
===================
On a scale 1 - 10 (10 being Audi Certification Required), I give this job a true 6 or 7.
ESTIMATED TIME OF JOB:
=====================
Approximately 3-6 hours depending on mechanical skill level, age of old sensors, ability to move about like a gymnast
It personally took me 4-4.5 hours and this was my first time doing O2 Sensors.VEHICLE PERFORMED ON IN TUTORIAL:
================================
2001 (Build Date 05/00) (C5) Audi A6 2.7L Twin-Turbo V6 30v
TOOLS NEEDED: (More or less depending on your mechanical skill level - these are the tools I personally used)
==============
Replacement Oxygen Sensors (See photo below for part #s)
1 22mm O2 Sensor Wrench AND/OR 1 22mm Crow's Foot (solely based on preference/availability of the tool)
1 Phillips
1 Flat head screw driver
1 Can PB Blaster (or similar)
1 1/2" Ratchett
2 1/2" one (1) foot extensions (total of 2 feet)
1 Universal Socket
1 10mm Socket
1 pair of large needle nose pliers or similar (to remove MAF to Y-Pipe Accordian hose clamp)
Anti-seize
4-6 Zip Ties
Flashlight
1 Roll of very strong tape (I used USPS Shipping Tape)
1 VAG-Com AND/OR OBD II Scan Tool (if reason for this repair is CEL/Codes)
1 Pair Snips/Scissors
*** BE SURE TO DO THIS WITH A COMPLETELY COLD ENGINE ***
Tools-Needed.jpg?t=1265248914
Here are some, not ALL of the tools I used. I had to add tools as I went further into the job not really knowing exactly what I'd need. However these are the essentials to start out with!
1-O2-Sensors-Part-Numbers.jpg?t=1265248953
2-O2-Sensor-Wrench-Set.jpg?t=1265248989
3-O2-Sensors-Wrench-Set.jpg?t=1265249019
4-Engine-Bay.jpg?t=1265249047
Step 1: Remove the engine cover pieces outlined in YELLOW by hand. They simply lift up and off.
Step 2: With a Phillips screwdriver - Unscrew the pop-up plastic screws and remove the engine covers.
Step 3: Remove 3 metal screws on the coolant reservoir tank with a Phillips.
*** Step 2 & 3 Outlined in RED ***
Step 4: Once coolant reservoir is unscrewed, carefully lift tank off of metal holding plate and located the sensor wire connected to the bottom. With a flathead screwdriver, being careful not to break the clip, disconnect this sensor and move the coolant reservoir out of the way. (Side note: At this time, I also removed the black engine cover on the side of the valve cover/side of manifold. Be sure to remove the oil cap before lifting up on this cover (after unscrewing 2 pop-up plastic screws just as in Step 2 above. Replace the oil cap once cover is removed.)
*** OFF TO THE PASSENGER SIDE NOW ***
5-Airbox.jpg?t=1265249081
Step 1: Remove/unclip the four (4) connectors to your two (2) ICMs (Ignition Control Modules). (Circled in Yellow) Simply push down on metal clip and slide off connector.
Step 2: Unclip two (2) clamps connected onto your fuel lines (Circled in Cyan/Baby Blue)
Step 3: Remove MAF housing from Airbox (Circled in Dark Blue) - there are two of these clips directly Left & Right from each other. Don't lose the O-Ring inside!
Step 4: Unclamp the Airbox's clamps (4) that connect the Top & Bottom of the Airbox together (Circled in Lime Green). The 4th is on the MAF housing corning, down below. Hard to reach.
Step 5: Now with your large pliers (or similar tool), remove the accordion hose from the silver Y-pipe. Squeeze the clamp together and it will open up, allowing you to slide off the hose.
Next to the accordion hose, this is where you will now see three (3) of your four (4) connector harnesses with connectors for the Oxygen Sensors.
6-O2-Connectors-Pass-Side.jpg?t=1265249181
*** REMOVING Y-PIPE ***
If you are like me and do not have any spare 1-time clamps lying around, I came up with another method to remove the Y-Pipe and never have to worry about tampering with those clamps.
Step 1: Remove three (3) 10mm bolts located near the rear of the Y-Pipe, near where you just removed the accordion hose. Next, follow the Y-Pipe down to where it splits and heads down the side of the manifold. Next to your Coil packs 1 & 4 (near the front of the engine) you will see two more 10mm bolts. Remove these. All necessary bolts to be removed are circled in RED in the above photo.
Step 2: Head back to the rear of the Y-Pipe and you will see part of the Spyder hose assembly connected to a little off branch next to the curve in the pipe. It is black and plastic. Squeeze down on the top and bottom of this and pull it off.
Step 3: If you have already replaced your DVs (Diverter Valves), you probably already have reusable hose-clamps installed. Using a flat head screw driver, loosen these hose-clamps and remove the black tubing from the Y-Pipe, from the DV. (Circled in GREEN in the above photo).
Your Y-Pipe should now be free to be removed. Your engine should now look like my photo below.
IMPORTANT: TO ENSURE NO DIRT/DEBRI/ETC GETS INTO ANY UNWANTED PLACES, USE CLEAN SHOP RAGS AND COVER OF HOLES OF THE PIPING YOU JUST EXPOSED FROM REMOVING THE Y-PIPE!!
Now that you have everything needed to be removed out of the way (Coolant reservoir, Air box, MAF housing, Accordion hose, Y-Pipe), using your flashlight you should be able to see the passenger and driver side O2 sensors. First we will go over the passenger side as it is easier to remove then the driver side.
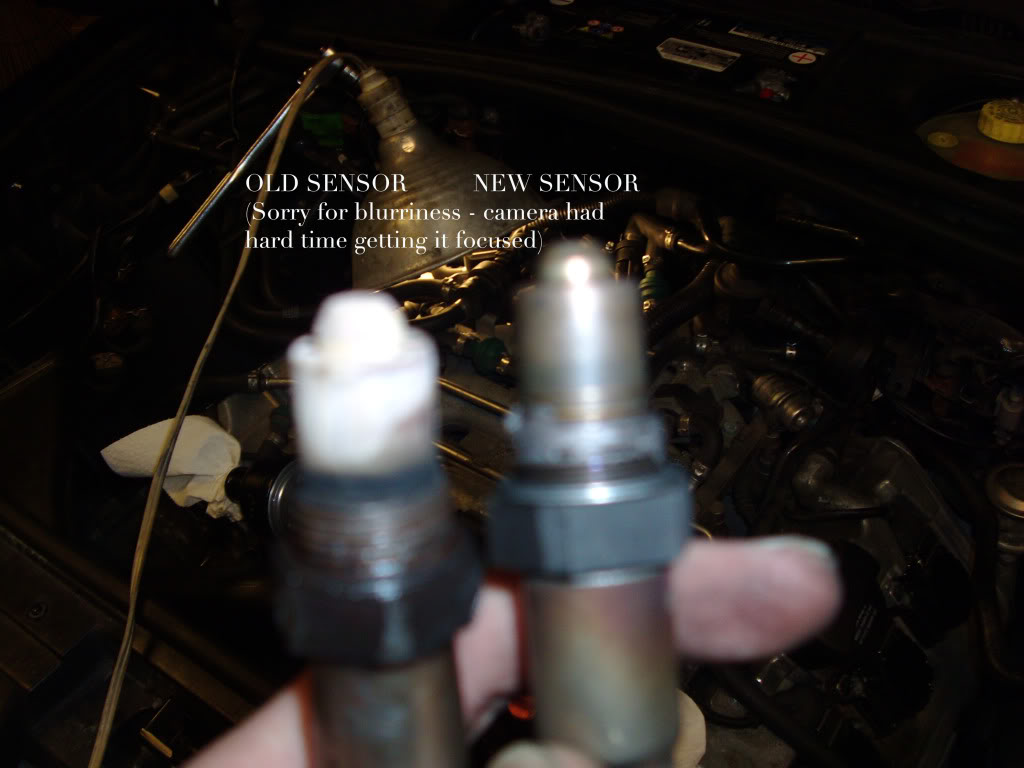
Remove the Passenger Side Pre-Cat Connector from its retaining harness by sliding it forward and out. Once removed from the harness, depress the two clips and slide the two connectors apart shown below:
Spray and SOAK that baby with PB blaster. The angle is a little hard, but after a few short, gentle sprays, you'll be able to determine exactly how to spray it where the sensor meets the bung of the CAT. Allow it to soak for 10-15 minutes if your sensors are older (mine had 115k miles on them. They weren't going anywhere!) You may want to repeat this step a few times depending on age.
Now with your rig'd tool (O2 wrench, Universal, 2 foot extension, ratchet) that is securely taped/tied together (you do NOT want to drop anything down below and at this angle, it is very easy to lose your O2 wrench/crow's foot! Better to be safe than sorry!)) slide it over the O2 sensor wire and down onto the sensor. If you aren't able to loosen the sensor with some elbow grease/muscle, try the old mechanic's method of tightening first, then loosening. Or you may try what I did and get a rubber hammer and pound away at the ratchet knocking her loose. It is easier said than done, be warned! To get off my passenger pre-cat, I probably fought with it for a good hour or so!! Once she comes loose, reach down and hand loosen her off. Your retaining clips should already be cut - just pull the sensor up and out.
Apply anti-seize to the threads of the new sensor, reach down and hand tighten her. Be careful not to twist the wires of the new sensor while doing so! I used my left hand to turn the wires as I tightened the sensor with my right hand. Get your rig tool again and give her a good nice tighten - doesn't have to be extremely tight, you don't want to fight her as much next time as you did this time if she needs to be replaced again! Re-thread the wire the way you feel is best, applying zip ties along the way. Try to stick to the OEM setup for best results. Attach the new connector-sensor end with the connector-ECU end, reinsert both connectors into their appropriate harness and congratulations, you are now done with the passenger side!
Now onto the PITA driver side. We do not lie about this�this sensor, due to it's angle and limited availability on the 2.7L engine puts the ITCH in BITCH. ROTFL.
Sorry the picture is out of place but this (circled in YELLOW and RED) are the pieces of the Spyder assembly I was referring to above that were disconnected.
The hardest part of removing the driver side O2 Sensor is it's angle. If it wasn't for that, it wouldn't be so bad. However, I, as well as many others, agree it is best to approach it from the passenger side of the engine bay, using your 2 foot extension, universal socket and O2 wrench/crow's foot. This sensor honestly took me a good 2-2.5 hours to get off! It got drenched in PB blaster for 20 minutes at a time, for about 5 times! I honestly kicked, cussed, cursed and threw a tantrum trying to get that sucker out. Do some breathing exercises to calm yourself before attempting this one! loll
This side is done the same as the passenger although below the connector you have a heat shield with two buttons that needs released, and 2 retaining clips that need cut. Once loosened with the wrench/crow's, again, hand loosen the rest, and carefully pull the old sensor out. Anti-seize the threads on the new sensor, hand tighten her down, then grab your wrench/crow's, like the passenger, tighten her down, rethread your wires, applying zip ties in factory location or some where close to, connect the sensor connector with the ECU connector, reinsert into the harness housing and give yourself a great big pat on the back! The two hardest sensors are complete.
As most here say - reinstall everything in the reverse order. Again, congratulations on a job well done!!!
Last thing's, last. If your old O2's were throwing a code, hook up your VAG-Com/OBD II Scan Tool, erase the code(s) and remember to take her on a drive cycle so the ECU can relearn all of it's 9 categories with the new sensors! Even if you weren't throwing codes, this is still a good step to complete.
Now, even though I have not done my post-cat's (I ordered them at the same time to have them as back-up, plus got a wonderful deal on them from amazon.com - but I will worry about doing these when the weather is a bit more kind.) the process is the exact same - only EASIER!! I bet that put a smile on your face. The only difference being these are located after the cat-converter and must be attained from underneath the vehicle. If you are doing these at the same time as your PRE's, just add a jack lift and two jack stands to your list of tools needed. PLEASE if you are unfamiliar with the proper way of lifting a car, refer to your OEM Manual AND/OR the Bentley Publisher's manual. Always secure ANY vehicle with the parking brake applied, blocks in front of/behind of the rear tires and ensure that the vehicle is safe and sturdy before EVER climbing underneath one.
I truly and honestly hope this HOW-TO Tutorial has and will help many of you in the future. I have just spent the last 2.5 hours preparing the pictures, and writing this tutorial - I thank all of you that has ever helped me in the past and am always happy to provide back to our little community of Audi Worlders
Good Luck & God Bless!
- Ben - (01A6Turbo)
Last edited by 01A6Turbo; 02-03-2010 at 06:04 PM.

The following 2 users liked this post by 01A6Turbo:
Call Me Turbo (11-12-2022),
KMTSME (12-06-2021)
 02-03-2010, 09:10 PM
#3
AudiWorld Super User

Join Date: Nov 2004
Posts: 2,251
Likes: 0
Received 0 Likes
on
0 Posts
BTDT! And the driver's side is a total PITA! The key for the driver's side is removing/unplugging everything you described especially the heat shield. o2 sensors, a bitch but it can be done.
02-04-2010, 12:53 PM
#4
02-04-2010, 08:43 PM
#5
AudiWorld Senior Member

Join Date: Sep 2002
Posts: 1,188
Likes: 0
Received 0 Likes
on
0 Posts
Drivers o2 is an amazing PITA! I wonder how the ecs tool would work?
http://www.ecstuning.com/Audi-C5_A6-...ical/ES240942/
http://www.ecstuning.com/Audi-C5_A6-...ical/ES240942/
02-05-2010, 12:03 PM
#7
AudiWorld Senior Member
Join Date: Sep 2002
Posts: 1,188
Likes: 0
Received 0 Likes
on
0 Posts
Haha! Same for me...Taped like 6 socket pieces together(Oh and a magnet on a stick for when a piece falls off!). I would pay $30 for it, if it worked.
Trending Topics
03-27-2010, 11:53 AM
#8

D.I.Y/How-To: Oxygen (O2) Sensor Replacement on Audi (C5) A6 2.7T / (B5) S4 2.7T
It is finally here! After hours of searching the forums myself for a good tutorial on how to change the Pre/Post cat O2 Sensors on a 2.7T - I was never able to come across anything but hundreds of people pleading for one - with descriptions, pictures, details, etc. Well folks, HERE YOU GO! I must say, I am happy to be the one to provide you with this information, however and like always, this must be said:
DISCLAIMER:
I, Ben C. (aka 01A6Turbo), hold no responsibility, should you (the reader of this tutorial) choose to attempt this repair work amongst yourself, without seeking the help of a professional. I hold no legal liability/responsibility should something within the event of you following my instructions cause damage or injury to yourself, your vehicle, or any other matter. I am posting this how-to tutorial as a follow guide due to a lack of available information/photographs/et. all for the Oxygen (O2) Sensor Replacement repair on the Audi (C5) A6 2.7T and Audi (B5) S4 2.7T engine models.
THE HOW-TO:
Okay, so your fuel economy has sort have been down in the dumps lately; possibly your reaching that "100k" mark Bosch claims their sensors last up to and it's time to check them; or maybe your car isn't idling/running as smooth as she was the day you purchased her; perhaps your CEL (Check Engine Light) has illuminated and you ran to your local auto store and the guy behind the counter told you one or more of your Oxygen Sensors were throwing codes and needed replaced. Well, that's why we're here! So let us start with the #1 most important thing of the day�.

MmmMmmmMmmm Have to love that Jo'!
OVERALL DIFFICULTY:
===================
On a scale 1 - 10 (10 being Audi Certification Required), I give this job a true 6 or 7.
ESTIMATED TIME OF JOB:
=====================
Approximately 3-6 hours depending on mechanical skill level, age of old sensors, ability to move about like a gymnast It personally took me 4-4.5 hours and this was my first time doing O2 Sensors.
VEHICLE PERFORMED ON IN TUTORIAL:
================================
2001 (Build Date 05/00) (C5) Audi A6 2.7L Twin-Turbo V6 30v
TOOLS NEEDED: (More or less depending on your mechanical skill level - these are the tools I personally used)
==============
Replacement Oxygen Sensors (See photo below for part #s)
1 22mm O2 Sensor Wrench AND/OR 1 22mm Crow's Foot (solely based on preference/availability of the tool)
1 Phillips
1 Flat head screw driver
1 Can PB Blaster (or similar)
1 1/2" Ratchett
2 1/2" one (1) foot extensions (total of 2 feet)
1 Universal Socket
1 10mm Socket
1 pair of large needle nose pliers or similar (to remove MAF to Y-Pipe Accordian hose clamp)
Anti-seize
4-6 Zip Ties
Flashlight
1 Roll of very strong tape (I used USPS Shipping Tape)
1 VAG-Com AND/OR OBD II Scan Tool (if reason for this repair is CEL/Codes)
1 Pair Snips/Scissors
*** BE SURE TO DO THIS WITH A COMPLETELY COLD ENGINE ***

Here are some, not ALL of the tools I used. I had to add tools as I went further into the job not really knowing exactly what I'd need. However these are the essentials to start out with!
Step 1: Remove the engine cover pieces outlined in YELLOW by hand. They simply lift up and off.
Step 2: With a Phillips screwdriver - Unscrew the pop-up plastic screws and remove the engine covers.
Step 3: Remove 3 metal screws on the coolant reservoir tank with a Phillips.
*** Step 2 & 3 Outlined in RED ***
Step 4: Once coolant reservoir is unscrewed, carefully lift tank off of metal holding plate and located the sensor wire connected to the bottom. With a flathead screwdriver, being careful not to break the clip, disconnect this sensor and move the coolant reservoir out of the way. (Side note: At this time, I also removed the black engine cover on the side of the valve cover/side of manifold. Be sure to remove the oil cap before lifting up on this cover (after unscrewing 2 pop-up plastic screws just as in Step 2 above. Replace the oil cap once cover is removed.)
*** OFF TO THE PASSENGER SIDE NOW ***
Step 1: Remove/unclip the four (4) connectors to your two (2) ICMs (Ignition Control Modules). (Circled in Yellow) Simply push down on metal clip and slide off connector.
Step 2: Unclip two (2) clamps connected onto your fuel lines (Circled in Cyan/Baby Blue)
Step 3: Remove MAF housing from Airbox (Circled in Dark Blue) - there are two of these clips directly Left & Right from each other. Don't lose the O-Ring inside!
Step 4: Unclamp the Airbox's clamps (4) that connect the Top & Bottom of the Airbox together (Circled in Lime Green). The 4th is on the MAF housing corning, down below. Hard to reach.
Step 5: Now with your large pliers (or similar tool), remove the accordion hose from the silver Y-pipe. Squeeze the clamp together and it will open up, allowing you to slide off the hose.
Next to the accordion hose, this is where you will now see three (3) of your four (4) connector harnesses with connectors for the Oxygen Sensors.
*** REMOVING Y-PIPE ***
If you are like me and do not have any spare 1-time clamps lying around, I came up with another method to remove the Y-Pipe and never have to worry about tampering with those clamps.

Step 1: Remove three (3) 10mm bolts located near the rear of the Y-Pipe, near where you just removed the accordion hose. Next, follow the Y-Pipe down to where it splits and heads down the side of the manifold. Next to your Coil packs 1 & 4 (near the front of the engine) you will see two more 10mm bolts. Remove these. All necessary bolts to be removed are circled in RED in the above photo.
Step 2: Head back to the rear of the Y-Pipe and you will see part of the Spyder hose assembly connected to a little off branch next to the curve in the pipe. It is black and plastic. Squeeze down on the top and bottom of this and pull it off.
Step 3: If you have already replaced your DVs (Diverter Valves), you probably already have reusable hose-clamps installed. Using a flat head screw driver, loosen these hose-clamps and remove the black tubing from the Y-Pipe, from the DV. (Circled in GREEN in the above photo).
Your Y-Pipe should now be free to be removed. Your engine should now look like my photo below.
IMPORTANT: TO ENSURE NO DIRT/DEBRI/ETC GETS INTO ANY UNWANTED PLACES, USE CLEAN SHOP RAGS AND COVER OF HOLES OF THE PIPING YOU JUST EXPOSED FROM REMOVING THE Y-PIPE!!

Now that you have everything needed to be removed out of the way (Coolant reservoir, Air box, MAF housing, Accordion hose, Y-Pipe), using your flashlight you should be able to see the passenger and driver side O2 sensors. First we will go over the passenger side as it is easier to remove then the driver side.


Remove the Passenger Side Pre-Cat Connector from its retaining harness by sliding it forward and out. Once removed from the harness, depress the two clips and slide the two connectors apart shown below:
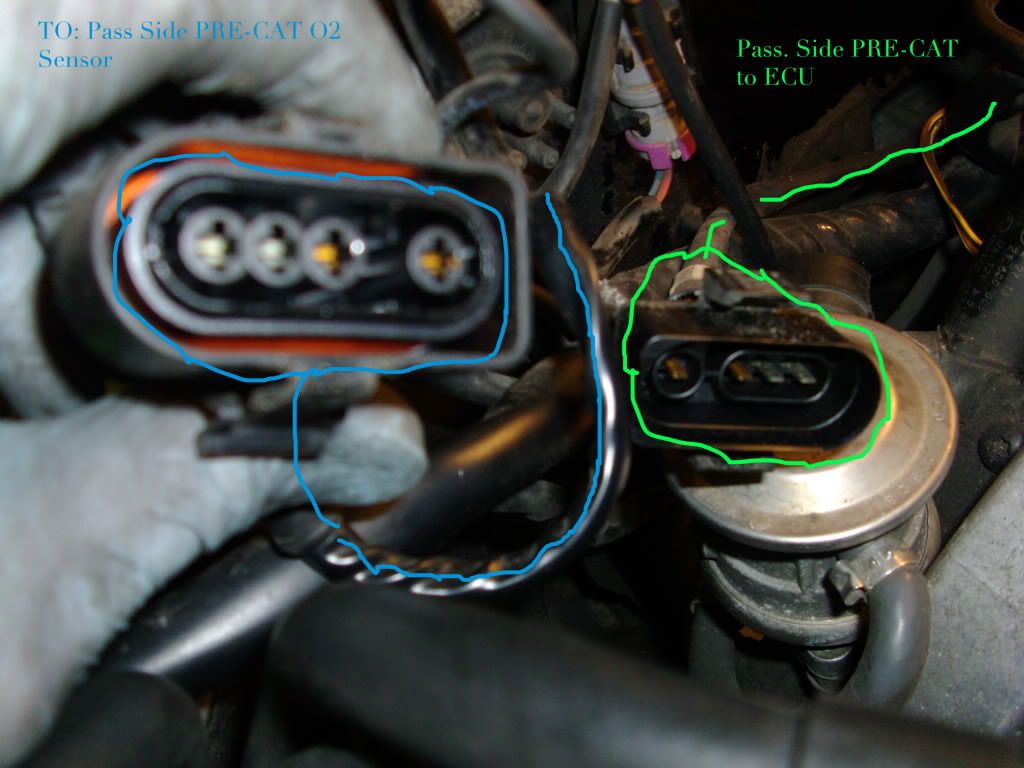
Spray and SOAK that baby with PB blaster. The angle is a little hard, but after a few short, gentle sprays, you'll be able to determine exactly how to spray it where the sensor meets the bung of the CAT. Allow it to soak for 10-15 minutes if your sensors are older (mine had 115k miles on them. They weren't going anywhere!) You may want to repeat this step a few times depending on age.
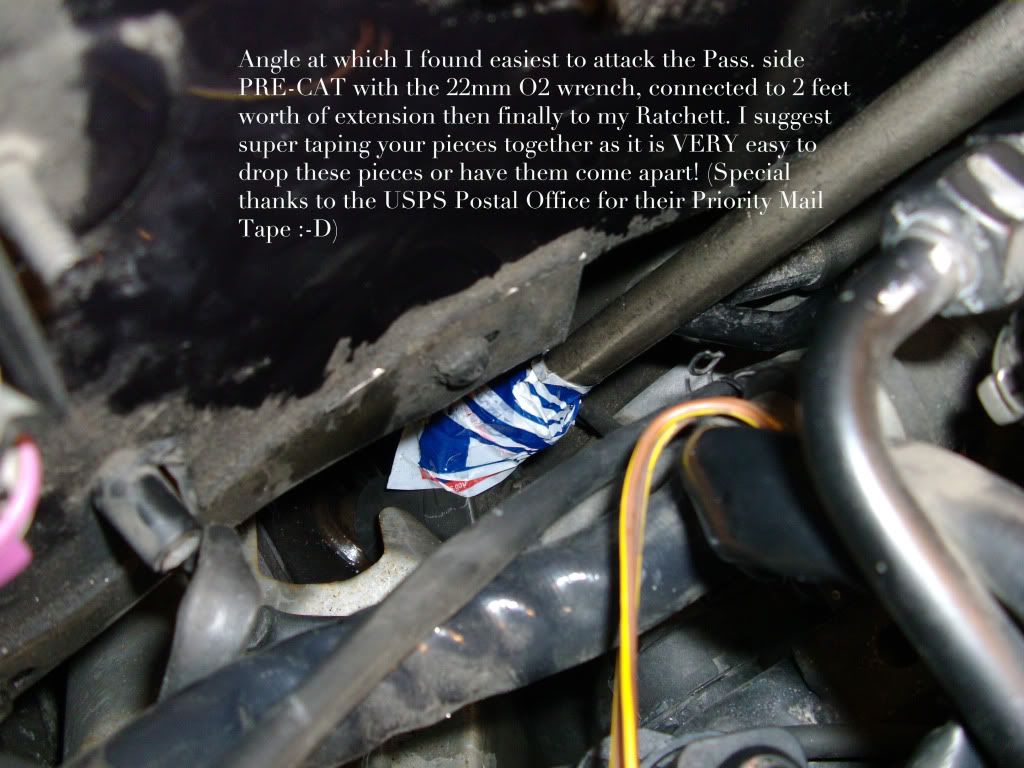

Now with your rig'd tool (O2 wrench, Universal, 2 foot extension, ratchet) that is securely taped/tied together (you do NOT want to drop anything down below and at this angle, it is very easy to lose your O2 wrench/crow's foot! Better to be safe than sorry!)) slide it over the O2 sensor wire and down onto the sensor. If you aren't able to loosen the sensor with some elbow grease/muscle, try the old mechanic's method of tightening first, then loosening. Or you may try what I did and get a rubber hammer and pound away at the ratchet knocking her loose. It is easier said than done, be warned! To get off my passenger pre-cat, I probably fought with it for a good hour or so!! Once she comes loose, reach down and hand loosen her off. Your retaining clips should already be cut - just pull the sensor up and out.
Apply anti-seize to the threads of the new sensor, reach down and hand tighten her. Be careful not to twist the wires of the new sensor while doing so! I used my left hand to turn the wires as I tightened the sensor with my right hand. Get your rig tool again and give her a good nice tighten - doesn't have to be extremely tight, you don't want to fight her as much next time as you did this time if she needs to be replaced again! Re-thread the wire the way you feel is best, applying zip ties along the way. Try to stick to the OEM setup for best results. Attach the new connector-sensor end with the connector-ECU end, reinsert both connectors into their appropriate harness and congratulations, you are now done with the passenger side!
Now onto the PITA driver side. We do not lie about this�this sensor, due to it's angle and limited availability on the 2.7L engine puts the ITCH in BITCH. ROTFL.

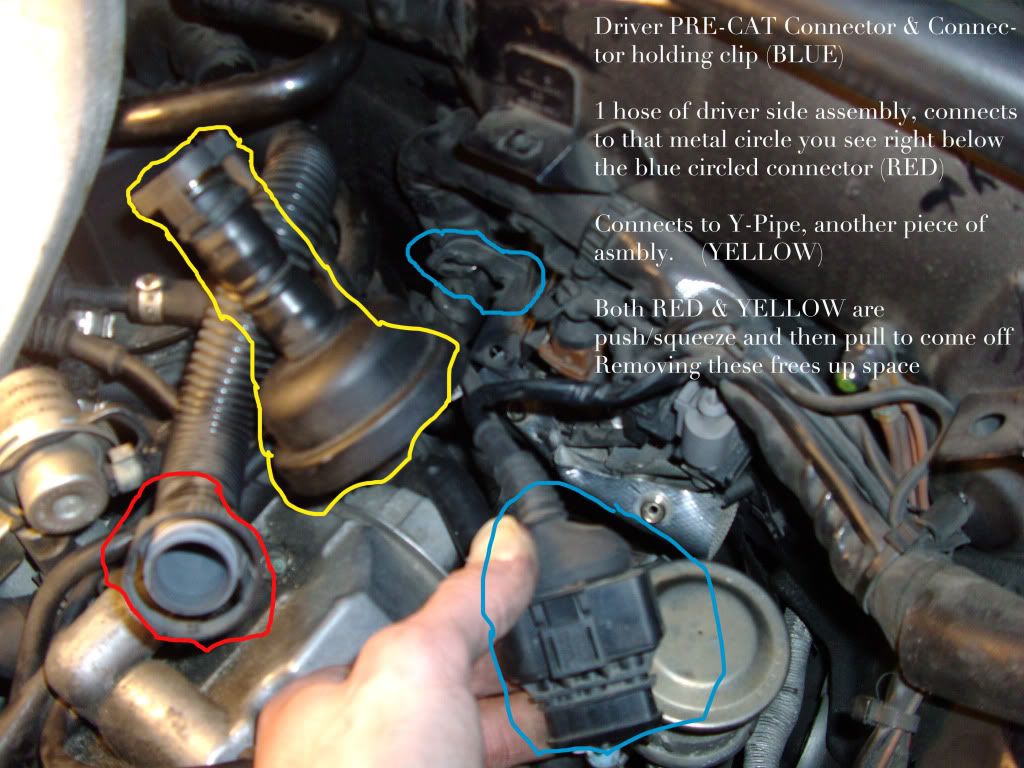
Sorry the picture is out of place but this (circled in YELLOW and RED) are the pieces of the Spyder assembly I was referring to above that were disconnected.
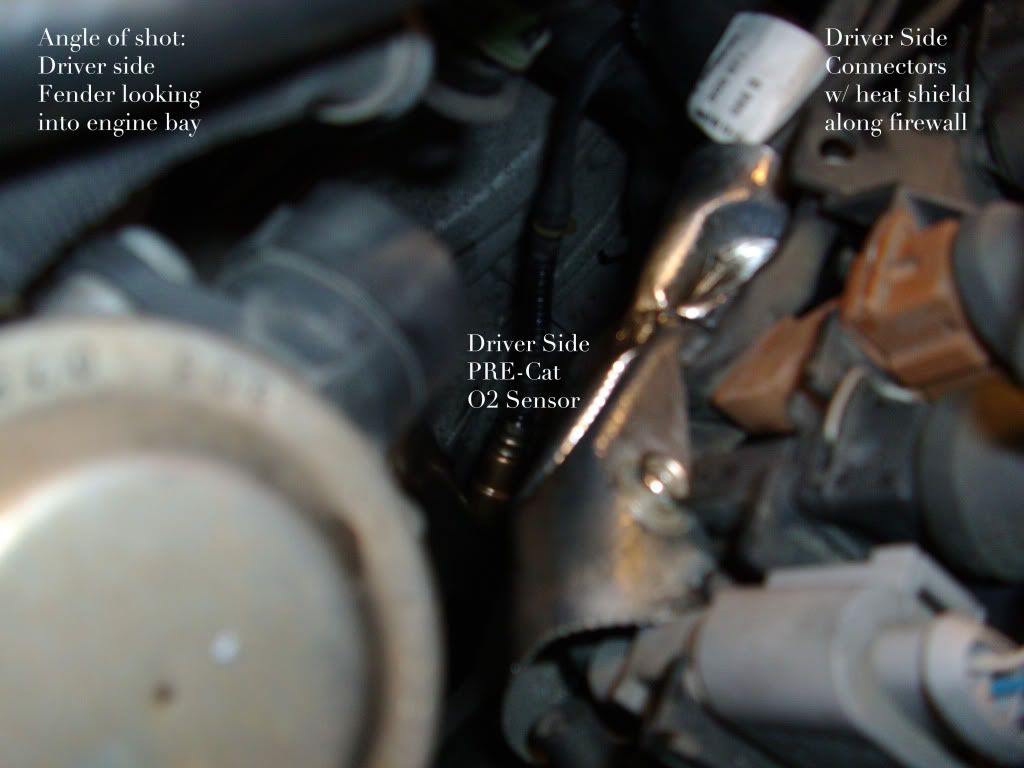
The hardest part of removing the driver side O2 Sensor is it's angle. If it wasn't for that, it wouldn't be so bad. However, I, as well as many others, agree it is best to approach it from the passenger side of the engine bay, using your 2 foot extension, universal socket and O2 wrench/crow's foot. This sensor honestly took me a good 2-2.5 hours to get off! It got drenched in PB blaster for 20 minutes at a time, for about 5 times! I honestly kicked, cussed, cursed and threw a tantrum trying to get that sucker out. Do some breathing exercises to calm yourself before attempting this one! loll
This side is done the same as the passenger although below the connector you have a heat shield with two buttons that needs released, and 2 retaining clips that need cut. Once loosened with the wrench/crow's, again, hand loosen the rest, and carefully pull the old sensor out. Anti-seize the threads on the new sensor, hand tighten her down, then grab your wrench/crow's, like the passenger, tighten her down, rethread your wires, applying zip ties in factory location or some where close to, connect the sensor connector with the ECU connector, reinsert into the harness housing and give yourself a great big pat on the back! The two hardest sensors are complete.

As most here say - reinstall everything in the reverse order. Again, congratulations on a job well done!!!
Last thing's, last. If your old O2's were throwing a code, hook up your VAG-Com/OBD II Scan Tool, erase the code(s) and remember to take her on a drive cycle so the ECU can relearn all of it's 9 categories with the new sensors! Even if you weren't throwing codes, this is still a good step to complete.
Now, even though I have not done my post-cat's (I ordered them at the same time to have them as back-up, plus got a wonderful deal on them from amazon.com - but I will worry about doing these when the weather is a bit more kind.) the process is the exact same - only EASIER!! I bet that put a smile on your face. The only difference being these are located after the cat-converter and must be attained from underneath the vehicle. If you are doing these at the same time as your PRE's, just add a jack lift and two jack stands to your list of tools needed. PLEASE if you are unfamiliar with the proper way of lifting a car, refer to your OEM Manual AND/OR the Bentley Publisher's manual. Always secure ANY vehicle with the parking brake applied, blocks in front of/behind of the rear tires and ensure that the vehicle is safe and sturdy before EVER climbing underneath one.
I truly and honestly hope this HOW-TO Tutorial has and will help many of you in the future. I have just spent the last 2.5 hours preparing the pictures, and writing this tutorial - I thank all of you that has ever helped me in the past and am always happy to provide back to our little community of Audi Worlders
Good Luck & God Bless!
- Ben - (01A6Turbo)
It is finally here! After hours of searching the forums myself for a good tutorial on how to change the Pre/Post cat O2 Sensors on a 2.7T - I was never able to come across anything but hundreds of people pleading for one - with descriptions, pictures, details, etc. Well folks, HERE YOU GO! I must say, I am happy to be the one to provide you with this information, however and like always, this must be said:
DISCLAIMER:
I, Ben C. (aka 01A6Turbo), hold no responsibility, should you (the reader of this tutorial) choose to attempt this repair work amongst yourself, without seeking the help of a professional. I hold no legal liability/responsibility should something within the event of you following my instructions cause damage or injury to yourself, your vehicle, or any other matter. I am posting this how-to tutorial as a follow guide due to a lack of available information/photographs/et. all for the Oxygen (O2) Sensor Replacement repair on the Audi (C5) A6 2.7T and Audi (B5) S4 2.7T engine models.
THE HOW-TO:
Okay, so your fuel economy has sort have been down in the dumps lately; possibly your reaching that "100k" mark Bosch claims their sensors last up to and it's time to check them; or maybe your car isn't idling/running as smooth as she was the day you purchased her; perhaps your CEL (Check Engine Light) has illuminated and you ran to your local auto store and the guy behind the counter told you one or more of your Oxygen Sensors were throwing codes and needed replaced. Well, that's why we're here! So let us start with the #1 most important thing of the day�.
MmmMmmmMmmm Have to love that Jo'!
OVERALL DIFFICULTY:
===================
On a scale 1 - 10 (10 being Audi Certification Required), I give this job a true 6 or 7.
ESTIMATED TIME OF JOB:
=====================
Approximately 3-6 hours depending on mechanical skill level, age of old sensors, ability to move about like a gymnast
It personally took me 4-4.5 hours and this was my first time doing O2 Sensors.VEHICLE PERFORMED ON IN TUTORIAL:
================================
2001 (Build Date 05/00) (C5) Audi A6 2.7L Twin-Turbo V6 30v
TOOLS NEEDED: (More or less depending on your mechanical skill level - these are the tools I personally used)
==============
Replacement Oxygen Sensors (See photo below for part #s)
1 22mm O2 Sensor Wrench AND/OR 1 22mm Crow's Foot (solely based on preference/availability of the tool)
1 Phillips
1 Flat head screw driver
1 Can PB Blaster (or similar)
1 1/2" Ratchett
2 1/2" one (1) foot extensions (total of 2 feet)
1 Universal Socket
1 10mm Socket
1 pair of large needle nose pliers or similar (to remove MAF to Y-Pipe Accordian hose clamp)
Anti-seize
4-6 Zip Ties
Flashlight
1 Roll of very strong tape (I used USPS Shipping Tape)
1 VAG-Com AND/OR OBD II Scan Tool (if reason for this repair is CEL/Codes)
1 Pair Snips/Scissors
*** BE SURE TO DO THIS WITH A COMPLETELY COLD ENGINE ***
Here are some, not ALL of the tools I used. I had to add tools as I went further into the job not really knowing exactly what I'd need. However these are the essentials to start out with!
Step 1: Remove the engine cover pieces outlined in YELLOW by hand. They simply lift up and off.
Step 2: With a Phillips screwdriver - Unscrew the pop-up plastic screws and remove the engine covers.
Step 3: Remove 3 metal screws on the coolant reservoir tank with a Phillips.
*** Step 2 & 3 Outlined in RED ***
Step 4: Once coolant reservoir is unscrewed, carefully lift tank off of metal holding plate and located the sensor wire connected to the bottom. With a flathead screwdriver, being careful not to break the clip, disconnect this sensor and move the coolant reservoir out of the way. (Side note: At this time, I also removed the black engine cover on the side of the valve cover/side of manifold. Be sure to remove the oil cap before lifting up on this cover (after unscrewing 2 pop-up plastic screws just as in Step 2 above. Replace the oil cap once cover is removed.)
*** OFF TO THE PASSENGER SIDE NOW ***
Step 1: Remove/unclip the four (4) connectors to your two (2) ICMs (Ignition Control Modules). (Circled in Yellow) Simply push down on metal clip and slide off connector.
Step 2: Unclip two (2) clamps connected onto your fuel lines (Circled in Cyan/Baby Blue)
Step 3: Remove MAF housing from Airbox (Circled in Dark Blue) - there are two of these clips directly Left & Right from each other. Don't lose the O-Ring inside!
Step 4: Unclamp the Airbox's clamps (4) that connect the Top & Bottom of the Airbox together (Circled in Lime Green). The 4th is on the MAF housing corning, down below. Hard to reach.
Step 5: Now with your large pliers (or similar tool), remove the accordion hose from the silver Y-pipe. Squeeze the clamp together and it will open up, allowing you to slide off the hose.
Next to the accordion hose, this is where you will now see three (3) of your four (4) connector harnesses with connectors for the Oxygen Sensors.
*** REMOVING Y-PIPE ***
If you are like me and do not have any spare 1-time clamps lying around, I came up with another method to remove the Y-Pipe and never have to worry about tampering with those clamps.
Step 1: Remove three (3) 10mm bolts located near the rear of the Y-Pipe, near where you just removed the accordion hose. Next, follow the Y-Pipe down to where it splits and heads down the side of the manifold. Next to your Coil packs 1 & 4 (near the front of the engine) you will see two more 10mm bolts. Remove these. All necessary bolts to be removed are circled in RED in the above photo.
Step 2: Head back to the rear of the Y-Pipe and you will see part of the Spyder hose assembly connected to a little off branch next to the curve in the pipe. It is black and plastic. Squeeze down on the top and bottom of this and pull it off.
Step 3: If you have already replaced your DVs (Diverter Valves), you probably already have reusable hose-clamps installed. Using a flat head screw driver, loosen these hose-clamps and remove the black tubing from the Y-Pipe, from the DV. (Circled in GREEN in the above photo).
Your Y-Pipe should now be free to be removed. Your engine should now look like my photo below.
IMPORTANT: TO ENSURE NO DIRT/DEBRI/ETC GETS INTO ANY UNWANTED PLACES, USE CLEAN SHOP RAGS AND COVER OF HOLES OF THE PIPING YOU JUST EXPOSED FROM REMOVING THE Y-PIPE!!
Now that you have everything needed to be removed out of the way (Coolant reservoir, Air box, MAF housing, Accordion hose, Y-Pipe), using your flashlight you should be able to see the passenger and driver side O2 sensors. First we will go over the passenger side as it is easier to remove then the driver side.
Remove the Passenger Side Pre-Cat Connector from its retaining harness by sliding it forward and out. Once removed from the harness, depress the two clips and slide the two connectors apart shown below:
Spray and SOAK that baby with PB blaster. The angle is a little hard, but after a few short, gentle sprays, you'll be able to determine exactly how to spray it where the sensor meets the bung of the CAT. Allow it to soak for 10-15 minutes if your sensors are older (mine had 115k miles on them. They weren't going anywhere!) You may want to repeat this step a few times depending on age.
Now with your rig'd tool (O2 wrench, Universal, 2 foot extension, ratchet) that is securely taped/tied together (you do NOT want to drop anything down below and at this angle, it is very easy to lose your O2 wrench/crow's foot! Better to be safe than sorry!)) slide it over the O2 sensor wire and down onto the sensor. If you aren't able to loosen the sensor with some elbow grease/muscle, try the old mechanic's method of tightening first, then loosening. Or you may try what I did and get a rubber hammer and pound away at the ratchet knocking her loose. It is easier said than done, be warned! To get off my passenger pre-cat, I probably fought with it for a good hour or so!! Once she comes loose, reach down and hand loosen her off. Your retaining clips should already be cut - just pull the sensor up and out.
Apply anti-seize to the threads of the new sensor, reach down and hand tighten her. Be careful not to twist the wires of the new sensor while doing so! I used my left hand to turn the wires as I tightened the sensor with my right hand. Get your rig tool again and give her a good nice tighten - doesn't have to be extremely tight, you don't want to fight her as much next time as you did this time if she needs to be replaced again! Re-thread the wire the way you feel is best, applying zip ties along the way. Try to stick to the OEM setup for best results. Attach the new connector-sensor end with the connector-ECU end, reinsert both connectors into their appropriate harness and congratulations, you are now done with the passenger side!
Now onto the PITA driver side. We do not lie about this�this sensor, due to it's angle and limited availability on the 2.7L engine puts the ITCH in BITCH. ROTFL.
Sorry the picture is out of place but this (circled in YELLOW and RED) are the pieces of the Spyder assembly I was referring to above that were disconnected.
The hardest part of removing the driver side O2 Sensor is it's angle. If it wasn't for that, it wouldn't be so bad. However, I, as well as many others, agree it is best to approach it from the passenger side of the engine bay, using your 2 foot extension, universal socket and O2 wrench/crow's foot. This sensor honestly took me a good 2-2.5 hours to get off! It got drenched in PB blaster for 20 minutes at a time, for about 5 times! I honestly kicked, cussed, cursed and threw a tantrum trying to get that sucker out. Do some breathing exercises to calm yourself before attempting this one! loll
This side is done the same as the passenger although below the connector you have a heat shield with two buttons that needs released, and 2 retaining clips that need cut. Once loosened with the wrench/crow's, again, hand loosen the rest, and carefully pull the old sensor out. Anti-seize the threads on the new sensor, hand tighten her down, then grab your wrench/crow's, like the passenger, tighten her down, rethread your wires, applying zip ties in factory location or some where close to, connect the sensor connector with the ECU connector, reinsert into the harness housing and give yourself a great big pat on the back! The two hardest sensors are complete.
As most here say - reinstall everything in the reverse order. Again, congratulations on a job well done!!!
Last thing's, last. If your old O2's were throwing a code, hook up your VAG-Com/OBD II Scan Tool, erase the code(s) and remember to take her on a drive cycle so the ECU can relearn all of it's 9 categories with the new sensors! Even if you weren't throwing codes, this is still a good step to complete.
Now, even though I have not done my post-cat's (I ordered them at the same time to have them as back-up, plus got a wonderful deal on them from amazon.com - but I will worry about doing these when the weather is a bit more kind.) the process is the exact same - only EASIER!! I bet that put a smile on your face. The only difference being these are located after the cat-converter and must be attained from underneath the vehicle. If you are doing these at the same time as your PRE's, just add a jack lift and two jack stands to your list of tools needed. PLEASE if you are unfamiliar with the proper way of lifting a car, refer to your OEM Manual AND/OR the Bentley Publisher's manual. Always secure ANY vehicle with the parking brake applied, blocks in front of/behind of the rear tires and ensure that the vehicle is safe and sturdy before EVER climbing underneath one.
I truly and honestly hope this HOW-TO Tutorial has and will help many of you in the future. I have just spent the last 2.5 hours preparing the pictures, and writing this tutorial - I thank all of you that has ever helped me in the past and am always happy to provide back to our little community of Audi Worlders
Good Luck & God Bless!
- Ben - (01A6Turbo)
