
 07-20-2016, 11:39 AM
Last edit by: IB Advertising
See related guides and technical advice from our community experts:
--
See related guides and technical advice from our community experts:
- Audi A6 C6 How to Replace Ball Joints Control Arms<br>Step by step instructions for do-it-yourself repairs.
--
See related guides and technical advice from our community experts:
- Audi A6 C6 How to Replace Upper Control Arms Bushings<br>Step by step instructions for do-it-yourself repairs.

06 A6 Quattro upper control arm bushing replacement
06-24-2011, 10:25 PM
#1
AudiWorld Member
Thread Starter

2006 A6 Quattro upper control arm bushing replacement
After seeing how much it cost to replace the front upper control arms ($1400 ~ $1600), I was compelled to write a guide to replace bushings only to help fellow AudiWorld members to save chunk of money. DIY upper control arms? - AudiWorld Forums
This guide is for information purpose only based on my experience with 2006 A6 Quattro with 3.2L FSI engine, VIN No. WAUDG74F96N03xxxx . Use it at your own risk.
I have no personal interest in any of products or companies I mentioned.
Please check the parts numbers with an Audi dealer to get the latest level parts to fit your car.
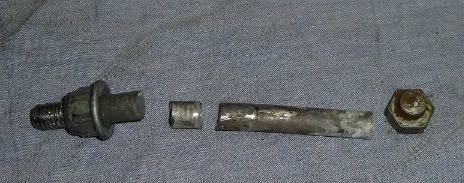
Parts needed:
I got bushings (item 3 and 5, both same part number) from genuineauidparts.com; bolt and nuts from local Audi dealer. All four bushings are same. I recommend to pre-order all bolts and nuts since dealers usually don't stock them.
The cost of upper control arm is about $180 each, and you can save a lot by replacing bushings by yourself.
http://genuineaudiparts.com/media/im.../1/1352330.gif
Tools: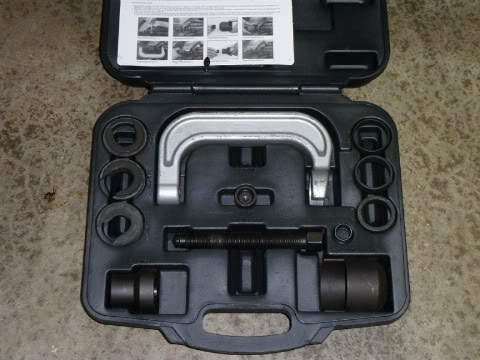
You can inspect the condition of bushings without removing tire or lifting your car. They are clearly visible through the gap between fender and tire.
You can see some cracks. Another indication is uneven tire wear. My tires showed slight uneven wear on outside.

B. Lift the car and put it on jack stands:
1. Engage parking brake and chock the rear wheels
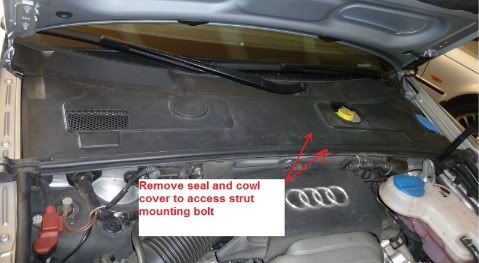
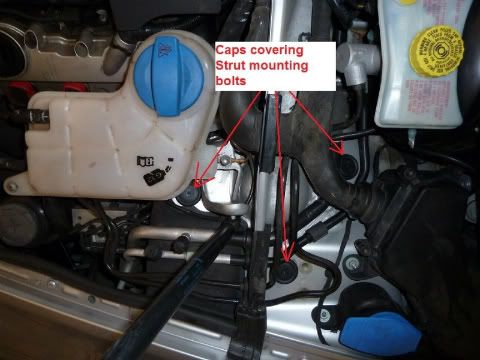
2. Open hood, remove cowl seal and cover, and three caps covering the strut mounting bolts.


3. Loosen up the front wheel lug bolts (do not remove yet)
4. Lift the car and put it on jack stands.
C. Removal of a strut/spring assembly:
1. Remove wheel lug bolts and remove tire
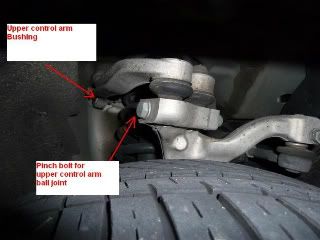
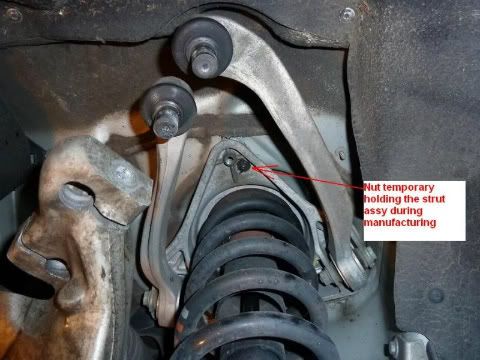
2. Remove a holding nut on the upper control arm holding pin. Sorry picture was taken after the ball joints were pushed out.

3. Remove the upper control arm pinch bolt and nut. This is the most difficult part of job because bolt is frozen shut to the knuckle due to galvanic corrosion even though they look clean. My left side came out by just tapping it with a small hammer, but I had to eventually drill out the right side. It wouldn�t come out using the air hammer like in the video shown in the above link. Be prepared to tackle this one!
This was end result after many swearings!

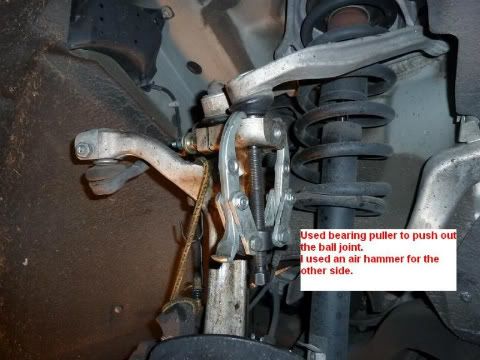
4. Remove ball joint of upper control arm from knuckle. I used a bearing puller on the outside one and air hammer on the inside one. There is some galvanic corrosion and they don't come out easily.

5. Remove pinch bolt and nut for strut to lower control arm
6. Remove three bolts holding strut bracket to strut tower
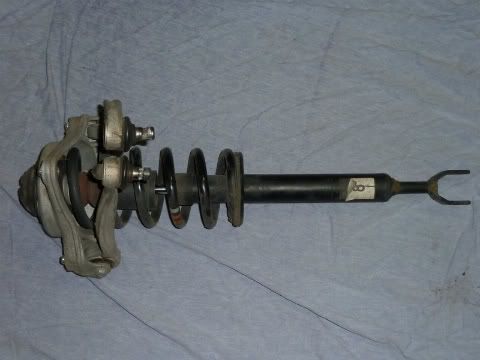
7. Maneuver the strut/spring assembly out of the lower control arm.
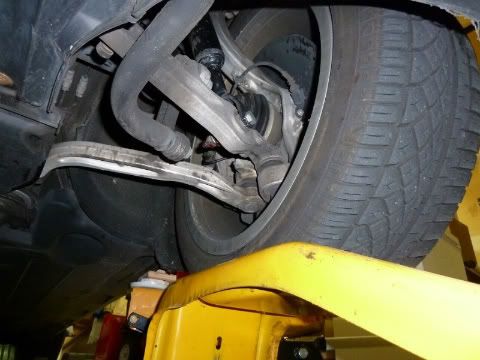
Note: For removal and installation of the strut/spring assembly, you may need to turn the steering wheel in certain direction to get better clearance. In addition you may need to push down the knuckle/wheel hub to clear the strut/spring assembly.

See the cracks on my bushings.

D. R&R of upper control arm and bushings:
1. Remove one upper control arm from the strut assembly
Caution: Remove one control arm at a time to replace a busing so that the other one is a guide for installing back. This is required so that bushings on upper control arms are not pre-loaded.
2. Remove the busing from the upper control arm. Lock the upper control arm on to a bench vise and set up the busing removal tool as shown.

Squeeze out the busing slowly while occasionally loosening the tool so that removal tool is not jammed/cocked into the control arm. You need patience because of homemade tools.
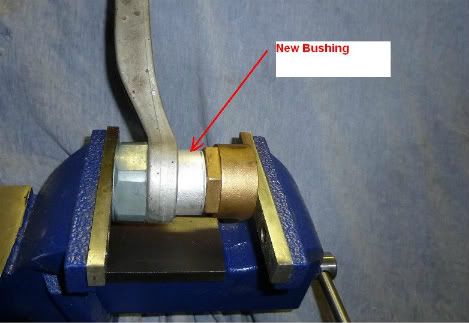
3. Install a new bushing. Set up the tool as shown so that new bushing is installed in the same direction as old bushing came out.

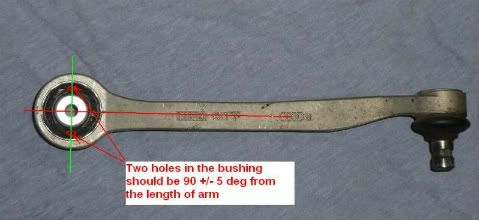
Caution: the holes in the busing needs to be positioned perpendicular to the control arm as shown. Audi specification is 90 +/- 5 degree.

4. Install the control arm to the strut assembly. Set the control arm with new busing is same location as the other control arm and tighten to the specified torque.
5. Repeat for the other control arm.
E. Install the strut assembly back:
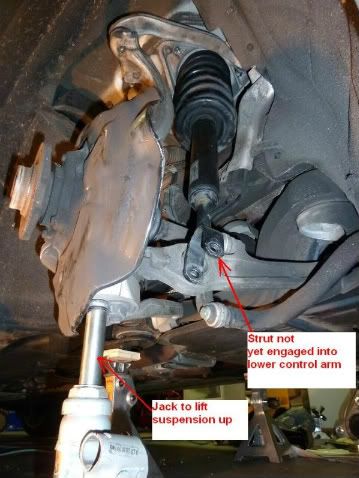
1. Position the strut assembly on the strut tower and install three bolt just enough to hold the strut assembly. Caution: do not engage the strut assembly to the lower control arm yet.
2. Install ball joints of the upper control arms to the knuckle. Clean the ball joint and apply anti-seizing compound. Lift the knuckle/hub assembly (I used a hydraulic jack) such that the ball joints of upper control arms are close, and push and tap the ball joint in the knuckle. Apply anti-seizing compound to the body of the pinch bolt. Install the pinch bolt and tighten to the torque.

3. Push down on the knuckle/hub assembly and engage the lower part of strut assembly to the lower control arm. Align the holes on the lower control arm and the strut, and hand tighten the pinch bolt and nut.
Note: For removal and installation of the strut/spring assembly, you may need to turn the steering wheel in certain direction to get better clearance. In addition you may need to push down the knuckle/wheel hub to clear the strut/spring assembly.
4. Tighten the three bolts for strut assembly to the strut tower to the torque and install plastic covers. Tighten tem in several steps so that strut bracket is evenly attached.
5. Install tire/wheel
F. Repeat R&R of strut and bushings for the other side:
Do same for other side.
G. Tighten the pinch bolt and nut for lower control and strut assembly:
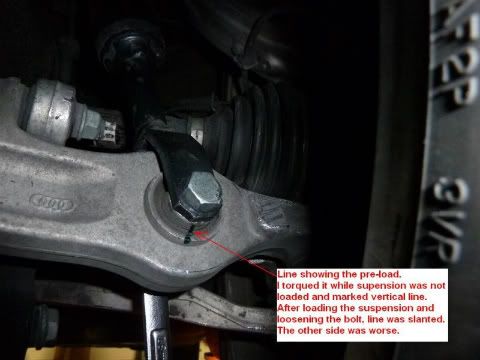
Caution: need to this procedure as car is in normal ride position or busing in the lower control arm will be pre-loaded like in the picture causing early failure.

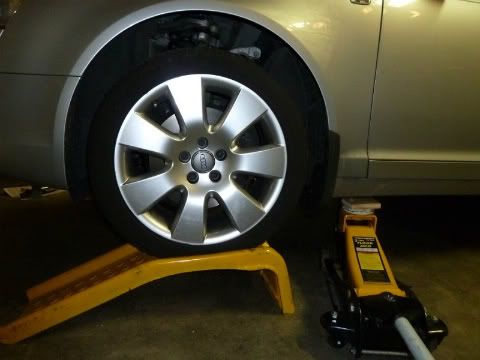
1. Lift the car off the jack stand and remove the jack stand
2. Position the ramp underneath the tire and lower the car
3. Repeat the same procedure to the other side

4. Bounce front of the car to remove any binding
5. Torque the pinch bolt and the nut to the torque

6. Lift the car and remove the ramps
Note.:
1. There is no need for front end alignment since suspension adjustments are at lower control arm, and strut bracket has self centering guides.
2. Since my car was close to 100K miles, I replaced brake rotors and pads along with flushing brake fluids while the car was on the stand.

I hurried up to post the guide, and there probably will be a lot of mistakes. I will correct them later. Alos you may PM me the corrections.
After seeing how much it cost to replace the front upper control arms ($1400 ~ $1600), I was compelled to write a guide to replace bushings only to help fellow AudiWorld members to save chunk of money. DIY upper control arms? - AudiWorld Forums
This guide is for information purpose only based on my experience with 2006 A6 Quattro with 3.2L FSI engine, VIN No. WAUDG74F96N03xxxx . Use it at your own risk.
I have no personal interest in any of products or companies I mentioned.
Please check the parts numbers with an Audi dealer to get the latest level parts to fit your car.
Parts needed:
Control arm bushings(4) 8D0407515C* $84.00
Lower control arm strut pinch nuts(2) N10106402 $1.58
Lower control arm strut pinch bolts(2) N10241202 $4.94
Upper control arm pinch washers(2) N10406105 $0.52
Upper control arm pinch nuts(2) N10272302(or N10286102) $2.56
Upper control arm pinch bolts (2) N10491802 $6.64
Anti-seizing compound
Total cost including tax and shipping ~$110Lower control arm strut pinch nuts(2) N10106402 $1.58
Lower control arm strut pinch bolts(2) N10241202 $4.94
Upper control arm pinch washers(2) N10406105 $0.52
Upper control arm pinch nuts(2) N10272302(or N10286102) $2.56
Upper control arm pinch bolts (2) N10491802 $6.64
Anti-seizing compound
I got bushings (item 3 and 5, both same part number) from genuineauidparts.com; bolt and nuts from local Audi dealer. All four bushings are same. I recommend to pre-order all bolts and nuts since dealers usually don't stock them.
The cost of upper control arm is about $180 each, and you can save a lot by replacing bushings by yourself.
http://genuineaudiparts.com/media/im.../1/1352330.gif
Update: Jan 31, 2016
Now there are after market replacement control arms available from Meyle and Lemforder near half the price of Audi OEM. You may consider them as option instead of replacing bushings.
One good example is this complete Meyle Kit from fcpeuro at $408
https://www.fcpeuro.com/products/aud...d-d3uppercamey
Tools:
18mm, 16mm socket and open-end wrench
Torque wrench
Jack and Jack stands
Ramps or Equivalent
Bearing puller
Bushing removal & install tool (rented from Advanced Auto Parts)
Black pipe bushing and coupling from Lowes (sanded down to slightly smaller than bushing diameter)
Air hammer or equivalent (Harbor Freight has real cheap one)
Bench vise will help
Busing removal & install tool
If you are interested in buying a proper tool.
Matra�s Audi equivalent 3301 tool is ~$180
http://www.samstagsales.com/images/vw_matra_3301.jpg
Another tool needed is 3348, and I could not find it.
Torque spec:Matra�s Audi equivalent 3301 tool is ~$180
http://www.samstagsales.com/images/vw_matra_3301.jpg
Another tool needed is 3348, and I could not find it.
Strut assembly to strut tower (16 mm, 50 NM + additional 90 degree)
Upper control arm to strut housing (16 mm, 50 NM + additional 90 degree)
Upper control arm to knuckle pinch bolt (16mm, 45 NM)
Strut to lower control arm pinch bolt (18mm, 90 NM + additional 90 degree)
A. Inspection of bushings and symptom:Upper control arm to strut housing (16 mm, 50 NM + additional 90 degree)
Upper control arm to knuckle pinch bolt (16mm, 45 NM)
Strut to lower control arm pinch bolt (18mm, 90 NM + additional 90 degree)
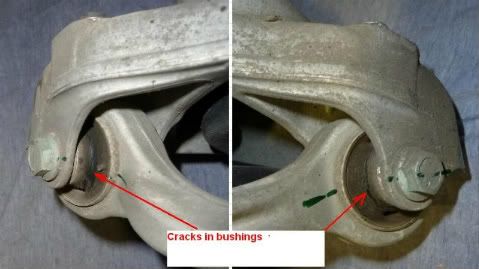
You can inspect the condition of bushings without removing tire or lifting your car. They are clearly visible through the gap between fender and tire.
You can see some cracks. Another indication is uneven tire wear. My tires showed slight uneven wear on outside.
B. Lift the car and put it on jack stands:
1. Engage parking brake and chock the rear wheels
2. Open hood, remove cowl seal and cover, and three caps covering the strut mounting bolts.
3. Loosen up the front wheel lug bolts (do not remove yet)
4. Lift the car and put it on jack stands.
C. Removal of a strut/spring assembly:
1. Remove wheel lug bolts and remove tire
2. Remove a holding nut on the upper control arm holding pin. Sorry picture was taken after the ball joints were pushed out.
3. Remove the upper control arm pinch bolt and nut. This is the most difficult part of job because bolt is frozen shut to the knuckle due to galvanic corrosion even though they look clean. My left side came out by just tapping it with a small hammer, but I had to eventually drill out the right side. It wouldn�t come out using the air hammer like in the video shown in the above link. Be prepared to tackle this one!
This was end result after many swearings!
4. Remove ball joint of upper control arm from knuckle. I used a bearing puller on the outside one and air hammer on the inside one. There is some galvanic corrosion and they don't come out easily.
5. Remove pinch bolt and nut for strut to lower control arm
6. Remove three bolts holding strut bracket to strut tower
7. Maneuver the strut/spring assembly out of the lower control arm.
Note: For removal and installation of the strut/spring assembly, you may need to turn the steering wheel in certain direction to get better clearance. In addition you may need to push down the knuckle/wheel hub to clear the strut/spring assembly.
See the cracks on my bushings.
D. R&R of upper control arm and bushings:
1. Remove one upper control arm from the strut assembly
Caution: Remove one control arm at a time to replace a busing so that the other one is a guide for installing back. This is required so that bushings on upper control arms are not pre-loaded.
2. Remove the busing from the upper control arm. Lock the upper control arm on to a bench vise and set up the busing removal tool as shown.
Squeeze out the busing slowly while occasionally loosening the tool so that removal tool is not jammed/cocked into the control arm. You need patience because of homemade tools.
3. Install a new bushing. Set up the tool as shown so that new bushing is installed in the same direction as old bushing came out.
Caution: the holes in the busing needs to be positioned perpendicular to the control arm as shown. Audi specification is 90 +/- 5 degree.
4. Install the control arm to the strut assembly. Set the control arm with new busing is same location as the other control arm and tighten to the specified torque.
5. Repeat for the other control arm.
E. Install the strut assembly back:
1. Position the strut assembly on the strut tower and install three bolt just enough to hold the strut assembly. Caution: do not engage the strut assembly to the lower control arm yet.
2. Install ball joints of the upper control arms to the knuckle. Clean the ball joint and apply anti-seizing compound. Lift the knuckle/hub assembly (I used a hydraulic jack) such that the ball joints of upper control arms are close, and push and tap the ball joint in the knuckle. Apply anti-seizing compound to the body of the pinch bolt. Install the pinch bolt and tighten to the torque.
3. Push down on the knuckle/hub assembly and engage the lower part of strut assembly to the lower control arm. Align the holes on the lower control arm and the strut, and hand tighten the pinch bolt and nut.
Note: For removal and installation of the strut/spring assembly, you may need to turn the steering wheel in certain direction to get better clearance. In addition you may need to push down the knuckle/wheel hub to clear the strut/spring assembly.
4. Tighten the three bolts for strut assembly to the strut tower to the torque and install plastic covers. Tighten tem in several steps so that strut bracket is evenly attached.
5. Install tire/wheel
F. Repeat R&R of strut and bushings for the other side:
Do same for other side.
G. Tighten the pinch bolt and nut for lower control and strut assembly:
Caution: need to this procedure as car is in normal ride position or busing in the lower control arm will be pre-loaded like in the picture causing early failure.
1. Lift the car off the jack stand and remove the jack stand
2. Position the ramp underneath the tire and lower the car
3. Repeat the same procedure to the other side
4. Bounce front of the car to remove any binding
5. Torque the pinch bolt and the nut to the torque
6. Lift the car and remove the ramps
Note.:
1. There is no need for front end alignment since suspension adjustments are at lower control arm, and strut bracket has self centering guides.
2. Since my car was close to 100K miles, I replaced brake rotors and pads along with flushing brake fluids while the car was on the stand.
I hurried up to post the guide, and there probably will be a lot of mistakes. I will correct them later. Alos you may PM me the corrections.
Last edited by audi bug; 01-31-2016 at 05:40 PM.
 06-27-2011, 01:28 PM
#2
AudiWorld Senior Member

Great info - thanks!! I wish precious DIY's like these were made a sticky. Damn mods have defected. Maybe we should just piggy back to the 55k service sticky and add it over there!!
Last edited by am_ver; 06-27-2011 at 01:38 PM.
07-05-2011, 04:19 AM
#3
Audiworld Junior Member

Join Date: Feb 2007
Posts: 56
Likes: 0
Received 0 Likes
on
0 Posts
2006 A6 Quattro upper control arm bushing replacement
After seeing how much it cost to replace the front upper control arms ($1400 ~ $1600), I was compelled to write a guide to replace bushings only to help fellow AudiWorld members to save chunk of money. https://www.audiworld.com/forums/sho....php?t=2803779
This guide is for information purpose only based on my experience with 2006 A6 Quattro with 3.2L FSI engine, VIN No. WAUDG74F96N03xxxx . Use it at your own risk.
I have no personal interest in any of products or companies I mentioned.
Please check the parts numbers with an Audi dealer to get the latest level parts to fit your car.
Parts needed:
I got bushings (item 3) from genuineauidparts.com; bolt and nuts from local Audi dealer. All four bushings are same. I recommend to pre-order all bolts and nuts since dealers usually don't stock them.
The cost of upper control arm is about $180 each, and you can save a lot by replacing bushings by yourself.
http://genuineaudiparts.com/partloca...layCatalogid=0
Tools:
You can inspect the condition of bushings without removing tire or lifting your car. They are clearly visible through the gap between fender and tire.
You can see some cracks. Another indication is uneven tire wear. My tires showed slight uneven wear on outside.
B. Lift the car and put it on jack stands:
1. Engage parking brake and chock the rear wheels
2. Open hood, remove cowl seal and cover, and three caps covering the strut mounting bolts.
3. Loosen up the front wheel lug bolts (do not remove yet)
4. Lift the car and put it on jack stands.
C. Removal of a strut/spring assembly:
1. Remove wheel lug bolts and remove tire
2. Remove a holding nut on the upper control arm holding pin. Sorry picture was taken after the ball joints were pushed out.
3. Remove the upper control arm pinch bolt and nut. This is the most difficult part of job because bolt is frozen shut to the knuckle due to galvanic corrosion even though they look clean. My left side came out by just tapping it with a small hammer, but I had to eventually drill out the right side. It wouldn�t come out using the air hammer like in the video shown in the above link. Be prepared to tackle this one!
This was end result after many swearing!
4. Remove ball joint of upper control arm from knuckle. I used a bearing puller on the outside one and air hammer on the inside one. There is some galvanic corrosion and they don't come out easily.
5. Remove pinch bolt and nut for strut to lower control arm
6. Remove three bolts holding strut bracket to strut tower
7. Maneuver the strut/spring assembly out of the lower control arm.
Note: For removal and installation of the strut/spring assembly, you may need to turn the steering wheel in certain direction to get better clearance. In addition you may need to push down the knuckle/wheel hub to clear the strut/spring assembly.
See the cracks on my bushings.
D. R&R of upper control arm and bushings:
1. Remove one upper control arm from the strut assembly
Caution: Remove one control arm at a time to replace a busing so that the other one is a guide for installing back. This is required so that bushings on upper control arms are not pre-loaded.
2. Remove the busing from the upper control arm. Lock the upper control arm on to a bench vise and set up the busing removal tool as shown.
Squeeze out the busing slowly while occasionally loosening the tool so that removal tool is not jammed/cocked into the control arm. You need patience because of homemade tools.
3. Install a new bushing. Set up the tool as shown so that new bushing is installed in the same direction as old bushing came out.
Caution: the holes in the busing needs to be positioned perpendicular to the control arm as shown. Audi specification is 90 +/- 5 degree.
4. Install the control arm to the strut assembly. Set the control arm with new busing is same location as the other control arm and tighten to the specified torque.
5. Repeat for the other control arm.
E. Install the strut assembly back:
1. Position the strut assembly on the strut tower and install three bolt just enough to hold the strut assembly. Caution: do not engage the strut assembly to the lower control arm yet.
2. Install ball joints of the upper control arms to the knuckle. Clean the ball joint and apply anti-seizing compound. Lift the knuckle/hub assembly (I used a hydraulic jack) such that the ball joints of upper control arms are close, and push and tap the ball joint in the knuckle. Apply anti-seizing compound to the body of the pinch bolt. Install the pinch bolt and tighten to the torque.
3. Push down on the knuckle/hub assembly and engage the lower part of strut assembly to the lower control arm. Align the holes on the lower control arm and the strut, and hand tighten the pinch bolt and nut.
Note: For removal and installation of the strut/spring assembly, you may need to turn the steering wheel in certain direction to get better clearance. In addition you may need to push down the knuckle/wheel hub to clear the strut/spring assembly.
4. Tighten the three bolts for strut assembly to the strut tower to the torque and install plastic covers. Tighten tem in several steps so that strut bracket is evenly attached.
5. Install tire/wheel
F. Repeat R&R of strut and bushings for the other side:
Do same for other side.
G. Tighten the pinch bolt and nut for lower control and strut assembly:
Caution: need to this procedure as car is in normal ride position or busing in the lower control arm will be pre-loaded like in the picture causing early failure.
1. Lift the car off the jack stand and remove the jack stand
2. Position the ramp underneath the tire and lower the car
3. Repeat the same procedure to the other side
4. Bounce front of the car to remove any binding
5. Torque the pinch bolt and the nut to the torque
6. Lift the car and remove the ramps
Note.:
1. There is no need for front end alignment since suspension adjustments are at lower control arm, and strut bracket has self centering guides.
2. Since my car was close to 100K miles, I replaced brake rotors and pads along with flushing brake fluids while the car was on the stand.

I hurried up to post the guide, and there probably will be a lot of mistakes. I will correct them later. Alos you may PM me the corrections.
After seeing how much it cost to replace the front upper control arms ($1400 ~ $1600), I was compelled to write a guide to replace bushings only to help fellow AudiWorld members to save chunk of money. https://www.audiworld.com/forums/sho....php?t=2803779
This guide is for information purpose only based on my experience with 2006 A6 Quattro with 3.2L FSI engine, VIN No. WAUDG74F96N03xxxx . Use it at your own risk.
I have no personal interest in any of products or companies I mentioned.
Please check the parts numbers with an Audi dealer to get the latest level parts to fit your car.
Parts needed:
Control arm bushings(4) $84.00
Lower control arm strut pinch nuts(2) N10106402 $1.58
Lower control arm strut pinch bolts(2) N10241202 $4.94
Upper control arm pinch washers(2) N10406105 $0.52
Upper control arm pinch nuts(2) N10272302(or N10286102) $2.56
Upper control arm pinch bolts (2) N10491802 $6.64
Anti-seizing compound
Total cost including tax and shipping ~$110Lower control arm strut pinch nuts(2) N10106402 $1.58
Lower control arm strut pinch bolts(2) N10241202 $4.94
Upper control arm pinch washers(2) N10406105 $0.52
Upper control arm pinch nuts(2) N10272302(or N10286102) $2.56
Upper control arm pinch bolts (2) N10491802 $6.64
Anti-seizing compound
I got bushings (item 3) from genuineauidparts.com; bolt and nuts from local Audi dealer. All four bushings are same. I recommend to pre-order all bolts and nuts since dealers usually don't stock them.
The cost of upper control arm is about $180 each, and you can save a lot by replacing bushings by yourself.
http://genuineaudiparts.com/partloca...layCatalogid=0
Tools:
18mm, 16mm socket and open-end wrench
Torque wrench
Jack and Jack stands
Ramps or Equivalent
Bearing puller
Bushing removal & install tool (rented from Advanced Auto Parts)
Black pipe bushing and coupling from Lowes (sanded down to slightly smaller than bushing diameter)
Air hammer or equivalent (Harbor Freight has real cheap one)
Bench vise will help
Busing removal & install tool
Torque wrench
Jack and Jack stands
Ramps or Equivalent
Bearing puller
Bushing removal & install tool (rented from Advanced Auto Parts)
Black pipe bushing and coupling from Lowes (sanded down to slightly smaller than bushing diameter)
Air hammer or equivalent (Harbor Freight has real cheap one)
Bench vise will help
Busing removal & install tool
If you are interested in buying a proper tool.
Matra�s Audi equivalent 3301 tool is ~$180
http://www.samstagsales.com/images/vw_matra_3301.jpg
Another tool needed is 3348, and I could not find it.
Torque spec:Matra�s Audi equivalent 3301 tool is ~$180
http://www.samstagsales.com/images/vw_matra_3301.jpg
Another tool needed is 3348, and I could not find it.
Strut assembly to strut tower (16 mm, 50 NM + additional 90 degree)
Upper control arm to strut housing (16 mm, 50 NM + additional 90 degree)
Upper control arm to knuckle pinch bolt (16mm, 45 NM)
Strut to lower control arm pinch bolt (18mm, 90 NM + additional 90 degree)
A. Inspection of bushings and symptom:Upper control arm to strut housing (16 mm, 50 NM + additional 90 degree)
Upper control arm to knuckle pinch bolt (16mm, 45 NM)
Strut to lower control arm pinch bolt (18mm, 90 NM + additional 90 degree)
You can inspect the condition of bushings without removing tire or lifting your car. They are clearly visible through the gap between fender and tire.
You can see some cracks. Another indication is uneven tire wear. My tires showed slight uneven wear on outside.
B. Lift the car and put it on jack stands:
1. Engage parking brake and chock the rear wheels
2. Open hood, remove cowl seal and cover, and three caps covering the strut mounting bolts.
3. Loosen up the front wheel lug bolts (do not remove yet)
4. Lift the car and put it on jack stands.
C. Removal of a strut/spring assembly:
1. Remove wheel lug bolts and remove tire
2. Remove a holding nut on the upper control arm holding pin. Sorry picture was taken after the ball joints were pushed out.
3. Remove the upper control arm pinch bolt and nut. This is the most difficult part of job because bolt is frozen shut to the knuckle due to galvanic corrosion even though they look clean. My left side came out by just tapping it with a small hammer, but I had to eventually drill out the right side. It wouldn�t come out using the air hammer like in the video shown in the above link. Be prepared to tackle this one!
This was end result after many swearing!
4. Remove ball joint of upper control arm from knuckle. I used a bearing puller on the outside one and air hammer on the inside one. There is some galvanic corrosion and they don't come out easily.
5. Remove pinch bolt and nut for strut to lower control arm
6. Remove three bolts holding strut bracket to strut tower
7. Maneuver the strut/spring assembly out of the lower control arm.
Note: For removal and installation of the strut/spring assembly, you may need to turn the steering wheel in certain direction to get better clearance. In addition you may need to push down the knuckle/wheel hub to clear the strut/spring assembly.
See the cracks on my bushings.
D. R&R of upper control arm and bushings:
1. Remove one upper control arm from the strut assembly
Caution: Remove one control arm at a time to replace a busing so that the other one is a guide for installing back. This is required so that bushings on upper control arms are not pre-loaded.
2. Remove the busing from the upper control arm. Lock the upper control arm on to a bench vise and set up the busing removal tool as shown.
Squeeze out the busing slowly while occasionally loosening the tool so that removal tool is not jammed/cocked into the control arm. You need patience because of homemade tools.
3. Install a new bushing. Set up the tool as shown so that new bushing is installed in the same direction as old bushing came out.
Caution: the holes in the busing needs to be positioned perpendicular to the control arm as shown. Audi specification is 90 +/- 5 degree.
4. Install the control arm to the strut assembly. Set the control arm with new busing is same location as the other control arm and tighten to the specified torque.
5. Repeat for the other control arm.
E. Install the strut assembly back:
1. Position the strut assembly on the strut tower and install three bolt just enough to hold the strut assembly. Caution: do not engage the strut assembly to the lower control arm yet.
2. Install ball joints of the upper control arms to the knuckle. Clean the ball joint and apply anti-seizing compound. Lift the knuckle/hub assembly (I used a hydraulic jack) such that the ball joints of upper control arms are close, and push and tap the ball joint in the knuckle. Apply anti-seizing compound to the body of the pinch bolt. Install the pinch bolt and tighten to the torque.
3. Push down on the knuckle/hub assembly and engage the lower part of strut assembly to the lower control arm. Align the holes on the lower control arm and the strut, and hand tighten the pinch bolt and nut.
Note: For removal and installation of the strut/spring assembly, you may need to turn the steering wheel in certain direction to get better clearance. In addition you may need to push down the knuckle/wheel hub to clear the strut/spring assembly.
4. Tighten the three bolts for strut assembly to the strut tower to the torque and install plastic covers. Tighten tem in several steps so that strut bracket is evenly attached.
5. Install tire/wheel
F. Repeat R&R of strut and bushings for the other side:
Do same for other side.
G. Tighten the pinch bolt and nut for lower control and strut assembly:
Caution: need to this procedure as car is in normal ride position or busing in the lower control arm will be pre-loaded like in the picture causing early failure.
1. Lift the car off the jack stand and remove the jack stand
2. Position the ramp underneath the tire and lower the car
3. Repeat the same procedure to the other side
4. Bounce front of the car to remove any binding
5. Torque the pinch bolt and the nut to the torque
6. Lift the car and remove the ramps
Note.:
1. There is no need for front end alignment since suspension adjustments are at lower control arm, and strut bracket has self centering guides.
2. Since my car was close to 100K miles, I replaced brake rotors and pads along with flushing brake fluids while the car was on the stand.
I hurried up to post the guide, and there probably will be a lot of mistakes. I will correct them later. Alos you may PM me the corrections.
 04-07-2012, 04:39 PM
#5
Audiworld Junior Member

Join Date: Oct 2009
Posts: 35
Likes: 0
Received 0 Likes
on
0 Posts
79,000 miles on my 2007 Audi A6, and I just did the front lower control arms, upper control arm links, and tie rods assembly. At this mileage I had a clunk, when turning the steering wheel at low speeds, and the ride quality was extremely poor. I knew The shocks weren't causing the bad ride quality, because I installed new koni yellows, and eibach springs at 50,000 miles.
This DIY was extremely useful to me, as I bought all the bolts, and nuts listed here from the stealership. They came in real handy, because as OP noted, the bolts are frozen, and had to be destroyed.
This DIY was extremely useful to me, as I bought all the bolts, and nuts listed here from the stealership. They came in real handy, because as OP noted, the bolts are frozen, and had to be destroyed.
04-16-2012, 02:34 PM
#6
AudiWorld Newcomer

Join Date: Jan 2011
Posts: 2
Likes: 0
Received 0 Likes
on
0 Posts
79,000 miles on my 2007 Audi A6, and I just did the front lower control arms, upper control arm links, and tie rods assembly. At this mileage I had a clunk, when turning the steering wheel at low speeds, and the ride quality was extremely poor. I knew The shocks weren't causing the bad ride quality, because I installed new koni yellows, and eibach springs at 50,000 miles.
This DIY was extremely useful to me, as I bought all the bolts, and nuts listed here from the stealership. They came in real handy, because as OP noted, the bolts are frozen, and had to be destroyed.
This DIY was extremely useful to me, as I bought all the bolts, and nuts listed here from the stealership. They came in real handy, because as OP noted, the bolts are frozen, and had to be destroyed.
The questions I have are..
1) Should/do I replace the whole control arm assembly?
2) Should/do I have to replace both side (driver/passenger)?
3) Do I have to have a wheel alignment after the replacement?
4) Any suggestions as to cost at repair shop as opposed to dealer?
Just curious as to your opinion. Great info though!
Thanks!
04-17-2012, 01:46 PM
#7
AudiWorld Member
Thread Starter
I have an A8 which I hear to expect the bushing to go out. The dealer quoted me $1415 to replace the Upper Control Arm Bushings, due to wear of Control Arm Kit???
The questions I have are..
1) Should/do I replace the whole control arm assembly?
2) Should/do I have to replace both side (driver/passenger)?
3) Do I have to have a wheel alignment after the replacement?
4) Any suggestions as to cost at repair shop as opposed to dealer?
Just curious as to your opinion. Great info though!
Thanks!
1. It depends on the condition of the ball joints of control arms and your budget. If ball joint is worn, whole control arm has to be replaced. The cost of each control arm is around $180, and the total for the contol arms is $720 compared to the total cost of $84 for 4 busings. Ball joints of my control arms showed no sign of wear, so I changed the bushings only.
2. Do both sides. No question about it.
3. No need for an alignment as I stated in the post. My car (06) has 110K miles. I was going to do an alignment after control bushings and new tires, but I decided not to because it was so well aligned that I actually thought new alignment would do more harm than good.
4. You can call around good independent shops near you. It will be noce you can share that too.
Last edited by audi bug; 03-26-2013 at 08:38 PM.
Trending Topics
04-21-2012, 09:21 PM
#8
Audiworld Junior Member
Join Date: Oct 2009
Posts: 35
Likes: 0
Received 0 Likes
on
0 Posts
I have an A8 which I hear to expect the bushing to go out. The dealer quoted me $1415 to replace the Upper Control Arm Bushings, due to wear of Control Arm Kit???
The questions I have are..
1) Should/do I replace the whole control arm assembly?
2) Should/do I have to replace both side (driver/passenger)?
3) Do I have to have a wheel alignment after the replacement?
4) Any suggestions as to cost at repair shop as opposed to dealer?
Just curious as to your opinion. Great info though!
Thanks!
The questions I have are..
1) Should/do I replace the whole control arm assembly?
2) Should/do I have to replace both side (driver/passenger)?
3) Do I have to have a wheel alignment after the replacement?
4) Any suggestions as to cost at repair shop as opposed to dealer?
Just curious as to your opinion. Great info though!
Thanks!

Thread
Thread Starter
Forum
Replies
Last Post
chrisone
Parts For Sale - Archive (NO NEW POSTS HERE)
0
07-31-2018 02:58 PM
rocketruss
A6 / S6 (C5 Platform) Discussion
7
09-07-2016 06:07 PM
Beach2MountainA6
A6 / S6 (C5 Platform) Discussion
2
10-22-2009 03:41 PM
rocketman4321
A6 / S6 (C5 Platform) Discussion
15
10-31-2005 04:28 PM
RickSF
A6 / S6 (C5 Platform) Discussion
4
03-09-2005 01:42 PM