
 08-02-2016, 04:05 PM
Last edit by: IB Advertising
See related guides and technical advice from our community experts:
- Audi A6 C5 How to Install Rear Sport Seats<br>Step by step instructions for do-it-yourself repairs.

Finally, rear sport seats are installed!!!
05-19-2005, 07:51 PM
#1
AudiWorld Expert
Thread Starter
Sorry I did not post this earlier...very full day, including the seat swap in the AM, Star Wars Revenge of the Sith at noon, then some family time in the afternoon, and a social event in the evening.
For those that missed my <a href="https://forums.audiworld.com/a6/msgs/460748.phtml">front sport seat swap</a>, I have been annoyed by the mismatch of the front and rear seats because of the different stitching patterns. I found a set from a local guy that is getting rid of his car a month or so, and he did not mind the swap since I have been helping him with some other stuff. Cool!
Anyway, the swap took less than 1.5 hours including taking some pics, and some technical difficulties when I split my pants!!! Luckily, I had my golf duffel in the trunk with a change of clothes.
Okay, to the seat swap...which can also be a good reference for those heading to the track and want to shed some excess pounds!
Tools: 17mm deep socket, T-30 and T-15 torx screwdriver, philips-head screwdriver, wire cutters.
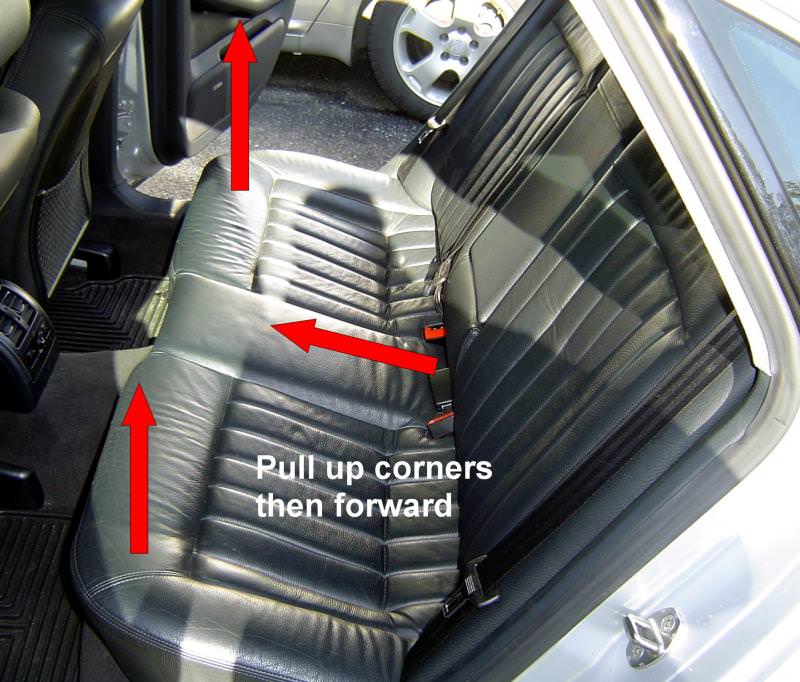
First step is to remove the bench seat pad. Pull upward on the front corners...you'll know when they are loose. You have to tug. Then pull up and forward toward the front of the car
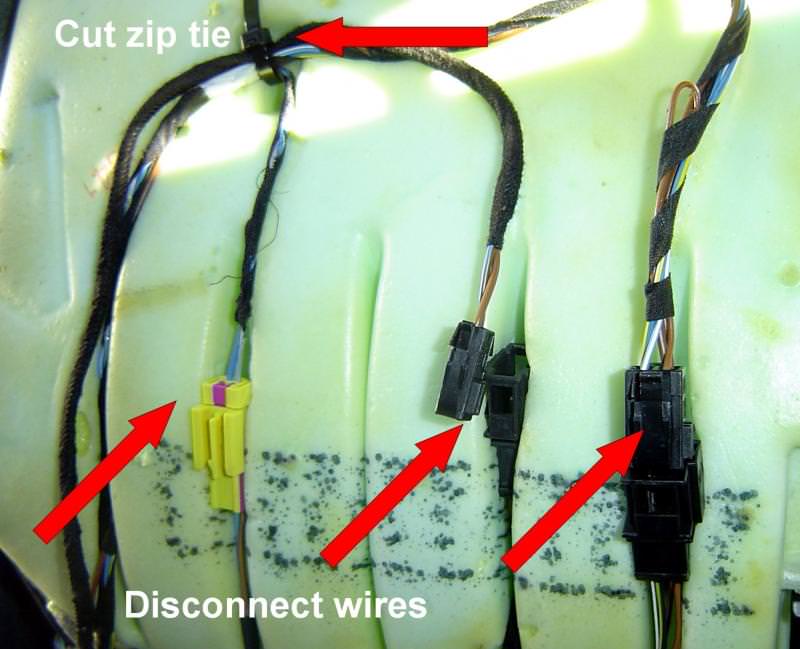
Once the seat is loose, you have to disconnect the wires for the heated seats and the sensor for the side curtain airbag. I do not have rears seat side airbags, but there is a wire that has a yellow connector, and I believe that this is the sensor for the passenger side curtain airbag. You need to use the wire cutters to cut the zip tie.
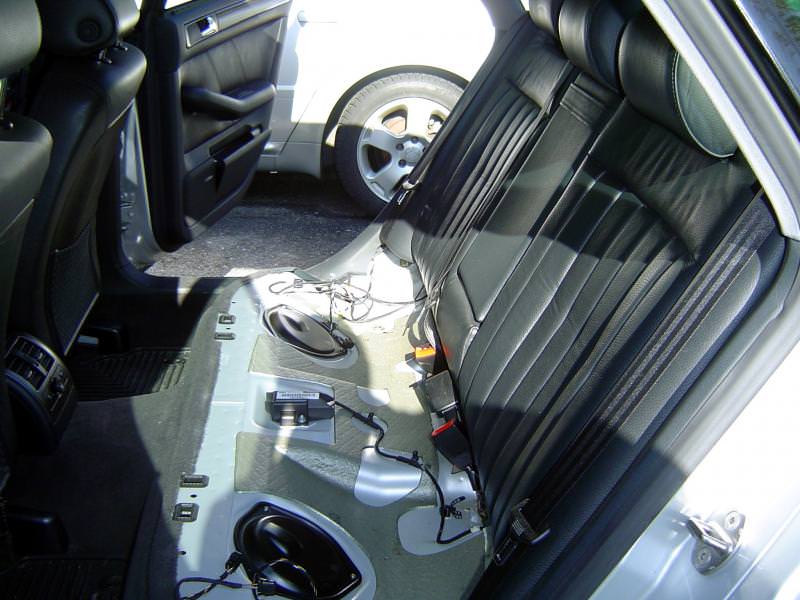
Remove the bench seat cushion
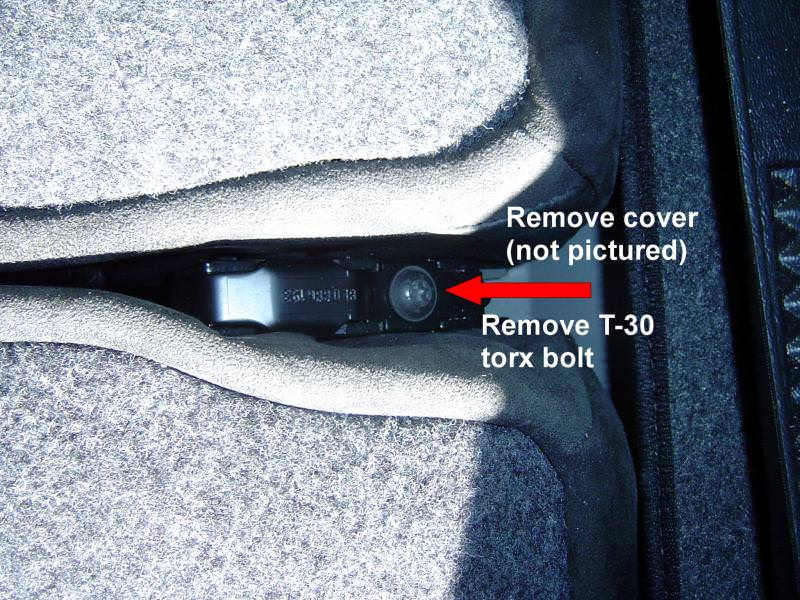
Fold down the seat backs, and remove the plastic cover to reveal the T-30 torx bolt shown below. To remove the cover, pull up from the rearward end of the cover and rotate up and forward.
Once the torx bolt is removed, remove the metal plate to reveal the hinges for the seatbacks. Lift the 1/3 split seatback out of the hinge, then slide toward the center of the car to remove from the outer hing pin and remove the seatback from the car.
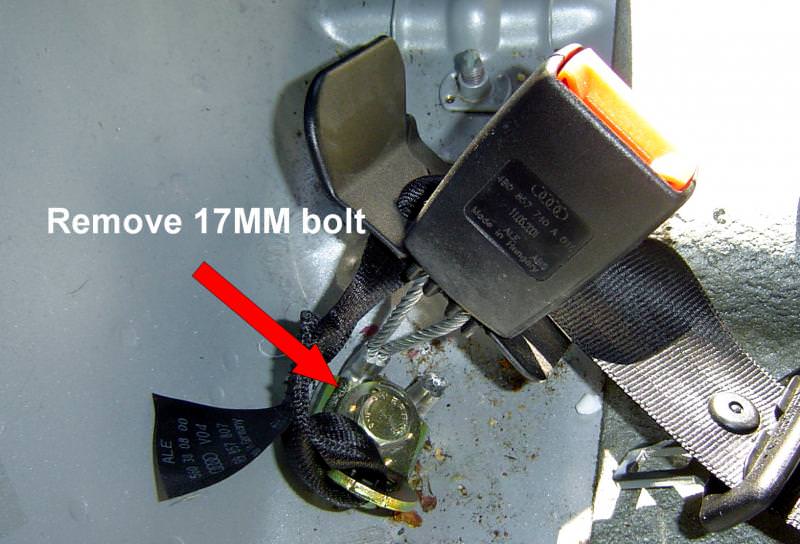
The 2/3 seatback cannot be removed without first removing the bolt that anchors the center seatbelt, since the seatbelt is built into the seatback. Remove this 17mm bolt pictured below.
Now ready to remove the side bolsters....
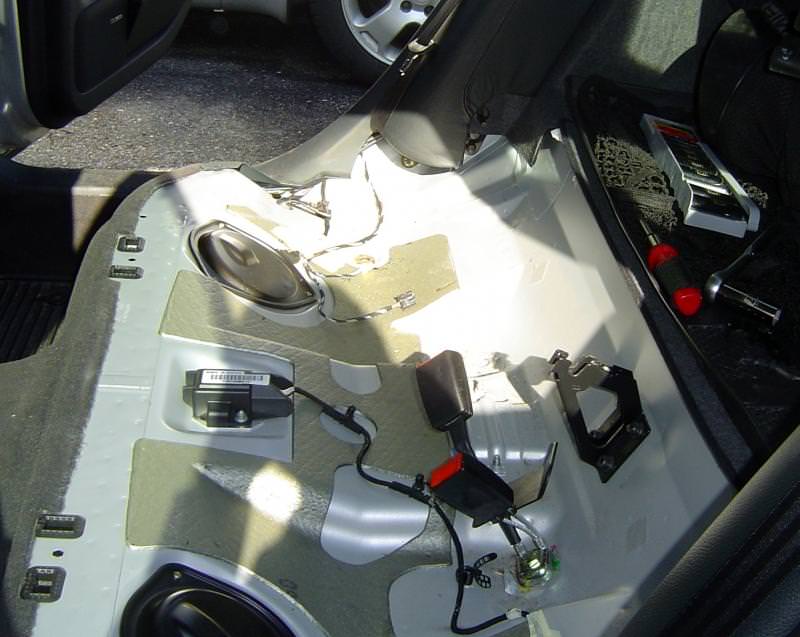
Using the 17mm deep socket, remove the locking nut for the strike pin on the side bolsters, and remove the strike pin. Pull the bolster out of the bottom retainer (sorry, no pic of this, but similar to the retaining clips for the seat bottom).

Everything out and almost ready to swap!
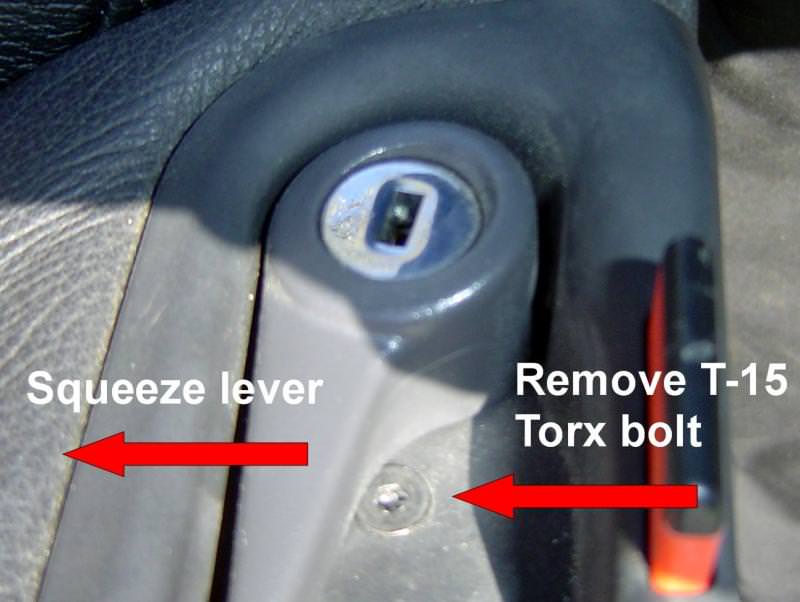
I wanted the locking mechanisms to match the ignition key, so I swapped out the entire latch mechanism. Easy thing, just a screw and a T-15 torx bolt as shown below.

Once all that is done, just install in reverse order, starting with the side bolsters, the seatbacks (don't forget to fasten the lower anchor bolt for the center seatbelt!!!), the seat bench, and voila!!! You now have rear seats swapped!!!
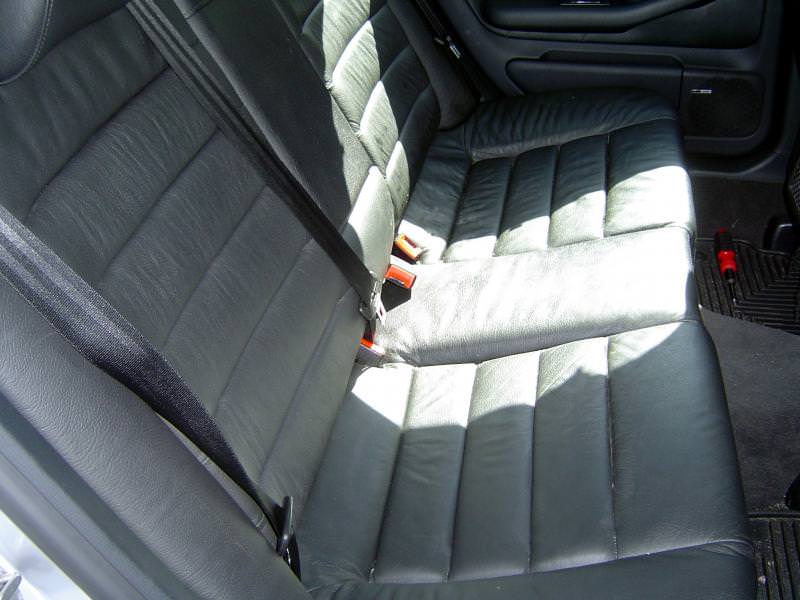
I know, I have to clean them. Full detail tomorrow afternoon (weather permitting). Note the difference in the stock onyx (on the nearside door trim) and the seat. Oh well. At least the front and rear seats match now!!!
For those that missed my <a href="https://forums.audiworld.com/a6/msgs/460748.phtml">front sport seat swap</a>, I have been annoyed by the mismatch of the front and rear seats because of the different stitching patterns. I found a set from a local guy that is getting rid of his car a month or so, and he did not mind the swap since I have been helping him with some other stuff. Cool!
Anyway, the swap took less than 1.5 hours including taking some pics, and some technical difficulties when I split my pants!!! Luckily, I had my golf duffel in the trunk with a change of clothes.
Okay, to the seat swap...which can also be a good reference for those heading to the track and want to shed some excess pounds!
Tools: 17mm deep socket, T-30 and T-15 torx screwdriver, philips-head screwdriver, wire cutters.
First step is to remove the bench seat pad. Pull upward on the front corners...you'll know when they are loose. You have to tug. Then pull up and forward toward the front of the car
Once the seat is loose, you have to disconnect the wires for the heated seats and the sensor for the side curtain airbag. I do not have rears seat side airbags, but there is a wire that has a yellow connector, and I believe that this is the sensor for the passenger side curtain airbag. You need to use the wire cutters to cut the zip tie.
Remove the bench seat cushion
Fold down the seat backs, and remove the plastic cover to reveal the T-30 torx bolt shown below. To remove the cover, pull up from the rearward end of the cover and rotate up and forward.
Once the torx bolt is removed, remove the metal plate to reveal the hinges for the seatbacks. Lift the 1/3 split seatback out of the hinge, then slide toward the center of the car to remove from the outer hing pin and remove the seatback from the car.
The 2/3 seatback cannot be removed without first removing the bolt that anchors the center seatbelt, since the seatbelt is built into the seatback. Remove this 17mm bolt pictured below.
Now ready to remove the side bolsters....
Using the 17mm deep socket, remove the locking nut for the strike pin on the side bolsters, and remove the strike pin. Pull the bolster out of the bottom retainer (sorry, no pic of this, but similar to the retaining clips for the seat bottom).
Everything out and almost ready to swap!
I wanted the locking mechanisms to match the ignition key, so I swapped out the entire latch mechanism. Easy thing, just a screw and a T-15 torx bolt as shown below.
Once all that is done, just install in reverse order, starting with the side bolsters, the seatbacks (don't forget to fasten the lower anchor bolt for the center seatbelt!!!), the seat bench, and voila!!! You now have rear seats swapped!!!
I know, I have to clean them. Full detail tomorrow afternoon (weather permitting). Note the difference in the stock onyx (on the nearside door trim) and the seat. Oh well. At least the front and rear seats match now!!!
Last edited by Boston Driver; 04-07-2018 at 04:27 AM. Reason: updated pic links

 05-19-2005, 09:18 PM
#5
AudiWorld Super User
j/k. That's nice! I'm officially jealous. That was really kind of the guy to switch w/ you. Lucky *#%@&!! =) It looks great!


Trending Topics
05-20-2005, 03:14 AM
#8
AudiWorld Member
Join Date: Sep 2004
Location: Family and Photography
Posts: 257
Likes: 0
Received 0 Likes
on
0 Posts
Won't the dealerr notice the difference when he turns in the lease. I thought you said he had a sport package that he was turning in.
I would hate to be the buyer of that lease
Tim
I would hate to be the buyer of that lease
Tim
05-20-2005, 03:57 AM
#10
AudiWorld Expert
Thread Starter
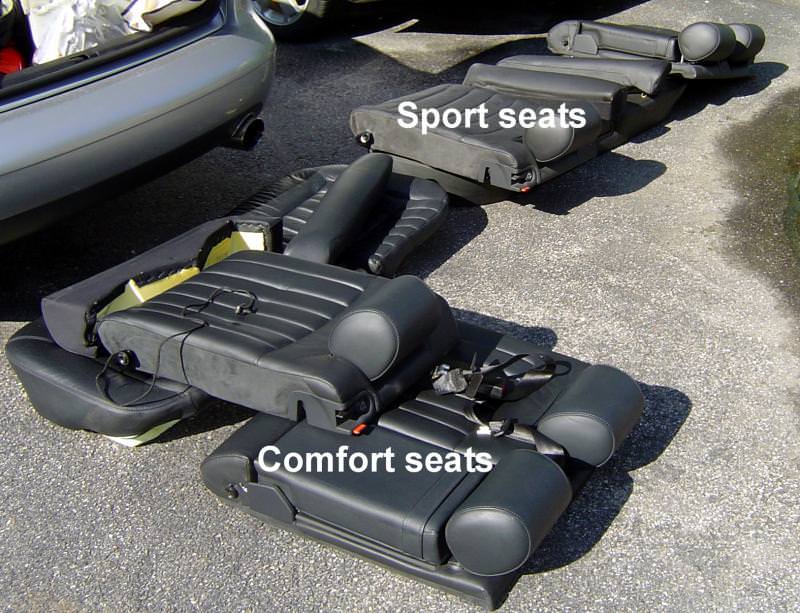
these are not the deep bucket type rear seats that you find in the 4.2. These are exactly the same shape.
<img src="http://img.photobucket.com/albums/v739/hliu55/rear%20seat%20swap/rearseat1.jpg">
<img src="http://img.photobucket.com/albums/v739/hliu55/rear%20seat%20swap/rearseat11.jpg">
<img src="http://img.photobucket.com/albums/v739/hliu55/rear%20seat%20swap/rearseat1.jpg">
<img src="http://img.photobucket.com/albums/v739/hliu55/rear%20seat%20swap/rearseat11.jpg">