DIY RS4 engine mount writeup (UBER LONG).
 03-22-2005, 12:40 PM
#1
AudiWorld Super User
Thread Starter

Join Date: Aug 2003
Posts: 2,808
Likes: 0
Received 0 Likes
on
0 Posts
Here's how I replaced my engine mounts with RS4 mounts on my A6 2.7t. The job on a B5 S4 should be essentially identical, although you may not need to drop the AC compressor. I don't have as many pictures as I originally wanted, but you can get a good look at the underside stuff by referring to the great writeup for the B5 A4 in the tech section which was written by HurricaneSteve and Will Mahoney.
<a href="https://www.audiworld.com/tech/eng57.shtml">B5 A4 Mount Swap Writeup</a>
Also thanks to Mat@Induction for some key pointers.
I used an engine hoist to lift the engine. I've seen it done by jacking the engine from below, but I didn't want to take any chances with the oil pan and the $28 hoist rental was well worth it.
Step one for me was to drive up on 4 rhino ramps. You can do jackstands too, but I think it is important to have the car up and level so that the engine doesn't tend to push back on the tranny mounts.
The holy grail of this whole job is getting to the top mount nuts. If you could reach these easier, this whole job would be a piece of cake. I have seen some reports of folks being able to get to those nuts from below, but I think that is just too darn difficult. You also want to make sure that you can get the top nuts tight on re-install which is much easier from the top.
First, remove the bumper and put the lock carrier (front clip) into service position. I assume you know how to do this, but if not, Bentley has it.
Remove the airbox, Y-pipe and vertical turbo inlet tubes. Also remove the hoses from the evap. system where they connect to the stainless hard tube on the horizontal turbo inlet tubes. Obviously, bag and cover any open pipes or hoses to prevent FO from getting into your turbos and causing D.
Drop down under the car and remove the sway bar completely. This is attached to the aluminum brackets which will be coming off. I took the sway all the way off because I didn't want it hanging from the uplinks. Mark the location of the lower mount nuts and the round locating hole and tab on the underside of the mount. At this point also remove the lower mount nuts completely.
Now hook up the engine hoist to the lift points at the front of the engine. The P-side one is in the aluminum casting and the D-side is an add-on black bracket. Lift the engine just enough to see a gap between the mount and lower bracket under the car.
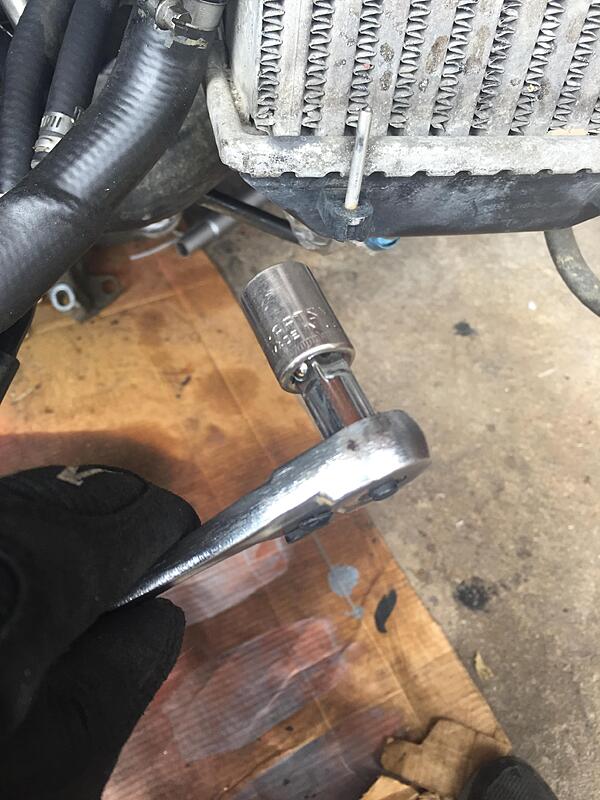
Unbolt the p-side turbo pipe at the front of the pipe and pull it forward and up and out. I took the pipes all the way out to make sure they were totally clean and free from debris. Here are pictures with the pipe in and with the nut now accessible with the pipe out. Remove the top mount nut (and washer if there is one). The top picture is with the turbo inlet pipe in. In the next pic you can just see the mount nut which is green on the upper mount screw which is red. It's easier to wrench now that it looks.
<img src="http://pictureposter.audiworld.com/61325/p_side_mount_loc.jpg">
<img src="http://pictureposter.audiworld.com/61325/p_side_mount_tube_out.jpg">
From below, jack the subframe very slightly so that it will not drop down. Remove the 2 18mm head screws from the front of the aluminum mount bracket on the p-side. Also begin backing out the main subframe screw (also 18mm) and watch to make sure the subframe doesn't drop too much. Use new bolts for these locations and follow Bentley torques specs. The subframe screw torque on the A6 is 110 Nm + 90 degrees. The other two screws are 60 Nm. With all the screws out, the bracket will drop right down and allow you to swap out the mounts. Line up the tabs on the top of the mount in the upper bracket and sandwich the thing in there with the lower bracket. Install your new screws from in the lower bracket. Line up the bracket using the round holes in the bracket, corner of the subframe and the body. Now torque those puppies down per spec.
Go above and tighten the upper nut. I recommend you use new nuts for both the top and bottom of the mount. Reusing washers shouldn't be a problem.
You can now reinstall your turbo inlet pipe. I wanted to minimize the amount of time I had the turbo open to peril.
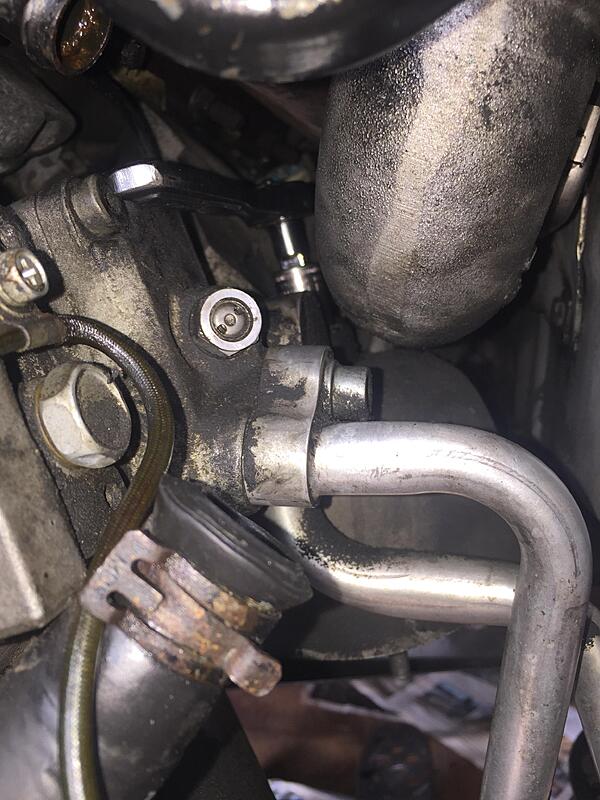
The driver side is essentially the same, but on my car I had to drop the AC compressor down. This requires taking tension off the accessory belt tensioner and sticking an allen wrench in the lock for that and pulling the belt off the compressor. Then remove the bracket nut for the AC hard pipe lines on the p-side of the oil pan. You'll need to remove the oil filter to access the three bolts holding the AC compressor in place. There are two bolts in front of the compressor and one in the rear (up next to the mount). Once these are loose, the compressor will drop down enough to allow you to pull the turbo pipe forward and up and out. You will need to rotate the pipe slightly to get it past the power steering pump hard pipe. The next pictures show a straight on shot of the d-side with the turbo inlet pipe still in. The second pic shows the top nut easily reachable.
<img src="http://pictureposter.audiworld.com/61325/d_side_mount_loc.jpg">
<img src="http://pictureposter.audiworld.com/61325/d_side_mount_tube_out.jpg">
You can now see the top nut perfectly and get it loose with a 13 mm ratchet.
Replace that mount as before, and retighten the lower bracket and subframe bolts.
One last thing to do before you let the engine back down is to move the engine from side to side to make sure it is centered. Let the engine down carefully and make sure the tabs in the lower part of the mount line up in one of the holes. Once this is done you can tighten the lower nuts and put everything back together. This job took me about 7 hours, but I could do it faster now that I know what I'm doing. I may have forgotten some little things, but work slowly and safely and you should have good luck. BTW, the C5 Bentley has absofrickinloutley nothing about this job so I don't know what the mount nut torque spec is, but I torqued them like I didn't want to have to go back in there EVAR! (without snapping off the bolts of course).
<a href="https://www.audiworld.com/tech/eng57.shtml">B5 A4 Mount Swap Writeup</a>
Also thanks to Mat@Induction for some key pointers.
I used an engine hoist to lift the engine. I've seen it done by jacking the engine from below, but I didn't want to take any chances with the oil pan and the $28 hoist rental was well worth it.
Step one for me was to drive up on 4 rhino ramps. You can do jackstands too, but I think it is important to have the car up and level so that the engine doesn't tend to push back on the tranny mounts.
The holy grail of this whole job is getting to the top mount nuts. If you could reach these easier, this whole job would be a piece of cake. I have seen some reports of folks being able to get to those nuts from below, but I think that is just too darn difficult. You also want to make sure that you can get the top nuts tight on re-install which is much easier from the top.
First, remove the bumper and put the lock carrier (front clip) into service position. I assume you know how to do this, but if not, Bentley has it.
Remove the airbox, Y-pipe and vertical turbo inlet tubes. Also remove the hoses from the evap. system where they connect to the stainless hard tube on the horizontal turbo inlet tubes. Obviously, bag and cover any open pipes or hoses to prevent FO from getting into your turbos and causing D.
Drop down under the car and remove the sway bar completely. This is attached to the aluminum brackets which will be coming off. I took the sway all the way off because I didn't want it hanging from the uplinks. Mark the location of the lower mount nuts and the round locating hole and tab on the underside of the mount. At this point also remove the lower mount nuts completely.
Now hook up the engine hoist to the lift points at the front of the engine. The P-side one is in the aluminum casting and the D-side is an add-on black bracket. Lift the engine just enough to see a gap between the mount and lower bracket under the car.
Unbolt the p-side turbo pipe at the front of the pipe and pull it forward and up and out. I took the pipes all the way out to make sure they were totally clean and free from debris. Here are pictures with the pipe in and with the nut now accessible with the pipe out. Remove the top mount nut (and washer if there is one). The top picture is with the turbo inlet pipe in. In the next pic you can just see the mount nut which is green on the upper mount screw which is red. It's easier to wrench now that it looks.
<img src="http://pictureposter.audiworld.com/61325/p_side_mount_loc.jpg">
<img src="http://pictureposter.audiworld.com/61325/p_side_mount_tube_out.jpg">
From below, jack the subframe very slightly so that it will not drop down. Remove the 2 18mm head screws from the front of the aluminum mount bracket on the p-side. Also begin backing out the main subframe screw (also 18mm) and watch to make sure the subframe doesn't drop too much. Use new bolts for these locations and follow Bentley torques specs. The subframe screw torque on the A6 is 110 Nm + 90 degrees. The other two screws are 60 Nm. With all the screws out, the bracket will drop right down and allow you to swap out the mounts. Line up the tabs on the top of the mount in the upper bracket and sandwich the thing in there with the lower bracket. Install your new screws from in the lower bracket. Line up the bracket using the round holes in the bracket, corner of the subframe and the body. Now torque those puppies down per spec.
Go above and tighten the upper nut. I recommend you use new nuts for both the top and bottom of the mount. Reusing washers shouldn't be a problem.
You can now reinstall your turbo inlet pipe. I wanted to minimize the amount of time I had the turbo open to peril.
The driver side is essentially the same, but on my car I had to drop the AC compressor down. This requires taking tension off the accessory belt tensioner and sticking an allen wrench in the lock for that and pulling the belt off the compressor. Then remove the bracket nut for the AC hard pipe lines on the p-side of the oil pan. You'll need to remove the oil filter to access the three bolts holding the AC compressor in place. There are two bolts in front of the compressor and one in the rear (up next to the mount). Once these are loose, the compressor will drop down enough to allow you to pull the turbo pipe forward and up and out. You will need to rotate the pipe slightly to get it past the power steering pump hard pipe. The next pictures show a straight on shot of the d-side with the turbo inlet pipe still in. The second pic shows the top nut easily reachable.
<img src="http://pictureposter.audiworld.com/61325/d_side_mount_loc.jpg">
<img src="http://pictureposter.audiworld.com/61325/d_side_mount_tube_out.jpg">
You can now see the top nut perfectly and get it loose with a 13 mm ratchet.
Replace that mount as before, and retighten the lower bracket and subframe bolts.
One last thing to do before you let the engine back down is to move the engine from side to side to make sure it is centered. Let the engine down carefully and make sure the tabs in the lower part of the mount line up in one of the holes. Once this is done you can tighten the lower nuts and put everything back together. This job took me about 7 hours, but I could do it faster now that I know what I'm doing. I may have forgotten some little things, but work slowly and safely and you should have good luck. BTW, the C5 Bentley has absofrickinloutley nothing about this job so I don't know what the mount nut torque spec is, but I torqued them like I didn't want to have to go back in there EVAR! (without snapping off the bolts of course).


 03-24-2005, 12:46 PM
#6
AudiWorld Super User
Thread Starter
Join Date: Aug 2003
Posts: 2,808
Likes: 0
Received 0 Likes
on
0 Posts
of days. Putting the clip back on will undoubtedly place the bracket in a slightly different place so you'll get some vibes through the body if the snub isn't centered.
I also thought doing that after a couple of days is good because the engine has had a chance to sit down on the mounts.
I also thought doing that after a couple of days is good because the engine has had a chance to sit down on the mounts.
05-08-2014, 01:44 PM
#7
AudiWorld Senior Member
Join Date: Apr 2000
Location: San Carlos
Posts: 1,252
Likes: 0
Received 0 Likes
on
0 Posts
Bringing this back from the dead, well because I have to tackle my mounts like now. They are basically destroyed and I need them done.
Do you happen to have the pictures still available somewhere? It would make following this a little easier.
Thanks!
Do you happen to have the pictures still available somewhere? It would make following this a little easier.
Thanks!
Trending Topics
07-05-2014, 12:57 PM
#8
AudiWorld Newcomer

Join Date: Apr 2013
Posts: 1
Likes: 0
Received 0 Likes
on
0 Posts
i need help with this topic. I can not access the top nuts on the mounts. I have the lower ones out. I cant even see the top nut on the passenger side because of the lower inlet pipe. and the drivers side I can not access, also, because of the lower inlet pipe, however i can atleast see it. what should i do?
07-06-2014, 05:38 AM
#9
AudiWorld Newcomer

Join Date: Oct 2013
Posts: 6
Likes: 0
Received 0 Likes
on
0 Posts
i need help with this topic. I can not access the top nuts on the mounts. I have the lower ones out. I cant even see the top nut on the passenger side because of the lower inlet pipe. and the drivers side I can not access, also, because of the lower inlet pipe, however i can atleast see it. what should i do?
08-28-2016, 11:45 AM
#10
AudiWorld Member

Join Date: Aug 2008
Posts: 72
Likes: 0
Received 0 Likes
on
0 Posts
I did it! As a tip to get to the driver's side top motor mount bolt (it's a PITA to get to): I didn't have to remove the driver's side turbo hard pipe (because it was so tight I couldn't remove it and was afraid of not being able to get it back in). I dropped the A/C compressor and removed the power steering line and coolant line that was to the right front of the A/C compressor to allow more room to get a wrench in there. I also pulled up the vertical coolant hard pipe that goes to the coolant reservoir a few inches. I was able to use a 1/4" ratchet (w/ a 13mm regular (non deep) 3/8" socket w/ 1/4" to 3/8" adaptor) to access the top driver's side motor mount from the front of the engine and was able to loosen the top motor mount bolt. Then I was able to spin the motor mount itself to loosen it from the top motor mount bolt.


Thread
Thread Starter
Forum
Replies
Last Post
AirVtec
S4 / RS4 (B5 Platform) Discussion
7
03-18-2005 03:17 PM
Matt T-28
A4 (B5 Platform) Discussion
14
04-21-2003 10:42 AM