When you click on links to various merchants on this site and make a purchase, this can result in this site earning a commission. Affiliate programs and affiliations include, but are not limited to, the eBay Partner Network.
Coolant flange tips. Buy the right tools first. Update: Aluminum!
This is not a full DIY. Just some tips to keep you from going insane...
This can be a maddening-frustrating task but if you remove the vacuum pump, HPFP, and rear timing chain cover to create better access it is manageable. I have attached a YouTube video. (Scroll down to the end.) The fellow is not the best with a camera but he shows exactly what to do to make the job go smooth.
And the job goes way better with the proper tools. And the tools are not expensive. And yes I have it in for the guy who invented triple square bolts. hahaha. (Slightly insane laughter, I've done this job too many times.)
Edit: added parts list and tools list at the end.
Update October 20, 2023
Glory-b and hallelujah! Finally. Yes. Yes. Yes. Aluminum.
To assess quality I ordered three aluminum coolant flanges: ECS Tuning ($54), Amazon ($27) and eBay ($20). In hand all are of good quality and all are essentially identical. I will venture to say all were made by the same foundry in Taiwan. Installation was normal and all connections fit and sealed fine. I installed the eBay version and returned the other two for refund. Links:
Tips to replace the dreaded coolant flange, Audi B7 A4 2.0T quattro.
-when you find an XZN i.e. triple-square bolt replace it with a stainless steel Allen head or Hex head bolt. Throw the triple square bolts you removed out into the woods. Ha-ha. Not really, but I personally replace triple-squares on common parts like brackets etc. when I find them. Those shallow, self-stripping heads must be Germany's attempt at DIY discouragement. I toss 'em.
-you must remove the vacuum pump. A short shank T30 torx bit on a mini gear wrench or flex head ratchet works nicely. Top-tip - As you pull the vacuum pump, mark the position of the impeller connector with a Sharpie marker. It's that rotating bar which fits into a corresponding grove at the end of the intake cam. Upon reassembly, the vacuum pump mounts up easier if things are lined up properly. Having a mark as a reference helps a lot.
-have on hand a paint can lid opener tool. Works great to toggle the catch on VAG electrical connectors. Hard on the fingertips otherwise. (About $1).
-disconnect the coil packs (all four) and push the wiring harness down and toward the fender to gain access to the vacuum pump and the attached ground leads (2).
-disconnect the ground leads (2) from that weird bracket that attaches to the underside of the vacuum pump. When you later go to reattach the ground leads to the weird bracket, don’t. Throw the weird bracket way out into the woods. Ha-ha. Then install a 10-12 inch extension cable to allow you to bolt the ground leads to the vacuum pump at the top of the vacuum pump for easy access next time. Bolt-in cable sections are available at most part stores or on line.
-reseal the vacuum pump since you have it out anyway. O-ring kits available on line. Oil from the leaky vacuum pump caused the coolant flange to leak in the first place. Fugitive oil drips precisely onto the flange O-rings and swells them resulting in the coolant leak. Guaranteed. It's amazing how that oil will drip so perfectly onto the O-rings below.
-if you are doing this for the first time remove the HPFP and rear timing chain cover. I highly recommend you do so, it allows much-much better access. Be sure to have a new cover gasket and HPFP O-ring before you do.
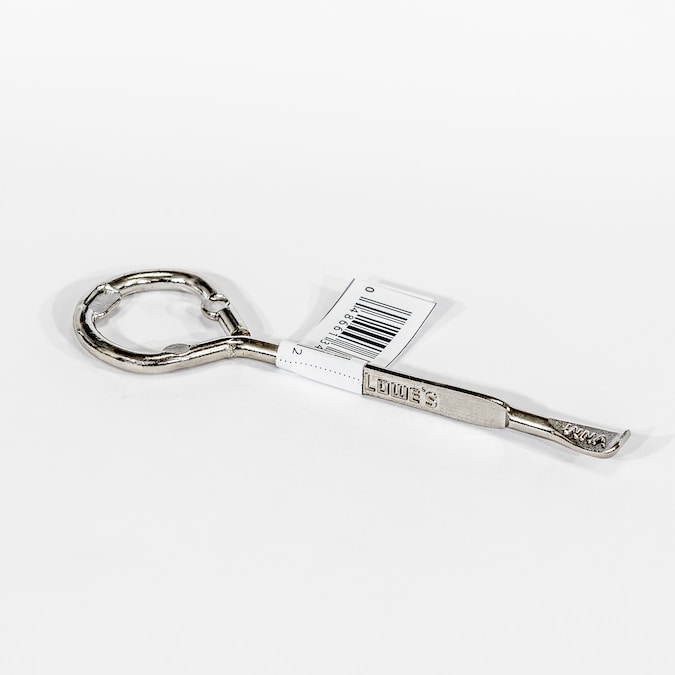
-find a fork-shaped bicycle spoke wrench. ($8). It’s the only tool that can access that idiotic coolant drain valve that Audi put on the radiator. (My hands are too big to get in there.) Drain the coolant into a clean container for re-use. It is still going to run out the coolant flange port when you pull the flange so have another catch pan handy.
-detach the hard-pipe coolant line above the intake manifold from its mounts. Chuck that triple square.
-you must have a cable-type hose clamp pliers! Use to release spring-eared hose clamps. Virtually impossible to do this job without this tool. (About $20 on line.) Link:
-those spring-eared hose clamps you struggled to get loose, yes throw those buggers into the woods too. Replace with quality stainless steel good-old radiator clamps. You’ll see why.
-hose pick ($7) the short coolant hose from the hard pipe. A little silicone spray worked in there helps. Leave it attached to the coolant flange then remove together with the flange. It can be done, just go at it patiently. Even if you get the short coolant hose off in one piece replace it with a new one. Some guys just cut it off.
-use two long flat screwdrivers at one time to dislodge the lower heater hose from coolant flange (tap-tap, push, tap-tap, push) after using one of those screwdrivers to slide the metal retaining clip to it's disengaged and resting position.
-replace the heater hose connector O-ring with a new one. Available on line.
-may as well replace the coolant sensor too. Comes with an O-ring.
-the mounting bolts for the coolant flange itself are T30 torx (Or worse yet M8 triple squares.). You know what to do when you finally get them out. Toss ‘em. Then replace those little bastards with 80mm long stainless steel Allen head bolts. Use a nylock nut to form a second head. Next time they will be easy to reach and undo. Plus they will be easier to get threaded in this time. (BTW- you may need to trim some off the threaded end of the Allen bolt if the partial thread section is too long. Compare to original bolt for length.)
My take on this: Using long bolts like this will allow you to remove/install the coolant flange next time without removing the timing cover and HPFP, making the job go just that much quicker. BTW-I have never stripped out the head of a stainless steel Allen (socket) head bolt. Never. That's why I like them.
-be sure to inspect and clean the coolant flange port on the block. It will likely contain pieces of the old coolant flange and other debris. A medium Scotch Brite abrasive pad works nicely. You want the port to be as smooth as possible so the flange neck/O-ring glides into place smoothly.
-have 1 or 2 extra O-rings for the coolant flange. You will probably need them. It's easy-easy to ding up the O-ring. Lube the O-ring! When right it sort of clunks into place squarely. Don't force the coolant flange into the block and don't use the retaining bolts to draw it in. You will scrape a chunk out of the O-ring. Ask me how I know. Pro tip: Don’t use oil as a lube, it can swell and destroy coolant O-rings, liquid soap like thick car-wash concentrate is a good alternative.
-a good mechanic will reserve about a day for this job. The rest of us will need at least two. First time it took me about an afternoon and part of the next morning. It is just a pain working in such a tight space way back along the firewall. The 2nd thru 5th time...only about 2 hours each. Practice. We're talking 'bout practice. (Yes, I've done this bee-otch five times now, thus the aluminum version.)
BTW- I really did do all the little modifications on my A4 like the long-bolt thing and getting rid of those spring-type hose clamps, etc. The mods bring the frustration level (and under-hood time) way-way down.
All the best, Haya....
Parts list:
Update October 2023:
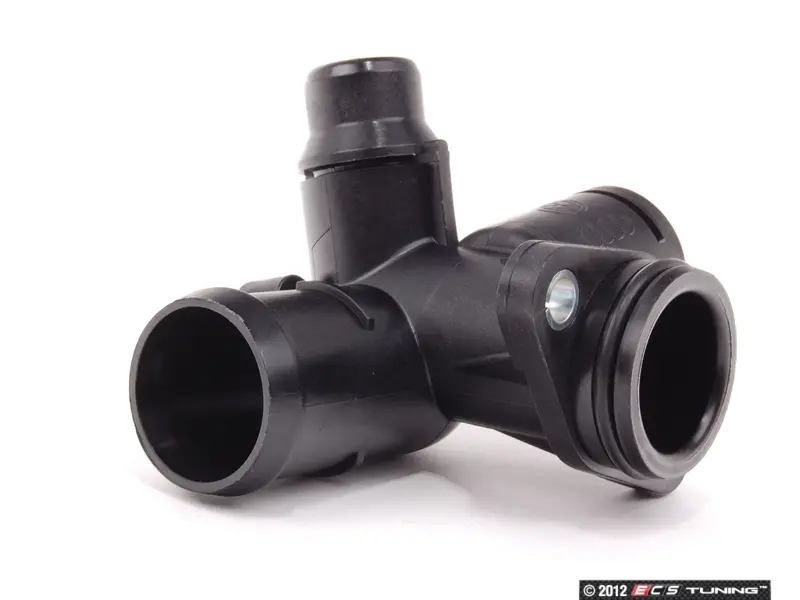
Coolant flange, cast aluminum - eBay part no. 06D121132C, $20
Coolant flange (plastic): ECS Tuning, part no. 06D121132C, $40 OE Audi. (Ooo ick. Don't buy plastic anymore the aluminum version is the cat's ***.)
Short coolant hose: Amazon, OE Audi 06D121101B, $13
YDS All 300 Grade Stainless Steel W4 German Type Hose Clamp, Worm Gear, 32-50 mm (1-1/4 to 2"), Amazon, $2 ea.
Coolant flange O-ring (extra): ECS, part no. WHT001688, $5
Heater hose O-ring: ECS, part no. N90316802, $3
Coolant temperature sensor: Amazon, Beck/Arnley part no. 06A919501A, $10
Timing chain cover gasket: Amazon, Victor Reinz part no. 06D103121B, $9
HPFP O-ring: ECS, part no. WHT005184, $5
Vacuum pump advanced O-ring kit: Amazon, Asin no. B07HH4DMCV, $15 (For original and/or upgraded vacuum pump. Fits both styles.)
MonsterBolts M6 x 80mm Socket Head Screws, DIN 912, Stainless Steel, Partial Thread, 10 Pack, Amazon, $8
2 AWG Gauge Black Pure Copper Battery Inverter Cable, Solar, RV, Car, Boat 12 in 5/16 in Lugs, Amazon, $8
Frustration-reducing Tools:
Paint can opener, Loew's or any hardware store, $1
Spoke wrench, BikeMaster part no. 14-04, Amazon, $8
Cable type 24 inch Hose Clamp Pliers, Amazon, $20
Hose pick set, Harbor Freight, $7
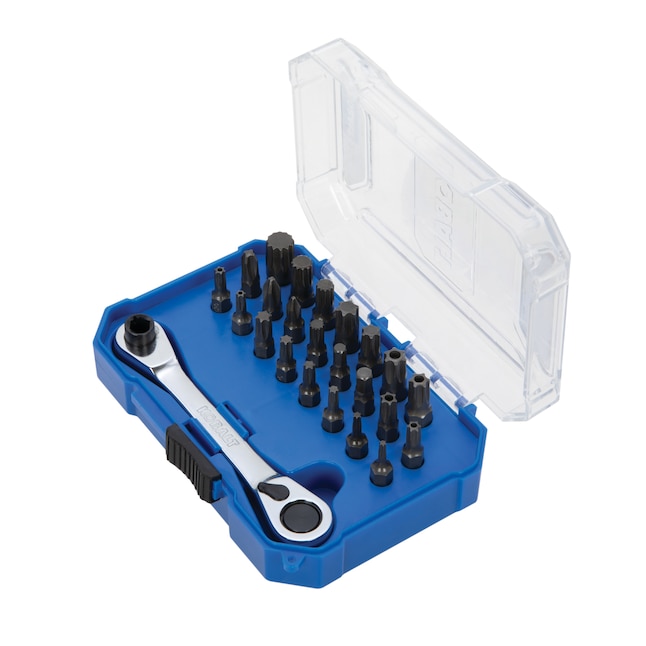
Kobalt 24-Piece Standard (SAE) and Metric Combination Polished Chrome Mechanics Tool Set with Hard Case, Loew's $20 Look. It even has a few triple-square bits. Yeesh!
EDIT: Added link to video. This fellow knows what he is talking about!
Update November 1, 2022
Around this time of year when overnight temperatures dip down to near freezing the Audi can develop weeping at its many O-rings. This happened again at the coolant flange, so I replaced the O-rings again. The one at the block was stiff-stiff. That's where it was leaking. Not much maybe 3-5 drops overnight on my garage floor. I figured I'd better fix it now rather than wait til later when it gets really cold.
Anyway, I wanted to try the new 1/4-inch drive flex-head ratchet I found on Amazon. Gearwrench part no. 81030, I paid about $22 (yikes), it may have gone up.
Wow what a great time saver and knuckle saver. It's 12 inches in length so it gets down in there nicely and has a fine-tooth ratcheting mechanism, so it works in tight spaces. Shown below with its socket adapter off to the side and the two bits I used to remove the vacuum pump (short T-30 Torx), and the coolant flange (3-inch-long x 5mm Allen). And, I did not need to remove the HPFP and timing chain cover. Yay!
It's practically a VAG specialty tool without being a specialty tool. Highly recommended. Haya....
Edit: Mar 29, 2023: I see on Amazon-Reviews several posts where the wrench has failed at the swivel head. I can see how this can happen as the pin it pivots on is rather fragile looking. Mine has not failed but I also realize this thing is designed for light duty. The 7 lb ft torque applied to snug up the coolant flange bolts is not gonna destroy the pivot. Just know this and take it easy and it will be fine.
Update Oct 9, 2023:Yep she broke. I've since sent off pics of the pieces to Gearwrench to see if I can get my money back. I hereby withdraw my recommendation. I have replaced it with one by Performance Tool (USA, made in Taiwan). In hand much better quality and strength. $21 after instant Amazon coupon. Link:
Just did this job. The original flange was still in very good condition after 15 years, and I'm sure if I stick a new o-ring on it it'll last for a long while. Initially I just wanted to 'rebuild' my vacuum pump as it was leaking oil and traveled down to the lower heater hose (connected to the bottom of flange). It must of been for some time now and finally the hose bursts while I was on the road. Had the car towed in, dealer replaced both hoses from the heater core. Well guess what, oil was pooling around on that brand new hose when I was doing my routine inspection. So while I decided to tackle the vacuum pump, might as well replace that 'old' flange. Also replaced the Upper Short Hose (flange to hard line), Cam Follower and o-rings for HPFP and Coolant Temp Sensor. This whole ordeal took me 15 hours!!! Most of them were spent on removing stuffs and fidgeting with one hose (from hard line to oil cooler) on the opposite side took me two hours to remove due to it being glued on to the metal pipe! And of course getting to the screws (both removing and installing) and TRYING VERY HARD not to drop them, otherwise I'm toast! 15 hours later and dropping one bolt from the HPFP and a T30 torx bit all disappeared into the abyss of of the engine bay, as I was about to do the final button - the plug housing for the coolant temp sensor has cracked into pieces. Couldn't plug anything back in. Topped off with coolant as the fans are blowing in FULL speed. Took her for a drive and everything seem fine other than taking longer than normal to 'warm up', then a check engine light (P0118) came on saying my temp sensor is whacked! Oh well, ordered a generic housing plug as temporary fix, jimmy'd it into the two exposed prongs from the cracked housing and everything is back to normal, until the original part arrives. But for now I don't even want to think that there will be leaks due to weather changes. Mine has been leaked-free since new for the past 15 years and all the parts I'm using are (genuine) from the dealer.
Guy:
Yes, the A4 can be a challenge to work on at first. Very time consuming. Nothing comes apart easy on this car, right?
Congrats to you for pulling off this expensive fix yourself. It's got to be nice knowing you can do this in-depth kinda stuff now. And going forward you will have the confidence to tackle other tasks that would have been entirely out of the question before.
Good for you.
Yes, those snap connectors become brittle over time. It's just a VAG thing. I'm used to it. There are de-pinning tools on line and instructions on how to de-pin and replace those brittle snap connectors on the YouTube. Good luck.
BTW- here a piece on replacing o-rings including those on the vacuum pump. Anytime I have the pump off, I replace the o-rings as a preventative measure. Not a bad job.
Pls. note the bit at the end about using the correct o-ring for your style vacuum pump. Haya.... https://www.audiworld.com/forums/a4-.../#post25760640
Thanks!
Those were the exact o-rings I bought from Amazon. Works like a charm. Car seems to drive better now (and feels better when braking to a halt) with less hesitations. How should I put it, better boosting and pressurized? This probably explained why I had a stall a few months ago when I started her up, hit the brakes, put in gear and it just died and rolled off. I believe the pump was losing pressure, as I've been feeling that it wanted to stall whenever I come to a stop - dipping rpm below average. Yeah so far at least the cooling system is taken care of since I also did the 'Thermostat' in Feb and that was kind of a pain too. Now I'm just waiting for that Coolant Temp Sensor plug housing and slip 'em on! I'm using a generic from Amazon which also stamped VW Audi but the fitting is kind of loose. Came with two wires and I just clip them on the exposed prongs. It works, as a matter of fact it's already a fix, but I'm gonna do a proper fix.
Next up: Timing Belt & Water Pump and all its components, not anytime soon but hopefully it isn't as bad of a job compared to the flange, et al.
New Flange (top), and old one on bottom with old hose - replaced with a new one.
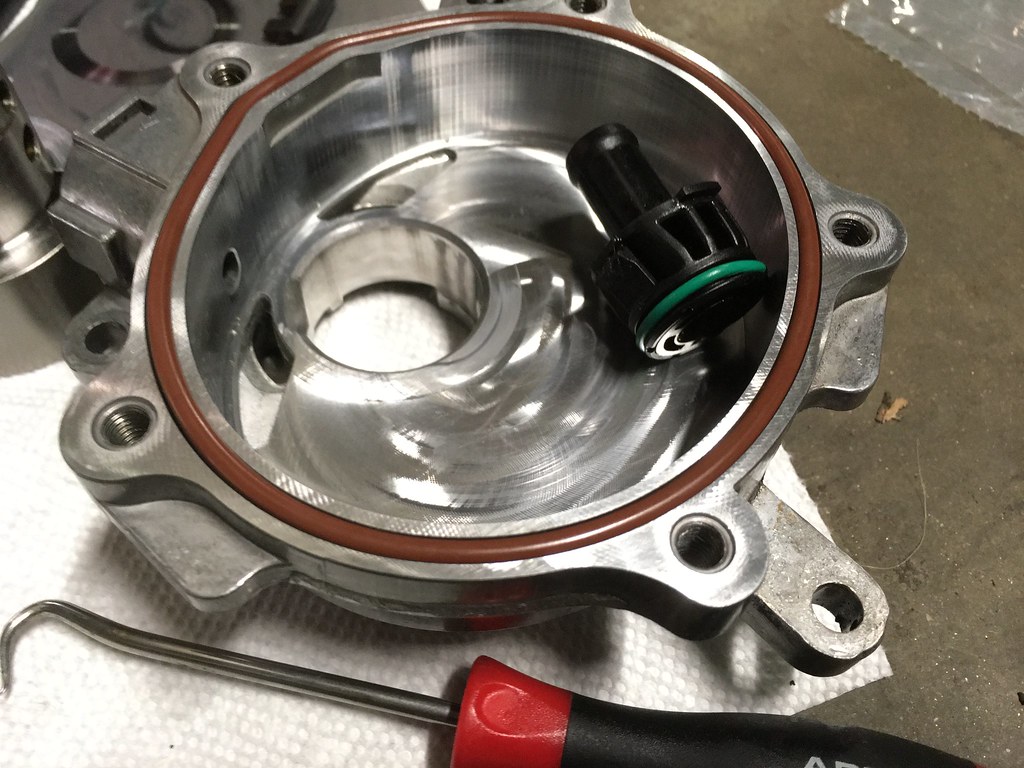
ya, you got it all. That o-ring at the vacuum pump outlet is the key. (The green one in your pic.) They get stiff and leak and you get less vacuum to the booster.
The TB and water pump is a bit of a challenge but there are lots of YouTube videos. 1 A Auto has a good video and tools list too. Check that out.
BTW- the TB/water pump kit from ECS Tuning is a good value. I have purchased that one twice. It will have the GEBA water pump w/metal impeller. That's what you want.
link: https://www.ecstuning.com/b-assemble...e/06f198001b7/
Edit: Oh hey, my review is still on there from 2016. haha.
2nd BTW- Audi recommends 110k mile interval on timing belt. I would not press it that far. At about 95k my belt was all stiff and frayed. I was lucky it did not snap. I'd say 75k would be a safe-not-sorry interval.
You can inspect the TB. That top plastic cover comes off independently. Take out the two T30 torx screws. Lift slightly and turn the cover to the left (rotate it towards passenger side when facing the engine). The cover will slip out from behind that coolant hose. A little liquid soap helps. There is a foam rub band on that coolant hose. I removed the rub band to make removing the cover easier. (Optional.) But be very ginger. That coolant hose has (brittle) plastic fittings at both ends. Expensive to replace.
Last edited by Hayabusafalcon; 04-23-2023 at 04:54 AM.
I already purchased all of them. I only use 'genuine parts', always have been on my cars. If you look at the pic, the original flange I took out is still in very good condition. If I were to replace a seal gasket I'm sure it'll last anther 5 or so years. Of course I bought the same one from Audi. I know some people say the parts are same so long as it is 'oem' but it is NOT. Many people I came across, even in Youtube say they used 'oem' but failed sooner, or even in just a couple of years. I wouldn't want any of that. I can expect the vacuum gaskets to fail since they are generic but that's not as much work to replace if it does. I'm anticipating the gaskets to lasts at least 5 years.
Nice. I see that coolant flange lip is starting to deteriorate. Typically when pulled it will leave some of itself behind in the engine block. Likely you had no oil leaks from the vacuum pump. Its the oil from the vacuum pump that drips onto the coolant flange and o-rings which causes swelling and ultimate failure. I periodically check that area for oil. If found I rebuild the vacuum pump. Haya....
Many of those parts are made by outside manufacturers for Audi. GEBA, Continental, INA. Your vacuum pump is a Pierburg. Nippondenso or Sanden made your AC compressor and so forth. There is nothing wrong with genuine VAG parts. I will not substitute for critical internal engine parts etc. Just know you are paying 2-4 times the price (or more) over house brands. The house brand mfr. that actually made the part. I have done well with aftermarket and house brand parts over the nearly seven years now of maintaining our B7 A4.
Last edited by Hayabusafalcon; 04-11-2023 at 03:28 AM.
 01-16-2021, 03:24 AM